Many of us have pets. Some people get cats, some people get dogs. Others love birds. Especially often you can see small budgerigars in apartments. These cute birds are pleasing to the eye and cheer up with their chirping. However, if, for some reason, you cannot get a parrot, this does not mean at all that you will not be able to admire their beauty on a daily basis. After all, you can weave a parrot for yourself from rubber bands!
For this we need:
- gum;
- machine;
- hook.
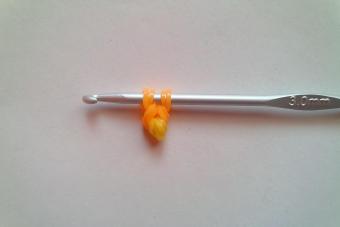
Let's prepare the beak.
We wind three times a yellow elastic band (r-ku) on a hook. And we throw it on a double-twisted orange elastic band. And we drop it again.

Now we carefully remove the left loops from the hook and wind 1 more row on the hook, return the loops. And we throw them all into 1 white p-ku.

We will leave this detail for the time being.
Now take the machine and turn it open side to the right.
Now let's make the wings.
We need to place a couple of green-colored p-ok on 1 and 2 columns (st-ki) of the middle row.
We throw 2 pairs of r-ok on the near row.
We throw 1 r-ku on the 3rd st-ki of all rows, 1 r-ku on the 4th st-ki of all rows.
1 r-ku on the 6th st-ki of the middle and upper rows.
And 1 more row on the 5th st-ki of the middle and upper rows.
Now we need to make feathers on the ends of the wings.
To do this, simply collect a chain of 3 pairs of yellow cuts, twisted in half. On the wing of such parts you need 3 pieces.
We place them on the machine.

On the 8th st-to the top row, wind 1 p-ku 3 times. And we will put the last row on the 4th st-to the middle row and on the 5th st-to the middle row.
Weave in the usual way, pulling and returning the r-ki to the st-k from which they are stretched. We start with the 8th st-ka of the top row.
First weave the top row, then the middle one and finally the middle one.
We remove the weaving from the loom.

We make 1 more of the same detail.
We need to place a couple of green-colored p-ok on 1 and 2 tbsp of the middle row.
Here we will always take 2 r-ki.
2 r-ki on the 2nd st-ki of the middle and upper row.
We have 7 pairs of r-ok on the far row.
We throw a couple of r-ok on the 2nd st-ki of the near and middle rows.
And we have 7 pairs of r-ok on the middle row.
On the middle row we place the r-ki to the end. That is, on all st-ki.
We throw on 1 row for 3, 4, 5, 6, 7 sts of all rows.

On the 9th st-ki of the middle and upper rows we wind the r-ku 3 times. And on the last st-to the middle row too.
Weave, like wings.
We remove the weave.

We will weave the parrot itself on 2 rows. Near and far. The middle one can be removed.
We take again 2 r-ki.
We work with white r-kami, since weaving starts from the head.
We have a couple of r-k on the machine somewhere in the middle, turning the eight. We need to place a couple more, crossing the previous one.

Reset the bottom layer (2 p-ki).
We hook the 2 upper rows with a hook and stretch them forward.

Weave 5 ordinary rows.
We always throw off 2 lower r-ki.
Now turn the machine with the open side towards you.
We will stretch a couple of p-ok on the 1st st-ki of both rows.
Now let's make the eyes.
We wind the black r-ku three times and throw it on a pair of white r-ok.
You need 2 of these eyes.
We throw them on 1 and 2 sts of each row.

We have r-ki on the remaining st-ki.
In the next row, attach the beak to 1 and 2 sts of both rows.

As usual, we will throw a pair of white cuts on the rest of the stitches.
We weave.
Stretch the weave.
From 4 sts we will drag the 2 upper r-s to the st-to forward.
Now we will weave on 10 stitches.
Weave 1 row.
Let's make spots under the beak.
We wind the orange r-ku three times and throw it on a pair of white r-ok.
We throw this detail on 1 and 2 sts of the upper row. And the same detail for 1 and 2 sts of the middle row.
We throw r-ki on the rest of the st-ki. But now we take a pair of 1 white and 1 light green p-ok.
Stretch the weave again by transferring the 2 upper rows from the last stitches of both rows to the next stitch.
Now we will weave on 12 stitches.
Weave 1 row with light green p-kami and 1 row with green ones.
We attach the wings to 3 and 4 sts.

And immediately remove from these st-kov 2 lower r-ki.
We fold the wings in the center of the loom and weave 1 row with green p-kami.
As before, we stretch the weaving by 2 stitches. And from the first sts we transfer all the r-s to the second st-s. We drop the bottom layer from the second stitches.
Weave 1 row with green r-kami. You can take a different shade.
We stretch the weave again.
Weave 2 rows.
At this stage we attach the tail. We throw it on the last sts of both rows.
And weave 1 row.
We collect all the elastic bands from the loom on the hook. If convenient, then you can use 2 hooks.
We lengthen the r-ku by fastening 3 pieces together with knots. We pass this r-ku through all the loops on the hook, but do not tighten it.

Carefully turn the parrot inside out.
We knit legs.
We wind the orange r-ku on the hook three times and throw it on the double-twisted r-ku.
We move the part and repeat 2 more times.
We remove all the loops from the hook onto a double-twisted p-ku. And once again we remove, but we no longer twist the r-ku.

We stuff the parrot with synthetic winterizer. Gently tighten to close the hole.
We attach the legs for any convenient loops from below.
Here is such a parrot!

This lesson will help you learn how to make beautiful toys using the lumigurumi technique, knitted from rubber bands. One such adorable thing is the parrot. Let's not talk much about it. Let's start knitting right away. You will learn how to weave a bright parrot from small rubber bands yourself below.
How to weave a parrot out of elastic bands: a step-by-step analysis of the lesson
To create a voluminous parrot, we need:
- Rubber bands of different colors;
- professional machine;
- plastic or crochet hook.
Let's start weaving on the hook. Take the hook and throw a yellow elastic band over it in three turns. Next, we put an orange elastic band on the hook in two turns and remove the yellow one on it. Take another orange rubber band and do the same.
After that, you need to carefully remove the first loops from the hook and, holding them, put another orange elastic band on the hook in a few turns. Then we return the removed elastic bands to the hook. And we will remove all the loops on the next white elastic band.
Now we will put aside this detail and continue weaving on the loom. We put the machine with the open side of the columns to the right and begin to weave the wings. Take two light green elastic bands and put them on the 1st and 2nd columns of the middle row. We will always wear two elastic bands on the wings.
We put 2 elastic bands on the second columns of the middle and top row. Now on the far row we will place 6 pairs of light green rubber bands, 4 pairs on the middle row. We put two elastic bands on the second columns of the middle and near rows. We put on two pairs of elastic bands on the near row.
Then we put on one elastic band on the third columns of all rows and one elastic band on the fourth columns of all rows. And one rubber band for the sixth columns of the middle and far rows and one elastic band for the fifth columns of the same rows.
Let's put them on the machine.

On the eighth column of the top row we put on an elastic band in three turns. And we will throw one more rubber band on the fourth column of the near row and the fifth column of the middle one.
Weave as usual: stretching and returning the rubber bands to the column on which they are stretched. We start weaving from the 8th column of the top row. First of all, weave the top row, then the middle one and the very last - the middle one. We remove the finished wing from the machine.
Weave another such wing.
Tail braid.We put two light green elastic bands on the first and second columns of the middle row. We put two rubber bands on the 2nd columns of the middle and top row. We will place 7 pairs of elastic bands on the far row. We put two elastic bands on the 2nd columns of the middle and middle rows. Now let's put on 7 pairs of elastic bands on the middle row. On the middle row we will place elastic bands on all columns. We put on 1 elastic band for 3, 4, 5, 6, 7 columns of all rows.

On the ninth columns of the middle and upper rows we put on an elastic band in three turns. And on the last column of the middle row too. Weave the tail in the same way as the wings. We remove the weaving from the loom.
Weave the body.The body of the parrot is woven in two rows, so the middle rad can be removed from the loom. Just like before, we put on two rubber bands. Let's start weaving with white.
We put two elastic bands on the machine approximately in the middle. These elastic bands must be worn in a figure eight. We will arrange a couple more rubber bands so that they intersect with the previous ones.
Now we put on a pair of elastic bands in a circle for 4 columns. Remove the bottom layer. We hook the 2 upper elastic bands with a crochet and pull them on the column forward.
We will weave five rows in the usual way, always removing two elastic bands. Next, turn the machine with the open side towards you. We put two elastic bands on the first columns of two rows.
Now let's make the eyes. We put on a black elastic band in three turns, and then remove it on one white one. Repeat again for the other eye. We put the resulting eyes on the first and second columns of each row.

We will place the rubber bands on the remaining columns. In the next row we will put the beak on the 1st and 2nd columns of two rows.
On the remaining columns we put on two elastic bands white color. We knit. Now from 4 columns we will transfer the 2 upper loops to the column forward. Further weaving is performed on 10 columns. Knit 1 row. Now you need to make spots under the beak. We put on an orange elastic band in three turns and remove it on two white ones. Let's put this part on the 1st and 2nd columns of the top row. Let's make one more spot and put it on the 1st and 2nd columns of the near row.
We put elastic bands on the remaining columns. But now let's take 1 white and 1 light green gum. Let's knit. We stretch the weave again, transferring the 2 upper elastic bands from the extreme columns of two rows to the next column. We will knit on 12 columns. We will knit 1 row with light green elastic bands and 1 row with green ones. We put wings on 3 and 4 columns.

Then we remove the two lower rubber bands from these columns. Next, fold the wings into the center of the weave and knit one row with green rubber bands.
As we did earlier, stretch the weave into two columns. It is necessary to transfer all the rubber bands from the first columns to the second columns. We remove the bottom row from the second columns.
Again we will knit one row with green rubber bands, if you want, you can change their shade. Stretch the product again and knit two rows.
It's time to attach the tail. Let's put it on the last columns of two rows. And we knit another row.
Now we will remove all the loops from the loom on the hook. Extend the elastic by tying three pieces together with knots. Pull this elastic through all the loops on the hook, but do not tighten the knot.
Carefully unfold the item. Now let's start weaving the paws. We put the first orange elastic band on the hook in three turns. We fold the next cutter in half and hook it. Let's remove the first rubber band on it.
Let's push this one aside and weave two more of the same on the same hook.
 We throw off all three parts on an elastic band folded in half. Then we will remove it on another elastic band, but we will not twist it.
The first paw is ready. One more needs to be done.
When both paws are woven, we finish the parrot. First, we fill it with synthetic winterizer, or any other filler.
Gently tighten the hole to close it.
We attach the paws for any loops from below. Our 3d parrot is ready!
Video on the topic of the article
To master such a technique can be difficult for someone. Therefore, we recommend that you watch the video. Also look at the lessons on how to weave a parrot without a loom, for example, on a slingshot.
In this article you will find everything from A to Z, namely how to weave a parrot out of rubber bands. The process of working with rubber bands is long, but not boring. You alternate colors all the time, enjoying their diversity. After all, very often you want to make an interesting little thing, which would then please the eye and remind you of the long hours spent on painstaking work. But you can’t start needlework if Bad mood, fantasy and muse left. You need to be patient, because the lumigurumi technique is not just a big name, but a popular technology for making beautiful products from Rainbow Loom rubber bands. Perhaps we'll start.
talking bird
Even a child can make such a feathered friend. But you need to constantly monitor the actions so that the product is even and of high quality. You can try to do it on a slingshot.
Craftswomen advise to start working with simpler products - baubles, bracelets or key chains, so to speak, to fill your hand. And then move on to large-scale crafts.
The product is made on a hook made of rubber bands. First you need to complete the beak:
- We wind the yellow rubber band three times. Throw it on the double-twisted orange and throw it off again.
- We remove the left loops, wind another rubber band and return the loops. Let's put everything on one white.

- We leave this detail. Now we continue to perform the product on the machine. We take an assistant to complete the wings. Let's take a few green ones, place them on columns No. 1, 2 (middle row). We place two rubber bands on the second columns of the middle and upper rows. Then we place 6 pairs of green, 4 pairs in the middle, and then throw on the 2nd columns of the middle and top rows. We will throw one rubber band on the third columns of all rows, and then one on the fourth, one on the sixth and on the fifths of the middle and upper rows.
- We create feathers. We collect a chain of 3 pairs of yellow ones, which are twisted in half. We use three things in total.
This is what the job looks like:

- We twist one gum three times on the eighth rack. We put the last rubber band on the 4th column of the top row and on the 5th middle one. Weave in a simple way. Start with the 8th column of the top row. Weave the top row, and then the middle and extreme. We take the workpiece.

- Let's create a new piece. We place several green rubber bands on the 1st and 2nd columns of the middle row. We take 2 things, and then two for the second rows. And so in total we place 7 pairs on the extreme row. Throw a couple on the 2nd columns of the middle and top, and then 7 pairs on the extreme rows. We have rubber bands on all rows, and then we throw one at a time on 3, 4, 5-7 columns of all rows.

- Then on the 9th we wind the elastic band three times. Weave the wings and remove the weave.

- Remove the middle row. We take two rubber bands, we start working with white ones, because the beginning is the head. We place a couple on the machine in the center, turning the figure eight.

- In a circle we cling pairs to the fourth columns. We reset the bottom row, and then we hook the top rubber bands, stretching them forward along the columns.

- And so we do five rows. Remember that you need to throw off two extreme elastic bands. We stretch a couple of rubber bands on the first columns of all rows. Let's take care of the eyes. We wind black three times, throw off a few white ones. Only 2 eyes, throw them on the 1st and 2nd columns of all rows.

- We fasten the beak.

- We throw a pair of whites on all the columns, weave, stretching. From 4 columns we will remove the two upper rubber bands forward. And then weave on 10 columns. Got the first row. We wind orange three times, throw it on white. Let's throw a detail on columns 1 and 2 of the upper row and on the lower rows. Thus, we throw on all the columns. Take a pair of white and green. We weave, stretching to the top two from the last columns. And so we work on 12 columns. We get a green row, and a yellow row. We attach the wings to columns 3 and 4.

- We remove the two extreme rubber bands. The wings will be in the center of the loom, we weave one row in pure green, not forgetting to stretch it into two columns. Let's throw off the bottom row from all the second columns, weave a row in green. Let's fasten the tail. Throw on the extreme columns and weave a row. Let's lengthen the rubber band, fixing it with three little things in knots. Do not overtighten the product:

- We twist the 3D parrot, try to do it as carefully as possible. Weave paws. To do this, twist the orange elastic bands three times, throw them off on the double-twisted elastic band. We repeat this twice. We remove all the loops on a twisted rubber band.
- Stuff the feathered friend with padding polyester to keep its shape and make it very attractive!