I don’t know about you, but I wanted some sun. What things remind us of him, after a solarium and a trip to the sea? Of course, fruits from tropical countries.
I propose to bring sunny notes to the interior and learn how to knit motifs in the form of lemon and orange slices. And you can also knit a motif in the form of a slice of lime. It depends on the color of the threads you choose.
How to knit veins in citrus slices and round rims, says Elena Fedotova. The usual and very famous hexagonal motif is adapted here for an orange slice.

“After the motif is connected, I knit an “orange” with a white thread. Since the small round is made with a “line”, and the larger one with a chain, the working thread must be pulled through the motif to the other side during knitting. I perform such a trick :

I knit the first motive on one side only with a chain, with all the broaches, not paying attention to them. Having knitted to the end, I cut the thread and ... unravel. I measure the threads of the same length for all other motives and tie them to the finish using short threads, and not the thread from the ball. Thus, when I need to move from a line to a chain, the thread is easily and quickly pulled to the wrong side. In the case of a thread from a skein, it would take a long time to stretch it))) Or cut it off at random.
Posts with 2/nac white color are performed opposite the corners over the motive in the first row of single crochets. In order to make a column, you need to pull out a little working thread from the inside out (see Figure 6), yarn over the hook, knit a column, and then pull the excess thread inside out again and continue the chain stitch.
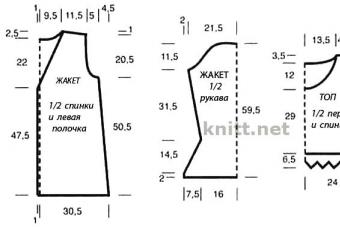
The scheme of the motive was also compiled by Elena Fedotova:

If you need a video on how to lay chains and crochet stitches on top of the main fabric, then here is an understandable video. In it, the craftswoman knits hot coasters in the form of an orange slice and a slice of lime.
For knitting, thick threads are used, so all lines are laid very clearly and clearly. Here the slices are just round, without any corners.
It should be noted that these simple techniques in crochet over the fabric are the simplest in an extensive technique called Overlay Crochet. I have already explained the essence: overlay - on top, crochet - crochet. In this way, mandala rugs are obtained, which are breathtaking.
You will need:
Cotton threads in brown, natural, white, green, orange and ocher; cotton wool for stuffing; crochet hook No. 1.5;
Description of work:
- interesting selection on the site !!!
- An introductory article on amigurumi knitting. Basic tricks and simple toys.
For porcini mushroom tie a chain of 7 c. p. and connect it into a ring 1 ps. b/n. Knit 3 in. lifting to replace the 1st tbsp. s / n., then knit in the round for another 19 tbsp. s / n., finish 1 ps. b / n in the 3rd initial c. n. (= 1st circle).
Each circle begins with knitting 3 in. n. and finish ps. b/n. 2nd circle; in every st. s / n. previous round knit 2 tbsp. s / n (= 40 st. s / n.).
3rd round: * knit 1 tbsp. s / n. in Art. s / n. previous round, 2 tbsp. s / n. in the next st. s / n., actions after * repeat (= 60 st s / n.).
4th circle: knit st. s / n., add 20 tbsp. s / n., evenly distributing them in a circle (= 80 st. s / n.).
5th and 6th circles: in each art. s / n. knit the previous round for 1 s. s / n.
7th circle in each art. s / n. knit the previous round 1 tbsp. s / n., while each 3rd and 4th st. s / n.
knit together (= 60 st. s / n.).
8th circle: in each art. s / n. knit the previous round 1 tbsp. s / n., each time the 4th and 5th tbsp. s / n. knit together (= 48 st. s / n.).
9th circle in each art. s / n. knit the previous round 1 tbsp. s / n., while each time 2 tbsp. s / n. knit together (= 24 st. s / n). Cut the thread and throw on a new stitch using an undyed thread.
10th - 16th circles: in each art. s / n. knit the previous round 1 tbsp. s / n.
17th circle: in each art. s / n. knit the previous round 1 tbsp. s / n., each time 3 tbsp. s / n. knit together (= 8 groups of st. s / n.). Stuff the mushroom with cotton wool, thread the thread through the last circle of Art. s / n., tighten and sew.
Champignon start knitting like a white mushroom until the 4th circle.
4th circle in each art. s / n. knit the previous round 1 tbsp. s / n.
5th circle: in each art. s / n. knit the previous round 1 tbsp. s / n., each time the 2nd and 3rd tbsp. s / n. knit together (= 40 st. s / n.).
6th circle: in each art. s / n. knit the previous round 1 tbsp. s / n., each time the 3rd and 4th tbsp. s / n. knit together (= 30 st. s / n.).
7th circle in each art. s / n. knit the previous round 1 tbsp. s / n.
8th - 10th circles: in each art. s / n. knit the previous round 1 tbsp. s / n., while in each circle 2 tbsp. s / n. Knit together 1 time (= 27 st. s / n.).
11th circle: in each art. s / n. knit the previous round 1 tbsp. s / n., while each time 3 tbsp. s / n. knit together (= 9 tbsp. s / n.). Stuff with cotton, thread the thread through the last circle of Art. s / n., tighten and sew.
For the legs of the chanterelle, tie a chain of 5 in. p. and connect it into a ring 1 ps b / n. Link 3 in. n. to replace the 1st tbsp. s / n., then knit in the round for another 23 tbsp. s / n „ finish 1 ps b / n. in the 3rd initial c. n. (= 1st circle).
Each circle begins with knitting 3 in. n. and finish ps b / n.
2nd - 6th circles: in each art. s / n. knit the previous round 1 tbsp. s / n.
7th circle: in each art. s / n. previous round knit 2 tbsp. s / n. (= 48 st. s / n.).
8th circle: knit st. s / n., while in every 4th st. s / n. knit
Art. s / n (= 60 st. s / n).
For the top of the mushroom, tie a chain of 5 in. n. and connect it into a ring 1 ps. b/n. Link 3 in. n. to replace the 1st tbsp. s / n., then knit in the round for another 19 tbsp. s / n., finish 1 ps b / n. in the 3rd initial c. n. (= 1st circle). Start each circle with c. n. and finish ps b / n. (1 tbsp. s / n. replace v. p., 1 tbsp. b / n. replaces 1 v. p.).
2nd circle: in each art. s / n. of the previous circle, tie 2 tbsp. s / n. (= 40 st. s / n).
3rd circle: * 1 tbsp. s / n. knit in st. s / n. previous round, 2 tbsp. s / n. knit in the next st. s / n., actions after * repeat (= 60 st. s / n.).
4th circle over each st. s / n. of the previous circle, tie 1 tbsp. b / n., grab st. s / n. the last circle of the stem of the mushroom to connect the parts.
ATTENTION: before completely connecting the circle, the knitted chanterelle must be stuffed with cotton.
5th croup * knit 1 tbsp. b/n. in Art. b/n. previous round, then knit 5 tbsp. s / n. in the next st. b / n., actions after * repeat.
Crocheted carrots.
For carrots, tie a chain of 6 c. p. and connect it into a ring 1 ps. b/n.
Link 1 in. n. to replace 1 tbsp. b / n., then knit in the round for another 9 tbsp. b / n., finish 1 ps b / n. in the initial c. n. (= 1st circle). Knit each circle st. b / n., while starting 1 c. lifting and finishing 1 ps b / n. 2nd - 10th circles: add 2 p. (= 28 p.).
11th - 16th circles: knit st. b/n. in every st. b/n. the previous circle.
17th - 30th circles: add 1 p. (= 42 p.)
31st - 43rd circles knit st. b/n. in every st. b/n. the previous circle. Carrots must be stuffed with cotton wool and continue to work.
44th circle: alternately knit 1 tbsp. b/n. in Art. b/n. previous round, 2 tbsp. b/n. in the next 2 art. b/n. (= 28 p.).
45th - 49th circles: knit st. b / n., while knitting 2 tbsp 5 times. b/n. together, evenly distributing them in a circle (- 8 st. b / n.).
Leaves.
We knit it with green threads.
In the ring we knit 6 st b / n. Next * dial 15 ch. and we knit a row of st b / n, connect them with the second loop of the previous row *, repeat from * to * 4-5 times.
crochet orange.
The diameter of an orange is about 8 cm.
For an orange, knit a chain of 6 c. n. and connect it into a ring 1 ps. b/n. Link 3 in. n. to replace the 1st tbsp. s / n., then knit in the round for another 21 tbsp. s / n., finish 1 ps. b/n. in the 3rd initial c. P.
Continue to work according to the scheme, each circle begins with knitting the amount of c. p., indicated in the scheme and finish 1 ps. b/n. If necessary, start the next circle with ps. b/n. You need to finish the circle in accordance with the sample. The numbers indicate the circle number. Having finished knitting the 6th circle, repeat the 5th and 6th circles 4 more times (= 14 circles).
ATTENTION: after tying the 14th circle, place a plastic ball.
15th - 18th circles knit in the same way as the 5th and 6th circles, however, in the 15th and 16th knit each time instead of 5 only 4 tbsp. s / n. and in the 17th and 18th circles, knit only 3 tbsp each time. s / n. Thread the thread through the remaining loops, tighten and sew.
Completion: pull knitted oranges over plastic oranges, thread the thread into the last row of st. s / n., tighten and sew it.
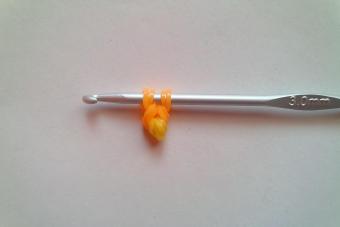
Master class "we shared an orange." In the summer, I wanted to knit a slice of orange and lemon for a slingobus. There was no Internet at hand, so I had to invent myself. More precisely, there is nothing complicated and new, but I will give you a couple of tips on how to knit such a slice quickly and so that at the same time it looks like a real one.  We will need: -cotton threads "iris" (I love them very much and knit them all the time) of two colors: orange and white, -hook number 1 (such a thin hook is suitable for these threads), -needle, -scissors, -and finally, as always, the most important thing: to make my slice neat and even, I used tying rings. If you don’t have these at hand, don’t worry! Look in your stock of buttons, there will surely be a button of the right size. Feel free to take it.
  An orange slice is knitted according to the principle of a circle, nothing complicated. From the threads of orange color we make a magic amigurumi ring, we collect 8 single crochets into it and tighten the ring by pulling the short tip of the working thread.
  The secret to quickly knitting this slice is that we will knit it with half-columns with a crochet. So the circle will grow faster. 1 row-increase in each loop: we knit 2 half-columns with a crochet in each loop.
  2 row-increase through 1 loop: we knit 2 half-columns with a crochet in every second loop.
  3 row-Change the thread to white, without cutting the orange: it will come in handy further. We knit with a white thread, making increments through 2 loops: in every third loop we knit 2 half-columns with a crochet. You can also knit this row with single crochets, then the white stripe will turn out thinner.

4 row - we return to the orange thread. We make increases through 3 loops: in every fourth loop we knit 2 half-columns with a crochet.  We finish the row with one single crochet and a connecting loop. We leave the last loop open, cut off the thread, leaving a small tip of about 5 cm. When knitting a circle, focus on the ring or button that you took. You may need to knit a different number of orange rows in the middle (not 2, like mine, but more ), because our circles and buttons can be of different sizes. Attach your slice to the ringlet, they should become the same size.
  So we got one slice, it looks like a real one, but very thin and with reverse side she has thread ends sticking out.
  Therefore, we will knit the second same slice. We do the same thing again.
  At the second slice, cutting off the white thread, we leave a long tip of about 30 cm and bring it to the front side in the knitting center, where we started from (photo above). Having finished knitting the second slice, we apply it to the first wrong side inside.
  We connect our two circles with single crochets to the middle of the circle, insert a ring or button inside and continue to tie it inside with it.
  We finish knitting with a connecting column, cut off the thread and hide the tip inside the knitting.
  Now back to the white thread. We need to "divide" our circle into 8 sectors. Each time we will do this: we bring the needle with a white thread from the center to the white circle, bring it to the opposite side and return it to the center again.


Today I will show you how I crocheted a handbag for a girl in the form of an orange in a section. It knits quickly, and for its manufacture you will need yarn in only two colors.
For a crocheted handbag for a girl, you needed:
acrylic yarn in white and orange colors (300 m = 100 g);
hook 2 mm;
light green narrow satin ribbon;
orange, white and light yellow sewing threads;
sewing needle;
orange zipper;
any cord for laying in the handles of the handbag;
safety pin for pulling the cord.
Handbag-orange for girls crochet: description, photo, scheme
The bag consists of several parts: two circles resembling a slice of an orange; the end part is in the form of a textured orange peel and a handle that is knitted in a circle.
"Orange slices"
To tie a flat circle with single crochets, for this, 6 loops are added in each row. So let's do it.
1 row. From white yarn: 6 single crochets around the amigurumi ring.
2 row. 2 single crochet - in each column of the previous row. You will get 12 loops. Hereinafter, it is desirable to end each row with a blind loop.
Change the yarn to orange.
3 row. 2 single crochet in every second column of the previous row: 12 + 6 = 18 st.
4 row. According to 2 tbsp. without a crochet in every third column: 18 + 6 \u003d 24 st.
5 row. According to 2 tbsp. without a crochet in every fourth column: 24 + 6 \u003d 30 st.
6 row. According to 2 tbsp. single crochet in every fifth column: 30 + 6 \u003d 36 st.
7 row. According to 2 tbsp. single crochet in every sixth column: 36 + 6 \u003d 42 st.
8 row. According to 2 tbsp. without crochet in every seventh column: 42 + 6 \u003d 48 st.
Here you can clearly see the division into six sectors. Let's smooth out this geometry a little by knitting an additional 4 tbsp. without a crochet. Next, we knit according to the description.
9 row. According to 2 tbsp. without a crochet in every eighth column: 48 + 6 \u003d 54 st.
10 row. According to 2 tbsp. single crochet in every ninth column: 54 + 6 \u003d 60 st.
11 row. According to 2 tbsp. single crochet in every tenth column: 60 + 6 \u003d 66 st.
12 row. According to 2 tbsp. single crochet in every eleventh column: 66 + 6 \u003d 72 st.
13 row. According to 2 tbsp. single crochet in every twelfth column: 72 + 6 \u003d 78 st.
14 row. According to 2 tbsp. single crochet in every thirteenth column: 78 + 6 \u003d 84 st.
15 row. According to 2 tbsp. without crochet in every fourteenth column: 84 + 6 \u003d 90 st.
16 row. According to 2 tbsp. single crochet in every fifteenth column: 90 + 6 \u003d 96 st.
17 row. According to 2 tbsp. without a crochet in every sixteenth column: 96 + 6 \u003d 102 st.
18 row. According to 2 tbsp. single crochet in every seventeenth column: 102 + 6 \u003d 108 st.
We make an offset: we knit 9 tbsp. without a crochet. Then 19 row.
19 row. According to 2 tbsp. without a crochet in every eighteenth column: 108 + 6 \u003d 114 st.
20 row. According to 2 tbsp. single crochet in every nineteenth column: 114 + 6 \u003d 120 st.
Change the yarn to white.
21 row. According to 2 tbsp. without a crochet in every twentieth column: 120 + 6 \u003d 126 st.
22 row. According to 2 tbsp. without a crochet in every twenty-first column: 126 + 6 \u003d 132 st.
So, we finished the last row, in which we got 132 st. without a crochet. We close it with a blind loop, cut the thread. We knit another similar circle and decorate them with dividers, imitating orange slices.

For each separator (and they need 6 pieces for each circle), you need to tie chains of air loops with white yarn; in each - 25 v.p. Carefully sew them from the center to the edge.

Handles for a crocheted handbag for a girl
When the orange circles are ready, it already becomes clear what size our handbag will be. You can start knitting pens.
For the handle, we knit 10 ch from orange yarn, close them in a ring, and continue to knit the tourniquet in a circle with single crochets. The length of the handle I got was 45 cm. You need two of these handles.

We stretch the cord into the handles with the help of a safety pin; its ends are tied with knots. When the handles are sewn in, the cord will not pull in, knots will prevent this. Thus, the handles will not stretch.

The end of the handbag
We have already found out that the final row of the circle consists of 132 loops. Therefore, for the butt we knit 132 ch. and close the chain into a ring. The knit is pimply, slightly reminiscent of the tuberous peel of an orange. The width of the handbag is 5 rows of tubercles, connected according to the proposed scheme. For lightning, we skip a fragment of the central row of tubercles.

1 row. A row of single crochets; close the row with a blind loop.
2 row. *3 v.p. lifting, 3 tbsp. with a crochet, knitted together. Then - 2 tbsp. single crochet*. Repeat from * to * until the end of the row. Close the row with a blind loop.
3 row. A row of single crochets. After knitting this row, the tubercles will become more prominent.
4 row - like the second.
5 row - as the first.
In the sixth row, we reach the place where we intend to insert the zipper, skip the required number of loops, knitting instead of them according to the number of loops - a chain of air loops, then continue to knit tubercles.
Total 7, 9 rows - like the first; 8, 10 rows are rows of tubercles (like the second one). We finish with the 11th row - a row of single crochets.

The butt is ready - we sew a zipper into it.

Now we connect the butt with circles, tying them together with a “crustacean step”.

Do not forget to mark in advance the places where the handles will be sewn in, and just skip this place by tying it along the front part (i.e., along the circle, and not along the end part).


Then we sew in the handles - and the crocheted handbag for the girl in the form of a summer orange is ready.

Or not at all? A little decor never hurts, right?
Flower for an orange bag
We knit a flower.
1 row. Around the amigurumi ring, repeat the bunch 5 times * single crochet, ch 3 *. We end the row with a blind loop.
2 row. * ch 3, single crochet * - from * to * repeat until the end of the row; while the chains from the c.e. are located above the chains of the previous row, and single crochets are attached to the columns of the previous row.
3 row. We knit petals. Around each arch: 4 ch, 5 tbsp. with 3 crochets, ch 4, single crochet in the previous row. Finish the row with a blind loop, pull the thread inside out, fasten and cut.
Arrange a narrow ribbon in the form of petals. Put a crochet white orange flower on top and sew on yellow sewing thread"French knots".

Now it's definitely ready. And most importantly, this crocheted handbag will include really a lot of little things. It is comfortable to wear both in the hand and on the shoulder. And, of course, any girl under the age of 10 inclusive will be happy with such a gift.


You may also be interested in the form of watermelon. You can find it at the link provided. All questions on the current article can be asked in the comments to the material (below).
Eva Casio especially for the site Master classes in needlework