Do you want to make a New Year's green beauty from available materials? Souvenirs made from packaging sheets, which are used to decorate bouquets, look very original. A DIY Christmas tree made from corrugated paper is made in several ways. Choose the option you like. Create original decorations for your holiday interior.
Green beauty: flat or voluminous
A DIY Christmas tree made of corrugated paper can be made either in the form of a relief or a three-dimensional object. For each decor option, choose the appropriate manufacturing method. A flat Christmas tree is good to use on a postcard, gift box, as a magnet, or as an element of a garland. Although all these details are easy to make in the form of three-dimensional Christmas trees, a voluminous souvenir is most suitable as a table or floor holiday decoration.
Cone base for a three-dimensional Christmas tree
Have you decided to find out how to make a Christmas tree from corrugated paper? The master class will teach you how to do this in several ways. Whatever you choose, the decor is always glued to the frame in the form of a cone. If you don't know what to use as a base, pay attention to one of the following options:
- buy a foam blank;
- roll up a paper “ball”, trim the bottom and glue the base in the form of a circle;
- make a cone according to a template from a sector of a circle;
- make it out of papier-mâché with a frame.
The choice depends on the available materials, the amount of time and the size of the tree.
Manufacturing methods
It doesn’t matter what kind of Christmas tree you are going to make - flat or three-dimensional, the algorithm of actions will be the same, just in the first case the paper or elements made from it are glued onto a flat plane, for example, a postcard, and in the second - onto the surface of a prepared cone.
A DIY corrugated paper Christmas tree can be made from:
- stripes glued in tiers;
- the same ribbons, but cut into thin strips in the form of a fringe;
- a large number of blanks rolled into fluffy “balls” from the previous paragraph;
- fringe elements twisted in the form of needles.
Choose the method you like, but keep in mind that the final impression of the souvenir depends on the chosen additional decor and the color of the paper. It can be not only green, but also any other, as well as metallic with sparkles, etc.

How to make a Christmas tree from corrugated paper with your own hands (easy way)
The manufacturing technology is as follows:
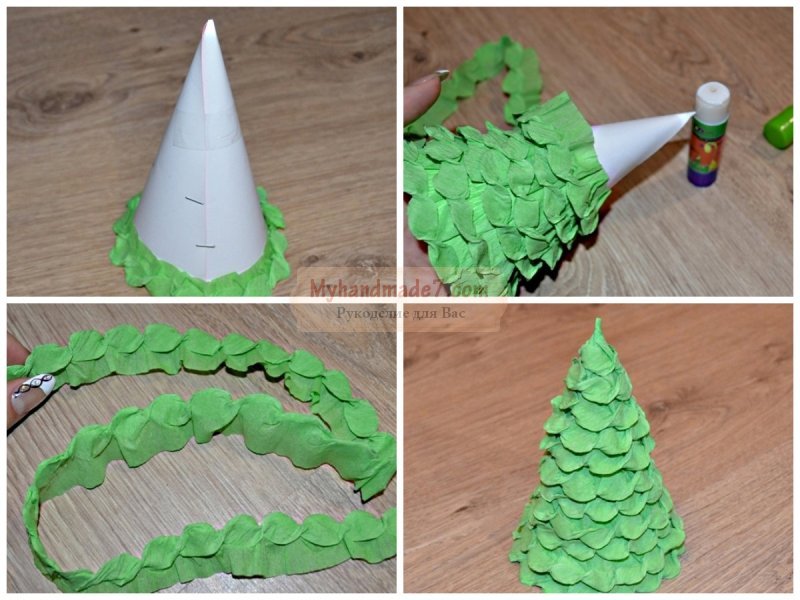
- Cut the paper into strips. The width of the blanks depends on the size of your product. You can make wider tiers at the base, and then, moving towards the top, reduce them. The length of the elements should correspond to the circumference of the cone or be longer if you fold the parts.
- Form the elements into accordions or neat folds of different or equal widths.
- Glue the prepared parts sequentially onto the Christmas tree blank, starting from the bottom tier, covering the upper edge of the previous one with the next one.
- Decorate the product at your discretion.
You have learned that you can quickly and easily make a wonderful craft with your own hands. This method is suitable for children's creativity - both in the family and in a circle.
DIY Christmas tree: master class "Christmas trees made from wrapping paper"
A very impressive and elegant product can be made in another way, however, compared to the previous one, this one will require more time. Work like this:
- Cut the paper into strips.
- Fold each strip into a small rectangle and make several cuts on one side.
- Unroll the workpiece back into the tape. The result was a fringe along one edge.
- Roll the element into a tight roll, secure the edge so that it does not unwind, and “fluff” the fringe.
- Make the required number of elements for your product. The parts can be made the same or decreasing in size towards the top tier.
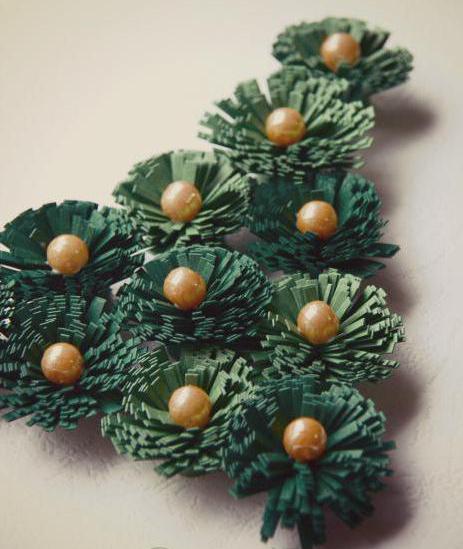
- Now, in order to get an elegant and fluffy Christmas tree made of corrugated paper, you need to glue the completed blanks onto the base. If you have a bulk one, you can use pins with multi-colored heads instead of glue. By sticking them into the middle of the part, you will receive not only a fastening element, but also an imitation of a Christmas tree decoration - the decor of your souvenir.
- Decorate the product with beads, bows, sparkles.

Christmas tree with thin needles
The next photo shows another very elegant crepe paper tree. A master class in the form of simple instructions will help you make the same decoration.

The work is carried out as follows:
- As in the previous methods, prepare strips of paper.
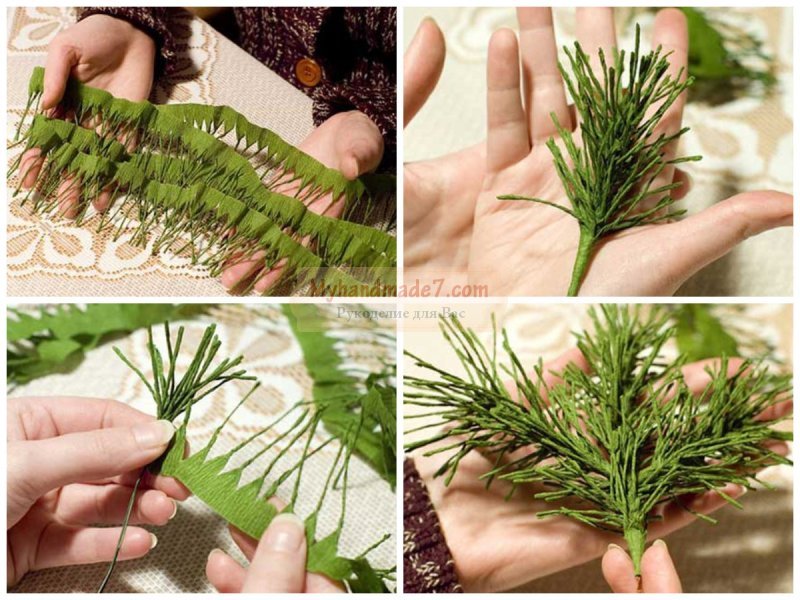
- Cut a “fringe” along one of the long sides. To do this faster, you can first roll the piece, make a few cuts, and then unfold the paper tape again.
- Now each small rectangle of tape will have to be turned into a thin stick - a Christmas tree needle. To do this, take a toothpick, sewing needle or pin and wind each rectangle onto the tool, and then, pulling it out of the first twisted needle, use it to create a second one, etc.
- Take a piece of wire for the branch frame and wrap it in a spiral with the resulting workpiece in the form of a ribbon with “needles”. For convenience, secure in several places with glue so that the paper does not unwind.
- Make the required number of branches and secure them to a strong stem frame.
So, you have learned how to make a Christmas tree from corrugated paper with your own hands. Choose the appropriate method. Create holiday decorations and gifts yourself and with your children.
Good afternoon dear friends. We continue to prepare for the New Year and prepare crafts for this holiday that can easily be turned into gifts. In the last article we looked at it in general, and today we will create Christmas trees in a narrow manner. Link to previous article.
Today's crafts will be made exclusively from paper. And there are so many instructions that with a normal approach, even a child can handle creating a Christmas tree. And if you don’t think it’s enough, you can try to make or create it yourself.
Well, for now we will begin to create beautiful forest beauties that will decorate your home throughout the holidays. And if you make a few pieces, you can assemble a whole fairy-tale forest on the window.
Take a regular sheet of paper. Of course, ideally it is better to take green, but white will do. We bend the sheet in two along the long side and draw the diagram shown in the photo below.

After applying the design, cut along the lines and bend as shown below. We make three blanks, and then glue them together. It turns out very beautiful and stylish. I am sure you will not see such Christmas trees anywhere else.

The following set of templates for making will allow you to create a Christmas tree in 3D format. You need to save and print the templates. We draw the diagram on a sheet of paper folded in two along the long side. And then we cut it out.


We cut along the main contour, and where the lines go inside we only make cuts. We bend the cuts at the end. Here, too, it is necessary to make two identical blanks in order to glue them together at the end and get volume.

If you wish, you can cut out more than just a Christmas tree. And a Christmas tree together with a fawn or a small Christmas tree standing next to it.


If desired, any craft can be painted to make it stand out from the rest of the Christmas trees. You can also use paints that glow in the dark.

And here is proof that children really love to do their own handicrafts.

Our beauties are ready. It turned out simply gorgeous. How do you like this idea?

For the next Christmas tree, it’s better to immediately take colored paper and immediately make a green Christmas tree. The tree is created from loops and curls.


On that score, if there was something you didn’t understand from the photo, I’ll leave a video on how to create such a masterpiece.
Christmas tree using origami technique (simple diagram for children with description)
Many people have been able to fold various figures from a sheet of paper since childhood. Well, remember they made airplanes or boats, all this is a simple origami technique. And I simply cannot help but talk about the fact that you can make a Christmas tree using the origami technique.

In order to fold the Christmas tree, you need to find an old book without a thick cover or a notebook with writing on it. Found it? Now let's continue, we wrap all the pages from the left corner to the middle. And so on every one. Therefore, a book that is too thick will not work.

Then we bend all the pages into a bag again.

The lower ponytail will need to be trimmed using scissors. Try to do everything slowly and carefully.

The product is completely ready. All that remains is to straighten out all the pages and sprinkle them with glitter.

How about this idea? The Christmas tree is a little more complicated to make, but it turns out more beautiful. First, practice on a white sheet, and then when you understand the whole process, you can do it on a green one.


The following beauty can be offered to children during a labor lesson in elementary school. All instructions are provided below.


How to make a three-dimensional Christmas tree from corrugated paper for the New Year 2020
As promised above, today there will be various options for making forest green beauties. And for the next craft you will need special corrugated paper or crepe paper. You will get a very beautiful Christmas tree.
You will need to find:
- cardboard or thick paper
- corrugated green staple paper
- scissors
- red paper
- various bows
- beads
Production stages:
We make a beautiful tall cone out of cardboard and cover it with green paper.


Make the strips about 10 cm long. We wrap each strip on a thin wooden stick or on a small brush to make a bud like this.

Fluff each bud and glue it to a paper cone. For a cone about 10-15 cm high, you will need to make over a hundred of these curls. To decorate the Christmas tree, you can use both ready-made and homemade bows. Christmas balls can be made from cotton balls sprinkled with glitter.

If the first option is too difficult for you, I also suggest making a Christmas tree from corrugated paper. It is less labor intensive.
We make the base of the Christmas tree from cardboard. You will need green paper, 18 cm wide and 2 meters long. We fold it in two along the entire length. Apply glue to the edge, leaving a free strip of 2 cm.

Glue and pull together to make a small skirt.

Next, we decorate our cone in a spiral with this blank. Don't forget to glue the strip to the cone. Finally, we decorate with improvised toys.

Or here’s another option for making a New Year’s beauty. We cut multi-colored strips 2-3 cm wide and wrap each strip around a cardboard cone to the very top.

Or you can do it like this.

New Year's beauty made of colored paper and cardboard
To make such a Christmas tree you need to make some blanks, three semicircles of different diameters. On each semicircle we make small cuts to create a fringe.

Then use scissors to twist the fringe. And we glue cones from the blanks. Well, then, on the large cone we put less on the middle cone and the smallest one. At the end we will make a beautiful star.


Here is a similar option, but in the video there is a small life hack on how to quickly and beautifully cut these circles.
But such Christmas trees will look very organic on the holiday table. All are made from the same paper circles of various shapes. By the way, if the question of preparing salads is still open to you, here are some tips.


Or this option for making Christmas trees from simple wrapping paper.

Well, if you want to make something big, beautiful and warm, you can make a big beautiful New Year's beauty. To make a large Christmas tree you need to glue together several sheets of cardboard. Roll them into a cone.

Wrap the resulting cone in beautiful wrapping paper.

After removing everything unnecessary, decorate the Christmas tree with improvised toys and a star.

You can also make a Christmas tree from cardboard, but we won’t make cones.

You will need to print this stencil.

Next, cut out the resulting stencil, apply it to sheets of cardboard, trace it, and cut it out. Fold in the middle. We make 8 identical blanks.

We'll go through the edges with a hole punch. If you have a figured hole punch, you can use it. We glue the middles together using double-sided tape.

Then we sew with white thread along the holes made. And we also cut out the star.

Finally, it is advisable to decorate with artificial snow and white sparkles.

Try making a colorful Christmas tree like this from paper circles and a wooden stick.

Or try making the same Christmas tree from candy wrappers and magazine clippings. Finally, coat the tree with glue and sprinkle with flour or sugar.

You can glue a Christmas tree from paper handprints. Preschoolers will really like this work.

And here is another master class on creating a Christmas tree from a glossy magazine.


And you can decorate your workplace with such a Christmas tree. You will need a green piece of A4 paper. We cut out a triangle and make a hole in the middle with a standard hole punch. We unfold the accordion and put it on the improvised trunk. Which can be made from the same sheet of paper rolled into a tight tube.


You can find these tips on the Internet. By the way, individual elements can be used to decorate the space around you.

A Christmas tree made from loops is something new; I really wanted to make something like this myself.

Another option for making crafts from loops.

Here's another idea on how to make a Christmas tree from improvised materials.

Let's return a little to decorating the office table. The next tree will be made from reminder leaves.

And even a preschooler can cope with this task.

Maybe you haven't tried making a Christmas tree using the quilling technique? So here's a good idea for you.

Master class on making a New Year tree from napkins
Yes, you can even make a beautiful New Year's beauty from napkins.

In order for you to get such beauty. You need several layers of napkins. Draw circles on a napkin, cut them out, and staple each circle in the center. Afterwards, crumple each layer to form a circle. Here are photo tips to help you.


You can decorate such a Christmas tree in the style of topiary.
Christmas tree stencils for cutting and printing
If you prefer the vytynanka style and you like painstaking work. I suggest making a Christmas tree to decorate the windows. Using this template you can make a Christmas tree in 3D.

We will make slits on one piece from the top and on the other from the bottom. And let's connect them together.


The stencil is printed.

Folds in two and is gradually cut out.

One craft is assembled from two blanks.

And here are your templates that will help you create this stunning beauty.


Do-it-yourself voluminous Christmas tree for a New Year's card
Each of our friends or acquaintances will certainly be waiting for gifts and congratulations on the New Year. And for every gift or congratulation you can make an original card. And I will help you with my tips on how you can make a beautiful paper card with your own hands.

To make the simplest postcard you will need to print a small blank. Make cuts along the lines and fold and glue to the main background.


If you don’t understand something, here’s help in the form of a video clip.


Or try making a card like this.


Paper Christmas tree on the wall
Who said that crafts should be small and remote. I propose to make a large Christmas tree that will be mounted on the wall. There are immediately finished options, and there is an option in the form of a coloring book that you can color as you wish.
The first Christmas tree will be like this. We will make it from cut strips.

The second option will need to be downloaded and printed. Then collect it on a large sheet of Whatman paper.


Of course, these are not all the options for Christmas trees that you can make for the New Year holidays and decorate your home, office or room with them. But these options seemed to me the most beautiful and more New Year's. Happy new year to you.
The first frosts arrived and people began to think about the New Year. This family holiday is loved by adults and children. Parents remember that they were once little. Children these days live in anticipation of gifts from Santa Claus. During the holidays, in order to decorate your home in an original way or make a gift for a loved one, you need to find time to make a gift together with your child. This will be a three-dimensional Christmas tree made of corrugated paper.
Master class “Snowy forest beauty”
What you will need to make a New Year's snow tree:
- three-color corrugated paper - lilac, white, light lilac;
- scissors;
- wooden kebab stick;
- white and blue threads;
- stapler;
- ruler no shorter than 25 cm;
- vase;
- filler in a vase.
Progress:
1. We make two identical rectangles.

2. Fold the rectangle like an accordion.

3. Remove the corners.

4. Connect the edges, find the middle and fold in half.

5. Using a stapler, fix the middle.

6. We do the same actions with the second rectangle.

7. Using a stapler, we connect the blanks along the edges.

8. Fix the middle of the blanks with thread.

9. There are 12 such blanks, four of each color. The largest size is 25 cm, and the small one is 4 cm.

10. Fill the vase with red beans, cereals, and colored pebbles. The main thing here is to fix the kebab stick well.

11. We string the largest lilac blank.


13. The next blank is snow-colored.


15. A three-dimensional paper Christmas tree made of corrugated paper is ready.

The final version looks like a fairytale snow beauty that will complement your holiday home decoration or be a creative gift for your loved ones. It will take a little time to make, but the main thing is that the productive result is a three-dimensional Christmas tree made of corrugated paper.
Master class “Green Beauty”
A voluminous Christmas tree made of corrugated paper, made by yourself, will delight people if its base is made correctly. To do this you will need to make a cone from whatman paper. This material is dense, holds its shape well, and is easy to glue. It will be convenient for the child to work with him.
What you will need to make a green Christmas tree:
- album sheet or whatman paper;
- stapler;
- corrugated, green paper;
- PVA or paper glue;
- scissors.

Manufacturing progress:
1. To make a Christmas tree trunk, we roll up a cone using the bag method. We glue it with glue or fasten it with a stapler. If the base is not level, then trim it with scissors.


3. If the width of the cut strip is 6 cm, then apply glue in a circle to the base from the bottom at the same distance. Pay attention to the trunk, it should not be visible. Glue a strip of green paper to the trunk and immediately make folds. The more of them there are, the more magnificent the tree will be.

4. Using this method, we glue the entire Christmas tree to the top. This operation can be performed in two ways: paste the strip in a spiral or in rows.


5. The volumetric Christmas tree made of corrugated paper is ready. All that remains is to add additional volume. To do this, carefully stretch the edges of the paper along its entire length.

6. It turns out to be a real forest beauty. Additionally, we will add decor in the form of stars.


When decorating the Christmas tree, you can show your imagination, use small balls, rain, sparkles, light garlands.
Other Christmas tree options
Idea No. 1. New Year's beauty.
To make it you will need:
- whatman;
- office glue or PVA;
- corrugated paper of the color of the Christmas tree;
- scissors;
- stapler
Progress:
1. We make a conical base for the future Christmas tree from whatman paper.

2. Cut strips 3 cm wide and 10 cm long, fold them in half and turn them a couple of times at the fold. This is how you get a blank for the Christmas tree. Their number depends on the size of the tree.


3. Take the blanks, coat the straight double edge with glue and glue it onto the whip so that the cone does not show through.
The result is a voluminous and beautiful Christmas tree made of corrugated paper.
Idea No. 2. Snowy Christmas tree.
To complete this you will need:
- whatman;
- white corrugated paper;
- scissors;
- sewing machine;
- glue.
Progress:
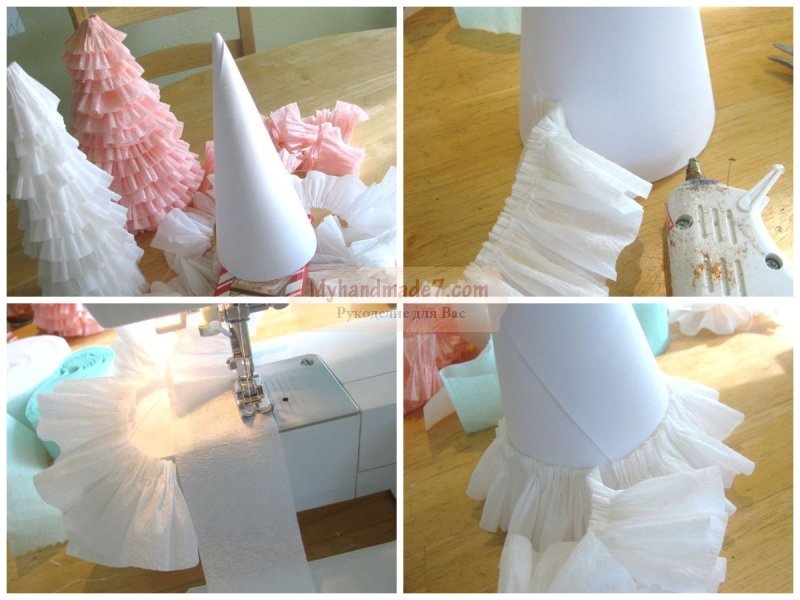
1. We make a base for the fake from a sheet of whatman paper - a cone.

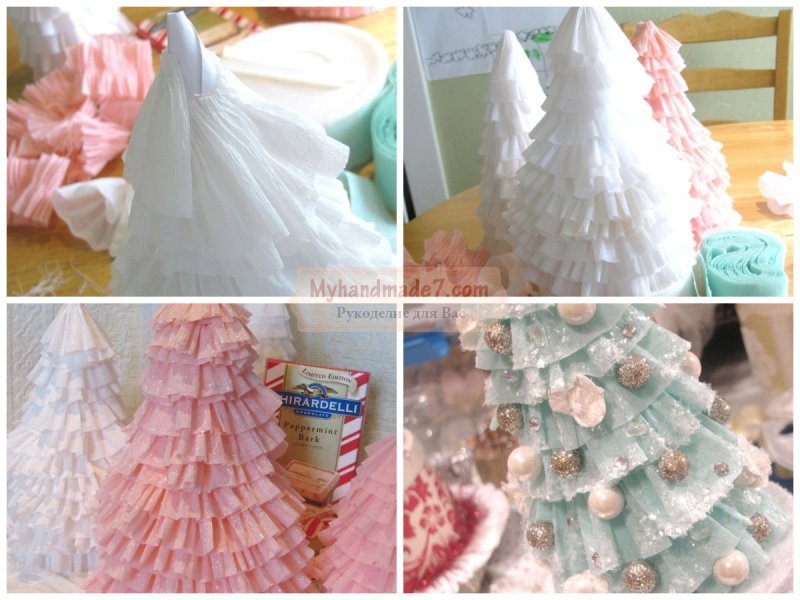
2. Cut the corrugation into strips 6 cm wide, sew on a machine with large stitches or a needle and thread. After we assemble it, we make it look like a ruffle.
You can make a creative and unusual Christmas tree from colored, double-sided paper with patterns.
What you will need for this:
- special paper;
- scissors;
- stick from sushi set;
- stapler;
- glue;
- a piece of foam.
Progress:
1. The blanks for our elegant Christmas tree are made similarly to the one described above: a snowy, forest beauty. There is no need to register a second time.


2. Let's focus on making the frame for it. Take a stick from a sushi set and a piece of foam. The foam should be about 1 cm thick and made in the shape of a square 10 x 10 cm. Place a wooden stick in the middle of the base.

3. We string the pieces onto the finished frame, starting with large ones and ending with small ones. If the top of the stick is visible, it is masked with an asterisk or snowflake.
Volumetric Christmas trees made of corrugated paper will decorate your home and lift your spirits, and most importantly, during production you will become even closer to your children.
Chizhevskaya Elena Vladimirovna
I bring to your attention, colleagues, master- manufacturing class DIY Christmas trees made from corrugated paper.
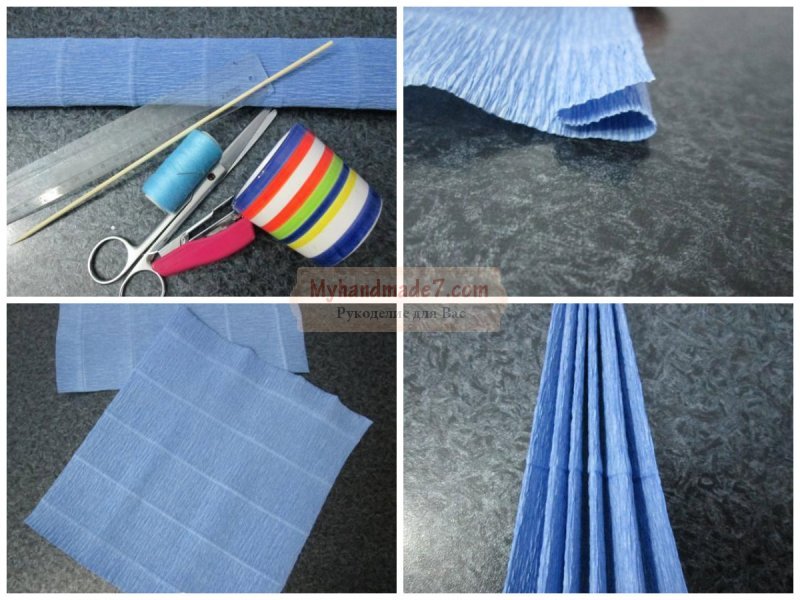
For work we need:
Roll corrugated paper;
Double-sided tape;
Glue gun;
Beads and bows (For decoration)
Cut a cone out of cardboard and connect it using double-sided tape.
Cover the cone with green corrugated paper.


Then from paper cut strips 2-2.5 cm wide and approximately 25-28 cm long.


We fold each strip in half, in half again and in half again, i.e. three times.
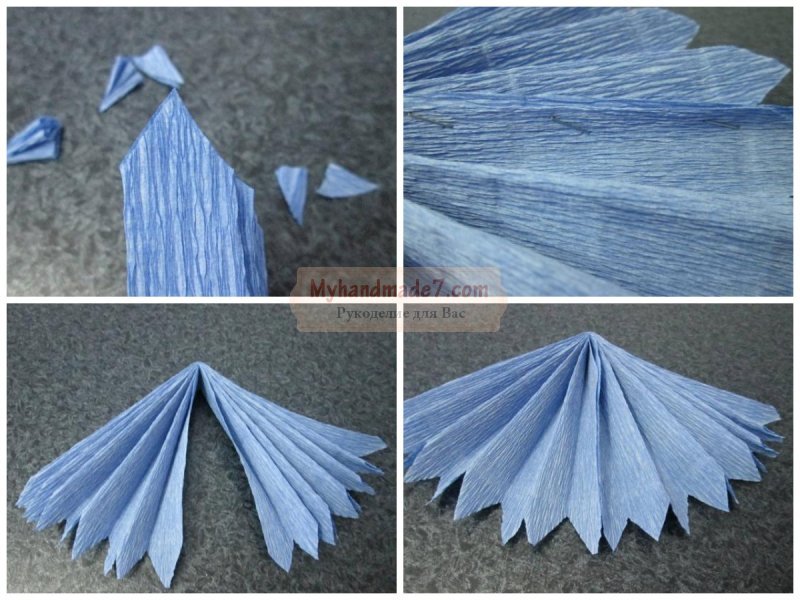
We cut the connected edges on one side and the other, and then cut the entire strip lengthwise, approximately to the middle. We unfold it, we get a long strip all with cuts.

Roll it tightly, as in the picture.

We fasten the edge with glue and straighten the upper part, where the cuts are, bending it to the sides.


We begin to paste over herringbone at the bottom, using a glue gun.


When the Christmas tree will be ready, let's start with her outfits.
Decorate with beads and bows.
What a beauty the New Year tree has come to visit us!


Make one like this Christmas tree absolutely easy and very fast. The basis must be a correctly drawn cone. But as for the material from which this beauty can be made and its design, there is a huge scope for your imagination.
In the next publication I will offer you another design option based on the same cone.
Thank you for your attention!
Publications on the topic:
How beautiful irises are. They delight us with their beauty, elegance, and diversity. People valued irises and called them Irises. On our site.
Dear colleagues, this master class will be useful for educators who are looking for interesting solutions in the design of their group or hall. Tasks:.
Today I want to show you all my flowers, which were made with my own hands from various materials, and which I have already talked about.
To give someone a bouquet of flowers for a holiday, you don’t have to go to the store and spend a lot of money. Done.
We will need (for one flower) 1. corrugated paper 2. cardboard, writing paper 3. scissors 4. glue 5. pencil with edges 6. hairpin.
The wonderful time of year is approaching - summer. All nature dresses in bright colors, beautiful flowers of cornflowers, poppies and daisies bloom in the fields.
Good day, dear colleagues and friends! I bring to your attention a master class "Cutting from corrugated paper" Corrugated.
Christmas tree made of corrugated paper- this is an interesting craft that preschool children can do, and some original ideas will also be of interest to experienced craftswomen who like to work with unusual materials. It only at first glance seems that paper crafts are children's creativity, but, in fact, you can create a beautiful and bright New Year's figurine that will decorate the festive interior of your apartment. Children will find it easy to work with corrugated paper: it is easy to cut with scissors, if necessary, it can be crumpled with your fingers, given a wavy shape, or rolled like an accordion.
Christmas tree made of corrugated paper
DIY corrugated paper Christmas tree It is performed on a cone-shaped base, so before we move on to the most original ideas for its implementation, we will take a closer look at several options for creating a sufficiently dense base for performing this craft. As a rule, a cone is made using a regular white A4 sheet, whatman paper or thicker cardboard. Someone simply rolls the leaf into a “bag”, like the one in which seeds were previously poured, and then trims off the excess part, aligning the bottom edge. But you can first cut the workpiece and then form a cone from it.
In addition to a sheet of suitable material, we still advise you to use whatman paper, since it is both a fairly dense material and bends well, and it will be easy to work with even for preschool children. As for the tools, we will definitely need scissors; you can also use a compass and a ruler. In most cases, however, instead of a compass, needlewomen use plates, tracing them along the contour on the sheet. Of course, in order to draw an outline or draw a line, you should use a sharp pencil. To roll and fix the workpiece in the shape of a cone, we will use glue; to work with paper, it will be enough to use PVA glue. The joints can also be glued with thin double-sided tape.
On the Internet you can also find a ready-made diagram of the blank, which you just need to print on a printer and cut along the contour, however, why waste ink on the printer if you can draw it yourself in a few seconds.
The base can be low and wide with a large base radius or high, then the base radius will be small. Depending on what kind of cone you want to get, you should cut the workpiece. A high base is obtained by cutting the base in the form of a sector equal to a quarter of a circle. The workpiece may look like a semicircle; to do this, you need to trace half of the plate on cardboard, and then align the edges with a ruler.
A wide cone is cut out according to this principle: on a sheet of paper you need to circle a plate, the radius of which will determine the height of the future cone. Next, we will need a ruler, with which we need to draw two perpendicular lines passing through the center of the circle. After which you will notice that the circle is divided into four parts. Now you need to use scissors to cut out a circle along the contour, and cut out one of the sectors - a quarter.

You should always glue the workpiece with an overlap, coat the strip on the top with glue, then attach it to the bottom and press with your fingers so that the glue adheres. Or glue a strip of double-sided tape to the bottom part, remove the protective strip and carefully glue the top part.
The main part of the base is ready, now we need to decide whether we will fill it or leave it hollow, since Christmas tree made of corrugated paper almost weightless, then you can leave the base empty inside. If you want to stuff it, you can use scraps of newspapers, corrugations, and napkins. On this basis you can also make it from coffee beans or pine flakes.
Christmas tree made of corrugated paper: master class
Now that the base is ready, we can take a closer look at how it’s done. Christmas tree made of corrugated paper master class, and you can find the main material for this craft at a stationery store or various craft supplies. Thanks to its texture, corrugation allows you to create original ones, while all the techniques presented are so simple and accessible that even a preschool child can handle the craft, and at the same time, this type of creativity will be interesting to adults.
It is not at all necessary to limit yourself to the green color of the corrugation when making such crafts; here you can show your imagination, make it white or gold, blue or red, you can combine a variety of colors or similar shades. Fortunately, for all creative types, corrugation is presented in stores in a wide range of color palettes.

The easiest option to decorate the base is to use wide strips of corrugated paper. You need to cut the sheet into strips 5-6 cm wide. Then each strip needs to be sewn on a sewing machine with a wide stitch so that they can be gathered. If you do not want to use a sewing machine for such a children's craft, then you can do a hand stitch. After stitching the strips with thread, you can gather them, adding volume to them, so that later they are easier to glue. Now you should carefully assemble the stripes with your fingers; thanks to the assembly, the Christmas tree will turn out to be fluffy, voluminous, as if it were wearing a cute pleated skirt.
Moving from the very bottom of the cone, you need to glue the stripes using a glue gun, with its help you will securely fix the strips. You need to glue them in a spiral: your strip is longer than the circumference of the cone, so you glue it along the bottom, and when you reach the junction, move its top a little and start the next layer, which should cover the first row.
So, moving in a spiral, you will reach the very top. When one strip ends, you need to glue another to it and continue to fix its upper edge on the cone-shaped base.

The top will turn out “naked”, so it needs to be decorated. The easiest option is to cut out a star from cardboard, coat it with glue and sprinkle it with glitter. You need to cut out two parts of the same size, gluing them together, and place a wooden skewer, a toothpick or a cotton swab tube in the middle. Then the star must be inserted into the tip of the base, and the top can also be decorated with rain.
Craft Christmas tree from corrugated paper almost finished, you can only decorate it with sparkles, to do this, apply a little PVA glue to the ends of each strip with a brush, and then sprinkle with sparkles.
How to make a Christmas tree from corrugated paper
You might like another option, how to make a Christmas tree from corrugated paper together with the child. This craft will take you more than 30 minutes to complete, and both you and your child will enjoy the creative process. You will entrust your child with one of the main parts of the process - folding the corrugation into an accordion.
To make your own Christmas tree from corrugated paper, we do not need a cone-shaped base; we will collect it from individual elements on a wooden skewer. A kebab stick or lula kebab is placed in a small glass. To secure it, we can use polyurethane foam or plaster, which we use for topiary. You can secure the skewer in a container with sand or cereal. If you have a miniature candlestick glass on hand, you can insert the skewer directly into the wax. Then you need to put on a skewer all the layers that will form our fluffy beauty. This will decorate the New Year's exhibition of children's works at school or kindergarten.
Christmas tree made of corrugated paper
In addition to the corrugation, we will also need scissors, a ruler and a stapler, as we have already said, a wooden stick and a glass. First we need to cut two rectangles: their size is 25x20 cm. This will be the lowest layer of our craft, respectively, this is the size of the largest rectangle. Then each rectangle must be folded like an accordion so that the width of the strip is about 2 cm. It must be folded in different directions alternately: first we bend it outward, then inward. As a result, we have an accordion strip, the width of which is 2 cm. Now on each side of this strip we need to trim the edges to create a sharp triangle tip. What will be the result? Christmas tree made of corrugated paper, photo They will tell you, so follow our master class carefully.
This strip must be bent in half and fastened with a stapler, and as a result we have a semicircle. Then, using the same principle, you need to prepare the second semicircle. The two finished pieces must also be fastened with a stapler, and the middle must be strengthened with a double thread and a knot must be tied on the reverse side.

To make it beautiful DIY corrugated paper Christmas tree, in total you need to prepare eight round blanks, all of different diameters. If our lowest blank was 25 cm in diameter, then the top one was only 5 cm. The width of the accordion gradually decreased, so the lowest strip was 2 cm wide, and the top one would be 5 mm. Removal can be done by eye; it is not necessary to take precise measurements.
When all eight round pieces are ready, they must be threaded onto a skewer: the largest on the bottom, the smallest on the top. The top of the head can also be decorated with a star.

Craft: Christmas tree made of corrugated paper
You can find many more interesting ideas on how bright and beautiful it turns out Christmas tree made of corrugated paper, video and photo master classes will become your main assistants when working with new material.
Corrugation can also be used to create. A fir branch with sharp needles and dense cones, which can also be created using sheets of corrugated paper in brown and green, will become a real work of art.


