...Tender pearls are dear to me,
pure gift of the seas!
Everyone knows about the love of women for pearls - from ancient times. There was even a recipe for beauty - “pearl water” - this is the water in which several pearls lay overnight. It is good to drink this water in the morning; it has anti-inflammatory and antimicrobial effects. Contemplation of pearls calms the psyche, pacifies and gives spiritual harmony.
Pearls have positive energy. A string of pearls around the neck is a sign of good taste, a symbol of elegance. Let's try it ourselves make a necklace with your own hands from this noble material. The planned length is about 50 cm. 
Necessary materials:
freshwater pearl 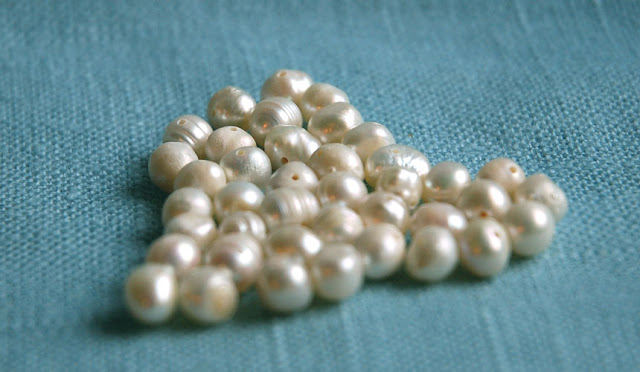
Accessories – metal cable (lank) – 55 cm, one lock fastener, two crimp clips: 
By the way, a variety of accessories for making your own jewelry can be found on the MaryLine website. Here you can, for example, buy leather cord to assemble original bracelets and fashionable necklaces.
Useful tools - wire cutters, mini pliers, mini pliers: 
We thread the elements onto one end of the wire in the following order: crimp – pearl – clasp, bend the tip at a distance of about 2.5 cm and return it and thread it in the reverse order – from the clasp into the pearl and into the hole of the crimp. Adjust the size of the loop and use pliers to carefully clamp the crimp 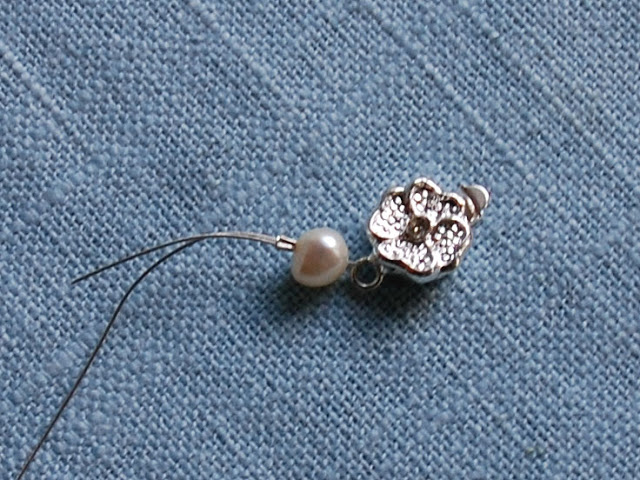 We string 2-3 beads, hide the remaining end of the cable, threading it through the pearls. We remove the excess part with pliers:

We continue to string the pearls to the desired length: 
We design the second end similarly to the beginning of the work, only in the reverse order: after the pearl - crimp - pearl - the second end of the lock. 
We bend the wire and with the tip we do the opposite way: pearl-crimp - two or three pearls, cut off the rest with wire cutters 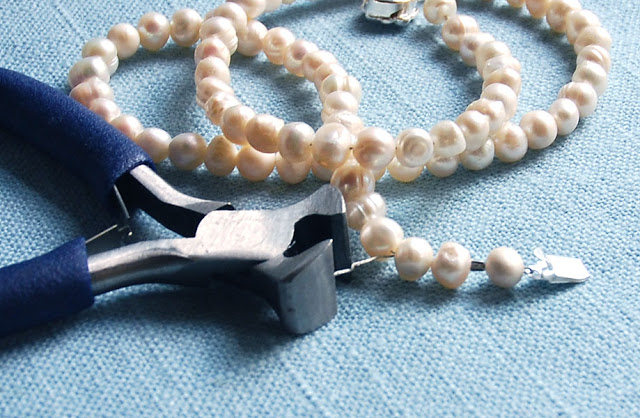
Thus, we designed the clasp for the necklace: 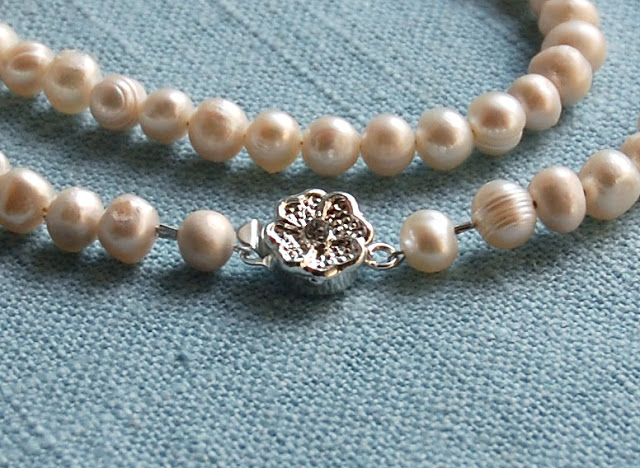
Length of the resulting – about 50 cm: 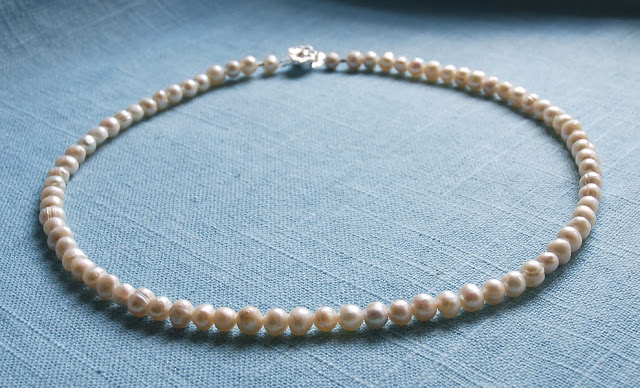
Beautiful pearls, an original lock - such a clasp can be worn “forward”, it will look like an element of decoration: 

In a similar way, you can collect stones and beads. You can try making it for decoration that you are going to give as a gift.
A string of river or sea pearls is a decoration that was invented thousands of years ago. It was considered the greatest treasure; it was used to decorate luxurious clothes and the crowns of emperors. Only the most distinguished beauties could boast of a pearl necklace. And even though many centuries have passed and fashion has changed hundreds of times, this touch to a woman’s outfit has always been and remains relevant to this day. This is a sign of impeccable style, a wonderful addition to an evening dress, and a necessary decoration for special, special occasions.
However, when you look into jewelry stores, you discover that a string of pearls is quite expensive... But what if you look at a handicraft store, watch a master class and learn how to make pearl beads with your own hands?
After getting acquainted with our master class today, you will be convinced that assembling such a thing with your own hands is not easy, but very simple! Even those for whom this will be the first piece of jewelry they have assembled on their own can do this... And how pleasant it is to wear it!
So let's get started. We will need the following accessories to assemble the jewelry:
The basis on which we will assemble the product.
Let's talk about materials in a little more detail so that their choice in each specific case does not lead to difficulties.
Theoretically, you can string pearls on different bases: on a special silk thread, on a nylon fishing line, on a jewelry cable... What to choose? The final decision, naturally, will depend on the craftswoman herself and her preferences. But in the case of pearls, a cable should not be used, because subsequent care of the product includes washing (otherwise the pearls will inevitably fade over time!), and the metal inside the beads may corrode and begin to rust. Nylon or silk thread does not cause these problems, so it is better to give preference to them.

Now about the locks and other decorative elements. Since a classic string of natural pearls is an inherently minimalistic decoration, you should not dilute it with a large amount of metal, beads and other foreign materials. Not because it will be bad - on the contrary, as a result of such experiments a truly chic and impressive product can be born - it will simply be completely different in both appearance and mood, and for now we are turning to the “classics”. And in this case, the main semantic load will fall on the clasp. It will need to be selected so that it holds the entire product not only in the literal sense, but also becomes its “highlight”, making the image of the decoration harmonious and complete. Especially if the pearl thread is worn with a high hairstyle that opens the neck from the back.
Fortunately, now there is a huge selection of toggles and locks for every taste, from the simplest and miniature to the complex and ornately designed. Choose the one that suits you; the main thing is that it does not visually “outweigh” the product. Let's see how the same thread will look with locks of different complexity: with the classic “lobster”, with a small but elegant “Pinion” and with an exquisite figured “Lily” toggle. The appearance of things changes dramatically!

Lobster clasp (silver)

Pinion clasp (antique silver)

Toggle "Lily" (antique silver)
You can experiment with shades of metal. Pearls are interesting because almost all colors of accessories go equally well with them. So here, too, the choice is determined mainly by your own wishes: someone likes sparkling light silver, someone likes a more restrained dark antique, someone likes the festive shine of golden shades or darker and very noble-looking bronze or copper. We also select all the auxiliary elements to match the clasp - in our case these are callots, as well as other details that you may decide to add to the product. This is important: “mixed” fittings look undignified and strange.
Stages of work.
We take a thread, thread it through the hole in the callot and tie a large knot at its end. To prevent it from accidentally coming undone while wearing, the knot should be soaked in a small drop of glue and allowed to dry. With instant glue this takes a few seconds. We clamp the callot with round pliers so that the knot is inside.


We begin to string pearls onto a thread. The surface of pearls is quite delicate, scratches and abrasions may appear on it, so the classic option for safe assembly is with a knot tied on the thread after each bead so that they do not touch each other. But not everyone likes these knots. You can also intersperse with beads, spacers or other decorative elements, but this will noticeably change the appearance of the item. So, if you wish, you can leave only the pearls - there is nothing wrong with that. Our product today will turn out exactly like this: this is how the customer wished it.

This is what the knot between the pearls looks like

And this will happen if you pass one bead between them

Thread without knots or intermediate elements
There is a little trick to tying. It is necessary that there is not a millimeter of free thread left, and the knots fit very tightly. This task is easy to cope with: hold the loop being tightened with a needle like this, holding the needle and bead in place, and pulling the thread towards you - then the knot will slide down to the desired position. Until you are sure that the knot fits tightly to the bead, do not tighten it tightly.

Adjust the product by stringing it to the desired length. When the last pearl is placed on the thread, thread the needle through the callot and tighten the knot again, or better yet several, and add a drop of glue. Pinch the callot.


This antique vintage bracelet is created from beaded and pearl beads. The design of the beaded bead consists of bugles, seed beads, pearls and crystal bicone beads.
MATERIALS
One finished bead 1.6 cm
- 5pcs - 12mm twisted glass beads
- 20pcs - 4mm crystal bicones
- 10pcs - 4mm crystal pearls
- 10pcs - 11/0 round beads
- 30pcs - 15/0 round beads
- 5pcs - 5x1.5mm spacer
- Fireline thread tensile strength 6lb
- beading needles size 10 or 12
Finished bracelet 21 cm
- 25pcs - 12mm twisted glass beads (Matsuno transparent iridescent gold)
- 5pcs - 12mm crystal pearls (Swarowski, bronze color)
- 10pcs - 7x4mm fire-polished rondelles gold color
- 100pcs - 4mm crystal bicones (Swarowski, peridot satin colors)
- 50pcs - 4mm crystal pearls (Swarowski, bronze color)
- 10pcs - 3mm round gold beads
- 1 - 3 g 11/0 round beads (Miyki 1 with gold line)
- 1 - 3 g 15/0 round beads (Toho 222 dark bronze)
- 25pcs - 5x1.5mm spacer (copper color)
- 10pcs - 10mm bead caps (gold)
- 10pcs - 8mm bead caps (gold)
- elastic beaded rope 1mm
- glue G-S Hypo Cement
Finished necklace 51 cm
- 25pcs - 12mm twisted glass beads (Miyki 2035 matte metallic khaki iris)
- Crystal pearls (Swarowski, brown)
- 6pcs - 12mm
- 6pcs - 6mm
- 6pcs - 5mm
- 50pcs - 4mm
- 18pcs - 7x4mm rondelles fire-polished rondelles black diamond
- 106pcs - 4mm crystal bicone (Thunder Polish, champagne silver color)
- 38pcs - 3mm round beads (Czech crystal shadow AB)
- 1 - 3 g 11/0 round beads (Toho 279 light topaz with gray line rainbow)
- 1 - 3g 15/0 round beads (Toho 994 with gold line rainbow crystal)
- 37pcs - 5x1.5mm spacer (gunmetal)
- 12pcs - 10mm bead caps (brass)
- 10pcs - 8mm bead caps (antique silver)
- lock
- 2 crimps
- 2 crimp caps
- bead thread
- clamping pliers
INSTRUCTIONS
seed bead
Take a 1.4m long thread from Fireline and string 1 12mm glass bead into the center of the thread
Using each needle, thread one 4mm pearl. Using the first needle, thread another glass bead, and insert the second needle through this glass bead. (Fig. 1)
Repeat step 2 and you should get a total of 5 elements. (Fig. 2)
Using each needle, string 4 4mm pearls. Make a crosshair through the first glass bead added in step, forming the resulting strip into a ring.
Using each needle, thread one 15/0 bead and a 4mm crystal bicone. Using the first needle, cast on 1 15/0 bead, 5x1.5 spacer and 1 15/0 bead. Pull the second needle through the last three beads added (Fig. 3 a-b, aa-bb)
With each needle, thread one 4mm bicone and 15/0 beads, cross the needles through the next glass bead located in the ring. (Fig. 3 b-c, bb-cc)
Repeat steps 5 and 6 around the entire ring. Pull each needle through an adjacent 4mm pearl bead.
Using one needle, pick up one size 11/0 bead and pull the needle through the next 4mm pearl. (Fig. 4 a-b)
Repeat, adding one bead at a time between 4mm pearls throughout the circle. (Fig. 4 b-c)
Repeat with the other needle at the other end of the ring.
Bracelet
Make 5 seed beads
On an elastic beaded cable, string: 1 rondelle 7x4mm, bead cup 8mm with the convex part in relation to the rondel, beaded bead, bead cup 8mm with the inner side in relation to the bead, as in the photo, 1 rondelle, 1 round bead 3mm, bead cup 10mm, 12mm pearl, bead cup 10mm, 1 round bead 3mm. Repeat this set 4 times and you should have a total of 5 seed beads and 12mm pearls.
Tie the elastic cord into a knot, to secure it, add glue to the knot and hide the remaining ends of the cord.
Necklace
Make 5 seed beads
On a beading thread 61 cm long, string one beaded bead in the center
On each side of the central seed bead, string:
8mm bead cup, 7x4mm rondelle, 3mm round bead, 10mm bead cup, 12mm pearl, 10mm bead cup, 3mm round bead, 7x4mm rondelle, 8mm bead cup, beaded bead.
Repeat this set once, then string:
bead cup 8mm, 7x4mm rondel, round bead 3mm, bead cup 10mm, pearl 12mm, bead cup 10mm.
round bead 3mm, 7x4mm rondelle, round bead 3mm, spacer. Repeat this set twice and then string:
3mm round bead, 7x4mm rondel, 3mm round bead.
On each remaining end of the bead thread, string:
pearl 5mm, round bead 3mm, crystal bicone 4mm, round bead 3mm.
Repeat this set twice.
On each remaining end of the bead thread, string:
crimp bead, crimp bead cover, one piece of lock. Pull the thread back through the crimp and the lid. Clamp the lid with pliers. Hide the remaining end of the thread in beads. Repeat on the other side.
Earrings
MATERIALS
- 10pcs - 12mm twisted glass beads (Miyki 2035 matte metallic khaki iris)
- 4pcs - 7x4mm rondelles fire-polished rondelles black diamond
- 40pcs - 4mm crystal bicone (Thunder Polish, champagne silver color)
- 20pcs - 4mm crystal pearls (Swarowski, brown)
- 4pcs - 3mm round beads (Czech crystal shadow AB)
- 1 g 11/0 round seed bead (Toho 279 light topaz with gray line rainbow)
- 1g 15/0 round seed bead (Toho 994 with gold line rainbow crystal)
- 10pcs - 5x1.5mm spacer (gunmetal)
- 4pcs - 8mm bead caps (antique silver)
- 2pcs - 6.4cm pins
- 2sh - earrings
Make 2 seed beads
On your pin:
round bead 3mm, 7x4mm rondel, bead cup 8mm, bead bead, bead cup 8mm, 7x4mm rondel, round bead 3mm, make a loop and carefully twist the end around the pin, cut off the excess with wire cutters. Separate the loop at the hook and insert its tip through the pin loop, then connect it back.
Repeat the same with the other earring.
© 2012, . All rights reserved. When reprinting an article, a link is required!
By assembling pearl beads using the knotted technique of stringing pearls, you will get a very delicate and flowing decoration.
The knots between the beads will not only add flexibility to the product, but will also protect the beads from hitting each other, and the jewelry itself will look stylish and professional.
We already know. However, it is easiest to consider the use of a simple knot in beadwork using the example of collecting beads using the knotting technique
To work you will need:
- Griffin pearl thread;
- Swarovski pearls (11 beads 12 mm, 20 beads 10 mm, 40 beads 8 mm);
- Lock, callots;
- Tweezers or thin pliers;

In order not to get confused in the order of stringing the beads and to see in advance what the finished product will look like, it is very convenient to lay out the beads of the future necklace before starting work. We place 11 pearls measuring 12 mm in the center, then on each side 10 pearls measuring 10 mm, and then 20 pearls measuring 8 mm. If the beads are too long for your needs, you can symmetrically remove the beads from each side and make the jewelry shorter.
 |
Once the length of the decoration and the order of the beads have been determined, you can begin threading. For this decoration, I decided to use #04 white Griffin thread, since for 8 mm beads, which are the vast majority of the jewelry, #08 thread was a bit thick. We will later attach a lock to the end of the thread, so step back about 10 cm from the end of the thread and tie a simple single knot, and then using the needle built into the thread, string the first (outermost on the tablet) bead: |
 |
Tie a simple knot close to the bead, but don't tighten it yet: |
 |
To tighten the knot, it is best to use tweezers, but if you don’t have one, you can get by with pliers/round nose pliers with thin ends. Insert the tool into the knot and grab the thread right next to the bead: |
 |
With one hand, continue to hold the thread with the tool, and with the other hand, pull the tip of the thread, tightening the knot around the ends of the tool: |
 |
Grab the thread with pliers or tweezers just after the knot and pull it closer to the bead: |
 |
String the next bead and make a knot in exactly the same way immediately after it. The knots should be tied close to the bead. If you see that the knot is coming out a little further, it is better to untie it before it is too tight and redo it. Continue stringing bead after bead until you reach the last one. |
 |
Attach fittings for attaching a lock to the ends of the decoration, in this case callots: |
 |
Tie a knot (or better yet, two if you see that the hole in the fittings is large and the knot may fall out) so that it ends up inside the cup: |
 |
Cut off the rest of the thread immediately after the knot: |
 |
And apply a drop of glue to the knot so that it does not come undone: |
 |
Close the hardware doors, leaving the assembly inside: |
 |
Now attach any lock you like to the loops. |
A master class in making beads was given by a young Russian fashion designer Maria Didarova, designer of the MaYa brand. Her first collection was dedicated to India, where pearls are considered a traditional adornment not only for women, but also for men.
“Pearls are a fairly light material, working with them is a pleasure,” says Maria. - In India, it is customary to combine pearls with gold or brass. Many people are tired of the usual pearl threads, so I suggest making beads from pearls of different sizes and shapes, as well as elements from brass.”
Pearl beads
1. You will need: a spool of thread, a needle, scissors, pearls of two sizes, drop-shaped pearls, 8 beads made of brass or other metal. To assemble beads, you don’t have to look for the necessary accessories in the appropriate stores. You can take existing strands of pearls or buy ready-made beads.

Thread length
2. The white thread should be wound in five layers. It should be long enough. Fold the resulting thread in half. Make a knot at one end and insert a needle at the other.

Beads in a box
3. It’s better to put the beads in boxes to make it convenient.

Stringing beads
4. Each step is 14 pearl beads. We begin to string seven beads of the same size. Then pearls in the form of a drop - with the cone facing up.

Brass
5. After the “droplet” there are small pearls. Then the brass element. And again, little pearls.

Drop of pearl
6. Then take a “drop” and string it with the cone down.

Next step of 14 beads
7. Then the next step begins. String 14 regular size pearl beads. Then again a “droplet”, a small bead, a brass element, again a small bead and again a “droplet”. Make sure that the droplet-shaped pearl cones are facing each other.

8 brass elements
8. Since there are only 8 brass elements, this means there will be 8 steps. The last part will consist of seven pearl beads.

Great accessory
9. The beads turn out to be very long. This is a great accessory. They can also be used as a bracelet, wrapped around your hand.


