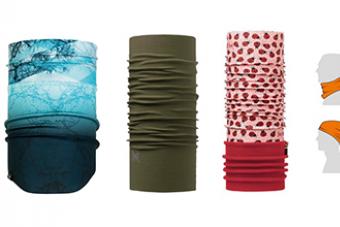
Pompoms

how to make a pompom from threads (method 1)
how to make a pompom
If you need to make 1 or several thick pompoms, then to make them, it is best to use a cardboard template in the form of a ring. More precisely, you need 2 rings of the same size. At the same time, the size of the pompom directly depends on the width of these rings. That is, the width of the template from the inner edge to the outer will correspond to the radius of the pompom. To make a pompom, fold the rings - templates together, wrap tightly with thread, the number of turns of thread on the template will determine the pomp of the pompom. The more turns, the more magnificent the pompom. A wide hole inside the rings will make it easier and faster to wind the thread onto the template. If the hole is small you will have to use a needle to wind the threads. After the required number of turns have been made, cut the threads along the outer edge of the template, inserting the scissors between the two rings. When the threads are cut, carefully pull the thread between the two rings, pull it tightly and fasten it. Pompom - ready!

pompom on a rectangular template (method 2)

pompom on fingers (method 3)

pompoms on a fork (method 4)
If you need small-diameter pompons, you can use small cardboard templates in the form of a rectangle, your fingers, or even a regular fork to make them. The cardboard rectangle needs to be cut from one side almost to the second edge, in the center of the template. Pull the thread into the cut so that its ends hang freely and are long enough to secure the pompom threads with a knot. Wind the required number of turns of yarn onto the template; the more, the tighter the pompom. Then tighten the pompom loops using the thread left in the cut of the template. Fasten it well and cut all the loops on the sides. If the edges of the pompom are not very even, we process them with scissors until the desired shape is obtained. When making pompoms on your fingers or a fork, the principle is the same: wind, pull, fasten, cut and align the edges with scissors.

pompom products

make many pom-poms at the same time (method 5)
How to make many pompoms at once? If you need to make many pompoms at the same time, you can use other methods that will save you time. For example, use an ordinary chair or even a table for this purpose. The yarn is wound around the legs of a table or chair. Then the yarn is pulled together at a certain distance and cut between the fastening threads. Use scissors to shape the pompoms into the desired shape.
If you need a large number of pompoms to make a rug or blanket, it is worth considering the following option, in which the pompoms are not made separately but are woven as a single piece on a template.


To make a blanket or rug, first prepare a frame to the required size. Nails are placed along the edge of the frame to secure the threads. Next, according to a certain pattern, the threads are pulled tightly along the frame. Each row of threads consists of 50 layers. At the intersection of rows, the number of threads is 100 pieces. After the required number of layers of threads have been stretched, all intersections of the rows must be fastened with knots. Then all that remains is to carefully trim the necessary threads. ATTENTION: cut only 30 threads on one side, in the middle, between the intersections of the rows. If you cut all the threads, you will get a lot of small pompoms, not a blanket. To make it easier to count threads, they are most often separated by color. And then you don’t need to count anything, just stick to the color. For example, they do: 20 rows with white thread, 10 rows with yellow and 20 rows with white. That is, the bottom 20 white rows remain untouched, and the top 20 and 10 yellow rows are cut. This method saves a lot of time.
Brushes

how to make tassels from yarn (method 1)

How to make tassels from yarn Yarn tassels, like pompoms, can be made in various ways, but most often a cardboard template or any available item of suitable width is used for this. The thread is wound onto the template, and a fastening thread is pulled under the turns of thread. The coils are cut on one side and the threads are tied into a bundle on the other side. (method 1). Such brushes are used to decorate scarves, hats, blankets, curtains and other items of clothing or decor. You can decorate such brushes with ribbons, beads or beads, it all depends on your imagination. Larger brushes are attached to braided cords or braids. There are two other ways to make brushes for this. The difference in the methods lies in the number of bends of the thread and, accordingly, in the size of the upper part of the tassel.


The beginning of work is the same for all options for making brushes. First you need to prepare a bunch of threads of the same length. And then only sleight of hand and a little attentiveness. Method 2- tie a knot on the cord to which the brush will be attached. Afterwards, a bunch of prepared yarn is “put on” this knot and fastened tightly with thread. In this case, both the fastening cord and the threads of the brush “look in the same direction. The cord is turned over, the threads of the brush are lowered and evenly distributed over the surface of the knot and tightened again with thread.
Method 3- the prepared pieces of yarn are divided into 2 parts, a cord with a knot is laid out on one part of the yarn, so that the knot is slightly below the middle of the pieces. Cover the top with the second part of the yarn pieces, and the entire structure is pulled together with thread, slightly above the knot. Next, the upper part of the pieces of yarn is lowered over the knot, and again secured with thread, but under the knot. If desired, the manipulations with securing the upper part of the brush are repeated again, only it should be taken into account that the yarn consumption increases and the length of the brush decreases significantly. Trim the finished brush using scissors.
Fringe


Fringe is the easiest decorative element for knitted clothing to make. To quickly cut the yarn for making fringe, most often use a cardboard template in the form of a rectangle, or any handy object suitable in size. The width of such an object or template should correspond to the length of the desired fringe + 0.5 - 1 cm for a fastening knot. The yarn is tightly wound onto the template and cut on one side, thus obtaining many threads of the same length at once. Afterwards, the threads are secured to the finished product using a hook. You can fasten the fringe threads one at a time or several at a time, into each loop of the edge or through several loops, it all depends on the desired density of the fringe and the final look of the product. If you use 2 or 3 threads at once for fringe, then it is advisable to fasten them through 1 edge loop. If you fasten it into each loop, it can stretch the edge of the product, although many people like it that way. On a lilac scarf, to make fringe, I used 3 threads at a time and secured them through 1 loop.


how to secure fringe
To secure the fringe, the prepared threads are folded into two, the resulting loop, when the thread is bent, is threaded under the loop of the edge row using a hook. Pick up the threads again and pull them into the loop, forming a knot. This knot is slightly pulled up by hand to secure it.
Fringe on knitted items looks beautiful and rich. Shawls, shawls, ponchos, scarves are those items of clothing that are decorated with tassels. Run these
decorative elements are quite simple and easy. Even a novice needlewoman can cope with such work. Today we’ll talk about how to make tassels for a scarf. Two options for making similar decorations for a knitted accessory are presented to the attention of craftswomen. We invite you to familiarize yourself with them.
Preparatory stage
In order to make tassels for a scarf, you will need the following tools and materials:
- scissors;
- crochet hook;
- cardboard;
- yarn;
- scarf.
The hook number must correspond to the thickness of the thread from which the scarf is made. Otherwise, you may find it difficult to pull them through the knitted fabric. The color of the yarn can be different, but in thickness it is desirable that it matches the one from which the main product is made.
Learning to make fringe
Do you want to know how to make tassels for a scarf? Please read the following instructions.

How to make scarf tassels more voluminous? Just work two or three threads at once in one broach.
Making tassels for the scarf. Method No. 2
The accessory looks very nice, the ends of which are decorated with fringe, reminiscent of bells in shape. How to make tassels for a scarf of this type? We'll talk about this further.

We prepare the same materials as in the previous version of the fringe: yarn, cardboard, scissors. Cut the thread to a size three to four times larger than the size you intend to make the project. Place this piece of yarn along the cardboard. Wind threads around this blank. The more turns you make, the more voluminous the brush will be. Next, tie a long piece of yarn into one knot. Cut the layer of thread and pull out the cardboard. Pull the knot tight. You have a pompom. How to tie tassels on a scarf so that they have the shape of a bell? Cut another piece of yarn and tie it around the tassel, leaving a few centimeters from the edge. Tighten the knot tightly. Hide the ends of the thread inside the product. Next, attach the pompom to it using a needle or hook. Pull the yarn through the thread holding the fringe at the top, insert it into the scarf and tie it into a knot.
You've learned two ways to make scarf tassels. We hope that the information presented will be useful to you, and very soon things decorated with handmade fringe will appear in your wardrobe.
For creative people, sometimes it is not enough to know how to knit, crochet, weave macrame, do crafts, draw, etc. You need to know a lot to make your idea come true. One of these skills is learning how to make brushes.
How to make scarf tassels
In order to make tassels from threads to decorate a knitted product, you need to prepare:
- Knitting thread;
- thick cardboard;
- scissors;
- Crochet hook.
How to make a thread tassel:
- In order to make the base, cut out a rectangle of 10 by 15 cm from thick cardboard. If you need a long brush, then the workpiece needs to be enlarged.
- The first turn of the thread needs to be laid around the short side of the workpiece - this will be the base on which the tassel (loop) will rest.
- The threads need to be wrapped around the long side of the workpiece (by the way, the thread can be folded in half), the first loop needs to be fixed or pressed tightly.
- Continue winding the thread, the more turns, the more magnificent and beautiful the tassel will be.
- At the end of the work, the thread that was wrapped around the short side of the workpiece (10 cm long) must be tightened thoroughly.
- Now, armed with scissors, you need to cut the wound threads to get a neat and fluffy tassel.
- Then you need to prepare the knitting threads; you will need 1 piece, 30 cm long, to wrap the finished tassel around the “head” with threads. Make a few turns below the place where the knot is located (literally 2 cm below), tie and trim the ends.
- Hide the protruding ends of the thread with a crochet hook in the middle of the tassel. Just be careful not to disturb the appearance and shape of the finished product.
- Shake the brush, look at it from the side - if you see uneven ends of the threads, they need to be trimmed.
The tassel for decorating the scarf is ready.
How to make a fringe tassel for a scarf from threads
And the second option is to create fringe or small tassels. In order to make such tassels, you will need thread and scissors. The thread needs to be cut into pieces of the required length of the finished product, plus another 2 cm. If it is a short tassel, then the threads need to be wound on cardboard of the required size, and then cut. And if the tassel is longer, then the thread needs to be folded 2 or 3 times, pulled from the bottom up to form a loop, and pulled through. After drawing, the ends of the threads must be tightened and cut with scissors. In order for small tassels to look harmonious on the product, it is necessary to make tassels in increments of several loops. This will depend not only on the size of the finished product, but also on the thickness of the threads.
Now try knitting a small scarf that you can wear around your neck under the collar of your coat or jacket. Scarf length 90 cm, width 20 cm.
For knitting you will need 100... 120 g of yarn No. 32/2 and knitting needles No. 2, 5 with closed ends. For this product, it is better to choose garter stitch: it is simple and will allow you to develop good speed and uniformity of knitting. In addition, you can clearly see the advantages of this knitting: the edges of the scarf will be smooth, elastic, hold their shape well, and will not curl.
First knit a sample to determine the required number of loops per product. To do this, cast on 20 loops and knit 3...4 cm in height using garter stitch (first method). Close the last row of loops loosely. Lightly iron the sample using a damp cloth. Measure the width of the sample with a measuring tape. Suppose the width turns out to be 8 cm. Then per 1 cm of knitting there are 20:8 = 2.5 loops. With a scarf width of 20 cm, you need to cast on the knitting needles: 2.5 x 20 = 50 loops.
Now cast on two knitting needles 52 loops (50 + 2 edge loops) and knit the scarf fabric. Don’t forget to slip the first stitch of each row onto the right needle without knitting, and knit the last stitch with a purl loop. Also make sure that the knitting is evenly knitted - do not tighten it or make it very loose. Having knitted a fabric 90 cm long, close the loops of the last row. Break the thread and remove its ends.
Brushes (Fig. 37).
The scarf can be finished with tassels. To make them, take a rectangular piece of cardboard 12...15 cm long and 8...10 cm wide. Wind the threads around the cardboard. To make tassels on one side of the scarf, the number of turns should be equal to the number of loops cast on for knitting it, multiplied by 2. Cut the threads on one side of the cardboard with scissors. Take two threads at a time, fold them in half, and pull them with a crochet hook under the loop of the closed row, then thread the ends of the threads into the resulting loop. Tighten them, but not too tightly, so that the interception lies softly, beautifully, without tightening the edges. Do the same tassels on the second edge of the scarf.
Here is an article on the topic:
A long scarf with large pom-poms or tassels at the ends.
This scarf can be knitted with a 2X2 elastic band. To make it you will need 300 g of yarn No. 32/2 in 5 folds and knitting needles No. 3 with closed ends.
First, calculate the required number of loops per product. For the sample, cast on 20 loops and knit it with a 2X2 elastic band (knit two, purl two in the first method). This sample cannot be ironed, as the convex loops will be deformed (crumpled).
Straighten the sample with your hands and measure its width with a centimeter tape, count how many loops there are for each centimeter of knitting. Let's assume there will be 3 of them. With a scarf width of 25 cm, you need to cast on 25 X 3 = 75 loops on the knitting needles. However, the calculation of loops in this case should be more accurate. In order for the scarf to turn out smooth and beautiful, both of its long edges must end with the same loops.
Look at the 2X2 rib knitting pattern (Fig. 1). The rapport of this knitting is 4 loops.
This means that you need to cast on so many loops so that their number is a multiple of 4, plus 2 knit loops (to make the edges the same), plus two edge loops. Let's make an amendment to our calculation: the number closest to 75, a multiple of 4, will be 76, add 2 loops (to align the edge) and 2 edge loops. In total we get 80 loops.
Having cast 80 loops on the knitting needles, knit the scarf with a 2X2 elastic band until its length reaches 120... 130 cm. When the scarf is knitted, close the loops of the last row without tightening. Cover the knits with knits, and the purls with purls.
Finish the ends of the finished scarf with pom-poms (see Fig. 2). Just make them larger than mentioned above; for this, make cardboard circles with a diameter of 7...8 cm with a central hole with a diameter of 2...2.5 cm.
Cut out a square of thick cardboard with a side slightly larger than the diameter of the pompom you need.
Cut a square piece of cardboard down the middle, just below the center point.
Cut a piece of yarn 30 cm long and insert it into the cut so that both ends of the yarn are the same size. (Figure 1)
Start wrapping the yarn around the cardboard, changing colors as desired. If you are making a pompom with a diameter 6,5 cm, wrap the yarn around the cardboard 100 times. If the pompom is larger, make more turns of yarn; if the pompom is smaller, then there should be fewer turns of yarn. Cut the yarn.
Tightly wrap the piece of yarn that hangs from the slot in the cardboard around the turns of yarn (Fig. 2) and tighten the fabric
After this, cut the thread turns and use scissors to trim the pompom and give it the shape of a ball (Fig. 3).


In the future, the pompom can be sewn tightly to the product, or, without cutting off the fastening thread, you can make a pompom on a cord.
Brush
Take a piece of thick cardboard and cut out a rectangle a little longer than the brush you need and 10 cm wide, along its narrow side there is a cord on which the brush will be held. Wrap the yarn around the long side of the rectangle. Moreover, the more thread is wound, the more voluminous the brush will be (Fig. 1).
Then tighten the thread along the narrow side of the cardboard.
Using scissors, cut the wound yarn at the end opposite the knot.
Cut a piece of yarn 30 cm long. Wrap it tightly around the tassel two or three times below the knot, 2.5 cm. Tie securely. Thread the ends of this piece of yarn into the needle and hide inside the tassels. Shake the brush and trim off any uneven ends (Figure 2).


The brush, just like a pompom, can be sewn tightly to the product, or, without cutting off the fastening thread, you can make a brush on a cord.
The tassel can also be decorated with a large bead. To do this, the brush is pulled from bottom to top through a bead of the appropriate size (Fig. 3).
Fringe can decorate almost any product, from a scarf to a handbag or sweater. Use your imagination - and the knitted item will be unique.
Cut the yarn into pieces twice as long as the fringe. To make this easier, wrap the yarn around a book or piece of cardboard that is as wide as the length of the fringe. Then cut the yarn on one side. Fold the pieces of yarn in half, thread the folded ends into the edge of the fabric using your fingers or a crochet hook, then pull the free ends of the fringe through the resulting loop. If desired, after you attach the fringe, decorate it with beads and tie it with knots.