Creating fur ears is not as difficult as it might seem at first glance. Prepare the following materials:
- igloo;
- threads;
- scissors;
- pieces of foam rubber;
- transparent glue (“Moment”);
- ordinary bezel;
Draw cat ears on a piece of paper and use the drawing as a template. After placing the template on the foam, trace and cut out two triangular pieces. It should be noted that the foam parts need to be made slightly smaller in size than the intended ears. Apply the foam base to the underside of the fur and trace it, increasing the seam allowances on all sides by 1 cm. Cut the base of one of the fur blanks 4 cm longer in relation to the template in order to subsequently attach it to the headband. Make two parts in total. To create the second ear, make similar parts: two from fur and one from foam rubber.
Connect the outer sides of the fur parts together and sew with a zigzag stitch on a sewing machine or by hand. Leave the base of the ear open. Turn the blanks fur side out and place the foam piece inside. Carefully sew the bottom of the ear close to the base of the filling using a hidden stitch.
Try on the headband and make marks in the gaps where the ears will join. Apply clear glue to the remaining long side at the base of the ear and wrap it around the headband at the marked area. In this way, glue the second ear as well. A headband with cute ears is ready to transform your look.
Stylized ladies' headband with ears
An airy, light women's headband is ideal for creating an elegant and sexy look. The following will help you complete this accessory:
- ribbon;
- glue;
- pieces of wire;
- beads;
- plastic rim;
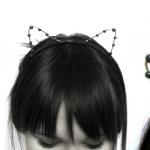
Bend the wire, creating an acute angle (a triangle without a base) to fit the ears. Bend the edges outward. Thread the wire through the beads, decorating the constructed triangular ears with them. The presence of decorative elements may vary in color and size. Secure the final row with beads with a drop of glue. Attach the ears to the headband using tape or glue. Decorate with a ribbon or a piece of leather, covering the edges of the wire.
Elegant women's headband with lace ears
A headband with openwork ears is a great accessory for a New Year's party. In order to implement the idea it is necessary:
- plastic rim;
- lace;
- cardboard;
- wire;
- satin ribbon (fabric);
- glue “Moment” (hot glue);
Wrap the headband with a satin ribbon or cover it with a beautiful fabric of a matching color. Be sure to secure the tape with glue in the central part and along the edges of the rim. Cut out ear patterns from cardboard. Pin the blanks to the lace scraps and trace along the contour. Cut out 2 pieces for each ear. Prepare pieces of wire and bend it to form the shape of the ears. Attach them to the lace parts and check the size taking into account the seam allowance. Connect the parts and sew, inserting wire into the seams. Attach the ears to the headband with glue and decorate them as you wish: with beads, seed beads, or rhinestones.
A headband with cat ears can come in handy at any time: for a theme party, New Year, just for the mood or to complement the look for especially extravagant people. To make such an iron rim, the main thing you need is accuracy and patience. A wide variety of materials can be used.

Wire ears
We offer this master class on making a headband with cat ears from wire.
Materials for work:
- Ordinary headband
- Beads
- Glue Moment
- Wire.
- Pieces of leather or leatherette
- Scissors

We bend two symmetrical ears of the desired size from the wire.

Carefully place the beads on the wire. When using instant glue, it is better to immediately mark specific points where the decor will be located, because after the glue “sets” it will be difficult to tear off an element fixed in the wrong place and even more difficult to clean the wire from the glue.

Then glue the ends of the wire to the rim. We cover it with pieces of leather or leatherette.
Video example
The video shows one of the options for making cat ears.
This is such a beauty. For a fashionable little girl, you can make a headband and these hairpins. The decor on them is made of pieces of felt, cut out in the shape of animals, processed with a loop stitch and decorated with small bells.


Fur ears are a very cute and original version of the headband. Making ears is not as difficult as it seems.
We will need the following materials:
- Fur strip (20-30 cm).
- Headband.
- Foam rubber.
- Threads.
- Needle.
- Scissors.
- Glue Moment.
Let's get started
Take foam rubber and cut 2 small triangles out of it. Attach the triangles to the wrong side of the fur. Circle with a pen, adding 1 cm on each side of the foam rubber. We will have 2 fur blanks. Increase the base of one of the fur blanks in relation to the foam rubber by 3-4 cm (depending on the width of the rim. This part of the fur blank is suitable for attaching to the rim Make the same blanks for the second ear. The manufacturing principle is the same:

Fold the fur pieces and sew with a blanket stitch. Do not touch the base! Turn your ear fur side out and insert foam inside. Sew the bottom of the ear close to the foam rubber. Try on the headband and mark the places where the ears will be. Attach the ear to the headband, apply Moment glue to the protruding edge and wrap the headband. We do the same with the second ear. Wonderful fur ears are ready.

Glue beads onto pieces of wire and secure them to the combs. Decorate your hair.


Which hat to choose for your baby? Of course, soft, warm and comfortable. It’s even better if, in addition to all of the above, the baby’s hat is fashionable, bright and different from others. And where can I get such a hat? We invite you to sew a fun and bright children's hat from fleece with your own hands. After all, fleece best meets all our requirements. This is a lightweight, soft, pleasant to the touch, anti-allergenic material, synthetic “wool” made from polyester. Fleece does not absorb moisture, but passes it well. Children do not sweat in clothes made from this fabric; fleece “breathes” and retains heat perfectly.
Based on just one pattern, you can design and sew many different children's fleece hats, both for boys and girls.
Ideas for children's fleece hats


Let's look at how to sew a children's hat from fleece
For our children's hat you will need:
- Hat pattern;
- Gray fleece;
- Pink fleece;
- Fleece in blue or light blue;
- Threads are black, gray, pink and blue.
We cut it from gray and black fleece, we get two parts, gray on the top of the cap and black on the inside.

Sew the front seam on the gray piece

Now we draw on paper and cut out the details of the “Face” of the bear cub on the fabric. The ears will be pink in front and gray in the back. Therefore, we cut out two pink and two gray ears.

Take a pink oval and a blue nose, pin them together and sew them together


Sew the resulting part onto the top of the hat.

Sew on the eyes

Then we start creating the Bear's ears. To do this, take the gray part and put it on the pink one, sew it together

We turn the resulting ear inside out and grind it down to 0.5 centimeters. We got two ears like this

We sew the back seam from the top 5 centimeters, insert the ears into the top seam, pin it so that they do not run away and sew the seam

We sew a pink patch near the right ear and make decorative black seams. Sew up the back seam. The top part of the hat is ready. All that remains is to make the inside and ties. Take the black piece of the hat, sew the front and back seams, and then the top seam. Now we cut out rectangles measuring 20*3 centimeters.

Fold them in half, sew them together and turn them inside out. We got ties. We sew the black and gray parts together, not forgetting to insert the ties and leave a small slit for turning inside out. They sewed it, turned it inside out, and sewed up the opening. The result is a hat.

Older children or teenagers will really like this hat. I saw this hat with ears on the Etsy website.


Unfortunately, I couldn’t find a pattern for this hat, but there is a diagram. If you wish, you can carefully examine the caps and repeat. Please note that the ears on the hat are one-piece with the back of the hat, and are not sewn in, as in the example above.

How to sew a baby fleece hat
As a basis for a hat with ears, you can take a pattern like this:


At various masquerades, costumes of our pets - cats - are very popular. The look won't be complete if it doesn't include cat ears. You can make a fun accessory with your own hands. Making ears won't cost much. Everything you need can be found on your shelf with handicraft materials. The ears themselves can be made from cardboard, from fur, or you can sew a cat’s hat from fabric. Of course, a more realistic product will be made of fur.
Cat ears: how to make?
To make a carnival headband with ears, you will need a regular hoop (headband). You can make it yourself from wire. It is best if it is extremely thin and invisible in the curls. You can choose a headband to match your hair color. Prepare pieces of fabric, fur, decorative elements for decoration - rhinestones, beads. It should be said that cardboard cat ears will not last long. To make fabric ones and secure their shape, prepare a piece of not very thick wire. You can use suede, leather or their substitute as material for the ears. The tools you will need are: a needle, thread, scissors, wire cutters, cardboard or selected fabric - this whole set will help you make cat ears with your own hands.

Ears on the headband
If sewing is difficult for you or you need to make the ears very quickly, you can use regular cardboard or any colored paper. Draw a template on paper, and then transfer it to cardboard, leaving 1 cm allowances (if you are working with fabric or leather, everything is done according to the same principle, only the parts will need to be sewn later).
Cut out the cardboard ears so that there are two blanks for each piece (front and back). Glue the elements together. When the glue dries, you can consider that the cat ears are almost ready. Just decorate the headband with them - and the accessory is ready. The extra strip (1 cm) needs to be folded outward. This will allow you to glue the product to the inside of the headband. The tips of the ears should point up. As soon as the product is dry, the masquerade element will be ready. You can improve the ears in different ways: cover the cardboard with leather, decorate it with rhinestones and beads. The headband itself can be wrapped with fur or colored ribbons to match the color of the suit.
Ears of their fur. Preparation

If you want to make your cat ears more realistic, sew them from fur. For work you will need: faux fur, two hairpins, cardboard and glue (it is better to take textile or hot glue). You will also need scissors and a ruler. Ordinary bobby pins will not work; the width of the hairpins should be at least one centimeter. You can use alligator clips, clip-on clips, or pull-on styles.
Cut out the fur ears according to the prepared template. The parts should be made of both cardboard and fur - for one ear there is a cardboard blank and two fur ones (front and back). The appearance of the ears can be anything: oval, triangular (it all depends on your desire). For a triangular shape, you need to cut out two equilateral triangles from cardboard.
Working with fur
Cut out the fur cat ears. To do this, attach cardboard templates to the underside of the fur and outline them. Leave 1 cm for allowances. Cut out the pieces.
Cover cardboard blanks with fur parts. The bases with allowances need to be turned back a little so that they do not stick to the cardboard.
Unscrew the allowances and glue them to the upper surfaces of the hairpins. The bottom one should accommodate the hair and fasten.
After the glue has hardened well, the item will be ready to wear. As you can see, it’s very easy to make cat ears with your own hands; it won’t take much time. If you have long hair, make two ponytails on your head and attach hairpins with ears to the elastic bands.
Hat with cat ears. Uncover

The hat with ears will have four cut parts. The pattern is drawn according to the principle of a children's cap, which can consist of four or six parts. To calculate the size of the wedge, divide the head circumference (in cm) by four. Add 1.5 cm to the seam allowance on each side of the wedge. The length of the product is approximately 20-23 cm.
There should be four parts (two fronts, two backs). You can draw the template yourself in any shape - triangular or oval. During the sewing process, the facing of the hat is cut out. You will need an elastic band 2 cm wide, its length should be half the circumference of your head. Sew a forelock onto the hat, and cut out a rectangular piece of fur for it.
Progress

The parts are cut out with seam allowances. The fur should be sewn into the ears in this way: cut the part in the middle, 2 cm away from the edge, put the fur underneath, then stitch the main part, leaving a hem of 2 cm.
After this, you need to connect the parts without fur with the parts with fur, overstitch, and turn them right side out. Sew the lining, connecting the pieces in pairs. Next, assemble the top in the same way as the lining according to the blanks, while inserting the ears into the seams. Sew a rectangle-forelock prepared from fur on the front. Now you need to connect the lining and the top of the hat along the bottom.
You can prepare a hemmed cuff as follows: create a piece in the shape of a rectangle, the length of which will be equal to the circumference of the cap at the bottom plus seam allowance, take the width 3 cm plus seam allowance. The facing cuff is cut out of fabric, like the top cap. You should sew the facing cuff (stitch on one side) and connect it into a ring, then stitch this part along the bottom of the cap. Our hat with cat ears is almost ready. Now you need to take the elastic and sew it to the back side of the facing cuff. Fold the facing inside out and stitch it onto the hat. The seam should be 3 cm wide. On the sides of the elastic it is necessary to make fastenings on the front side.
Hello, friends!
Any mother wants her child to be dressed not only warmly, but also beautifully in cool weather. It’s easier for a mother who knows how to sew. For example, she can easily sew a hat for a child or a teenager herself.
Today we will look at a master class on sewing an unusual headdress for a child and answer the question - How to sew a baby hat with ears. They are sometimes called animal caps.

Among the many models of similar hats, there is one of a very simple cut. Sews easily and quickly.
Let's look at the cut and sewing of a hat with ears in detail. If you have any suggestions for other models, write in the comments or by email.
So, let's start sewing a children's hat with ears.
You will need:
- A piece of material approx. length. 55 cm;
- Threads matching the color;
- Chalk/soap for marking;
- Tape measure;
- Ruler;
- Pins;
- Scissors;
- Sewing machine;
- Iron;
- 30-40 minutes of free time.
What material is suitable for sewing a hat?
To prevent the hat from causing discomfort when worn, make it from stretchable material. Thin or medium-weight knitwear is perfect, for example, footer, ribana, children's knitwear, fleece, etc.

You can sew a hat from a suitable knitted T-shirt or jumper that has served its intended purpose, if the child has grown up and the item is still in good condition. You can give a second life. Just pre-wash and iron.

Note: It is advisable to make a pattern, taking into account the stretch coefficient of the selected fabric.I'll tell you how below.
Hat pattern and required measurements
The model is very simple, so any child’s hat can serve as a pattern.
If it turns out that there are no hats of the required size, take two measurements:
- Head circumference Og (1);
- Cap depth Gsh (2).
note– measurements are taken and recorded in the whole size, not in half, as often happens when taking other measurements from a figure.

What is the elongation coefficient for and how to find it
To draw a pattern taking into account the properties of the selected material and the size of the child, we determine the stretch coefficient of the fabric.
To do this, place marks on the canvas between a 10 cm section.

And stretch the material.

Record the resulting stretch value.
Let's say that from the original 10 cm the stretch was 2.5 cm = 12.5 cm.
Divide 10 by 12.5 = 0.8
0.8 – tensile coefficient for this fabric.
IMPORTANT! We stretch without fanaticism. Remember - the harder you pull the fabric, the tighter the hat will fit and squeeze the child’s head. We don't need discomfort!
Multiply the resulting measurement of head circumference by 0.8
For example, Og - 56 x 0.8 = 44.8
Helpful information:
For more information on how to determine the elongation coefficient,
Draw a pattern and cut a hat with ears
On a piece of paper, draw a rectangle, with one side equal to 1/2 the measurement of the head circumference (taking into account the coefficient), and the other side equal to the measurement of 1/2 the depth of the cap.
Then round the corners as shown.

Note: If you doubt the measurements and calculations, you can cut out the blank, try it on, make clarifications and make a cut on the main fabric.
Hat pattern first:

Refined pattern

I specially divided it into sections so that the difference could be seen. I narrowed it a little at the top, it’s more comfortable and beautiful.
Lifehack
To make the hat pattern piece even on both sides:
- First, trace the pattern in full size;
- Mark the middle of the part;
- Fold half of the pattern exactly along the line;
- Trace along the contour of the other half;
- Cut out the pattern.
We will sew a hat with ears. Therefore, we cut out additional details.
Which animal do you like best - Cat, Teddy Bear, Fox, Wolf? We select and draw the “ears” of the desired animal. You will get an unusual “animal” hat. Can be decorated with suitable applique or embroidery.
My hat has cat ears. Meow…

The result is a hat pattern:
The base of the hat is 1 piece with a fold;
“Ears” - 4 parts.
Uncover
Fold the material in two layers - the hat will be denser, warmer, and the seam will be hidden inside. Don’t forget to mark the location points for the “ear” parts.
For a cap with a lapel, step back from the fold at the bottom by the desired amount, approximately 2.5 - 3.5 cm.
Note: We will consider cutting and sewing an interesting model of a cap with a lapel in the next issues. I recommend not to miss new publications.
Looking ahead, I’ll show you a photo of the resulting hat.

If you change the design a little, it will suit even a teenager.

We outline the fold line. You can add a basting stitch.
After cutting, an oval-shaped workpiece is obtained. 
Note: For marking, I use a self-disappearing marker. Convenient tool. The drawn line disappears after a few hours. Typically, such markers or pencils are sold in “handicraft” stores or sewing equipment stores.
It lasts a long time - mine is 3 years old, it’s like new. The main thing is not to heat the markings, otherwise they will remain for a long time.
Sewing a hat
Sewing a hat is very simple:
- Checking the evenness of the cutting;
- We fold the parts of the “ears” face to face, grind along the contour, turn them inside out;
- According to the markings, we lay out the parts of the “ears”, baste or pin them;

- We chop off or baste the parts along the contour, leaving an open area for turning.
- We sew a line along the cuts using a sewing machine or overlocker (if you have one).

In this case, I use a special needle with a rounded tip (so as not to tear the fibers) and an elastic stitch for knitwear. A zigzag stitch works well, and even a straight stitch if you set them to a minimum pitch.
- After stitching the parts, carefully iron along the seam.
- Cut off excess allowances.
- Turn it inside out.

- We sew up the open area by hand using blind stitches or using a sewing machine.
- By placing one part of the part into the other, we form a cap.

The hat is ready. If there is any material left, make a scarf.
You can decorate the model with applique or paint the hat with special paints or markers.
Helpful information:
The resulting model is demonstrated by my son Ivan.
Well, okay, mom, even though it’s a child’s hat, it’s a cool color...

Helpful information:
MK video “How to sew a children’s hat with ears”
I wish you beautiful sewing projects and good luck in all your endeavors!
Elena Krasovskaya

