Beadwork as a fascinating hobby unites people of different age categories. Option joint creativity An adult and a child can use figurines of animals made of beads, made according to simple patterns. To make such a snake, you don’t even need diagrams of various beaded animals. In this master class for beginners, the snake will be green.
Figures made with your own hands and with the help of children's imagination will become exceptionally unique; a purple giraffe, a rainbow snake or a pink sheep can become an original keychain for an adult, a decoration for a girl, or another guest of a children's mini-zoo for a young animal lover.
Beaded snake pattern for beginners
To work for very beginners you will need:
- 50 cm of wire or thick thread;
- green beads;
- 2 large black beads;
- 1 red bead.
It is important that the size of the beads is a comfortable size for children's hands.
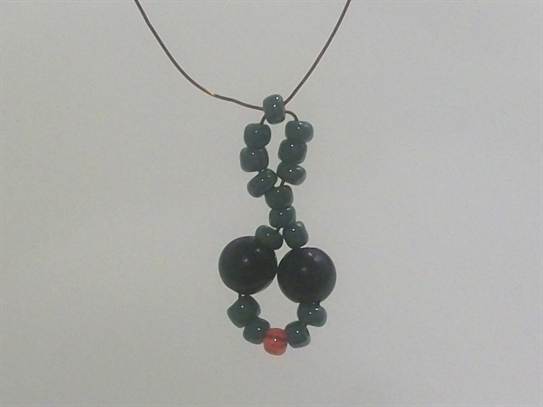
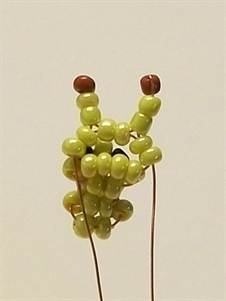
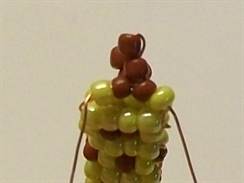
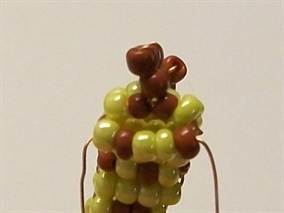
We braid the head
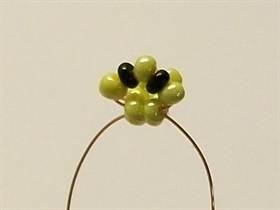
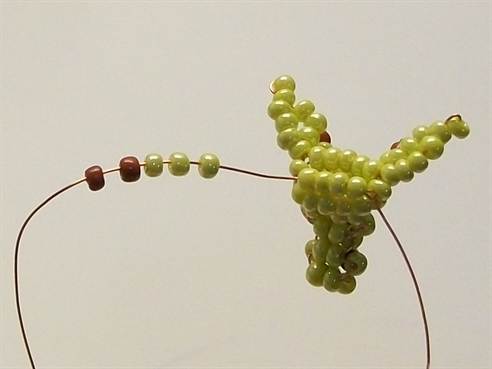
We take the wire and string the beads in the following order: green, black, two green, red, two green, black green. We move the beads to the middle of the wire.

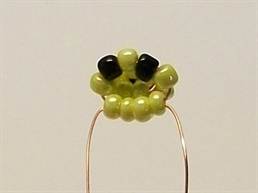
We string two green beads onto both free ends of the wire.

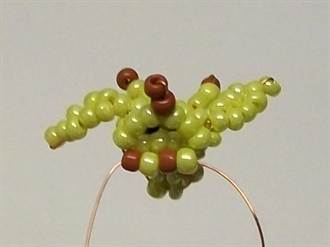
Putting everything together, we get the head of a snake.

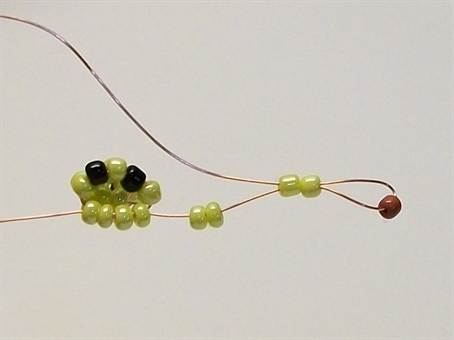
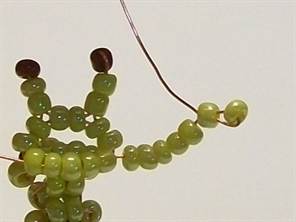
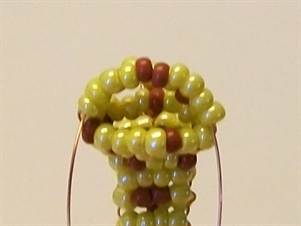
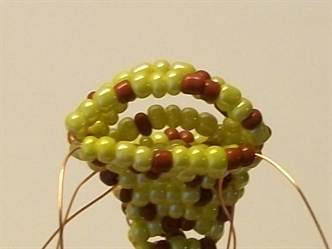
Making the torso
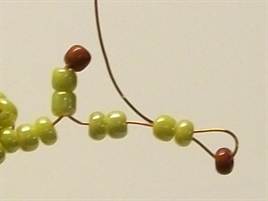
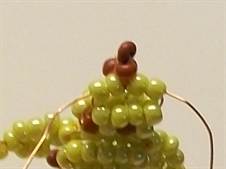
We put 3 beads on one end of the wire, and 4 beads on the other. Now we pass the wire with 3 beads in the opposite direction through the last bead in the group of 4.

Tighten the wire to make a ring.
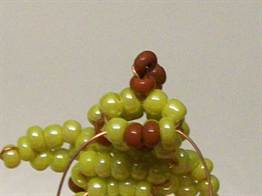
In total we will need to make five similar rings. This way we get most of the snake’s body.

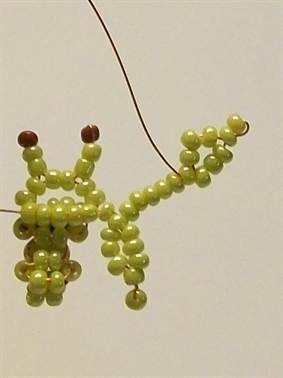
Now you need to make 4 more similar smaller rings, consisting of 5 beads each.

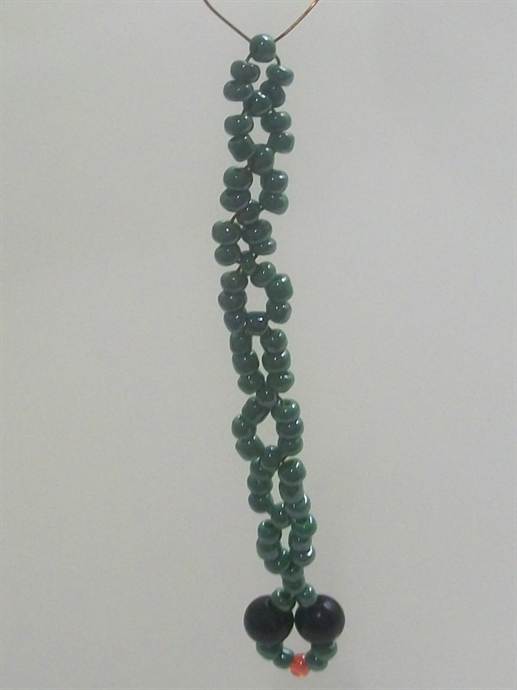
And finally we weave 4 more rings of three beads in a similar way.


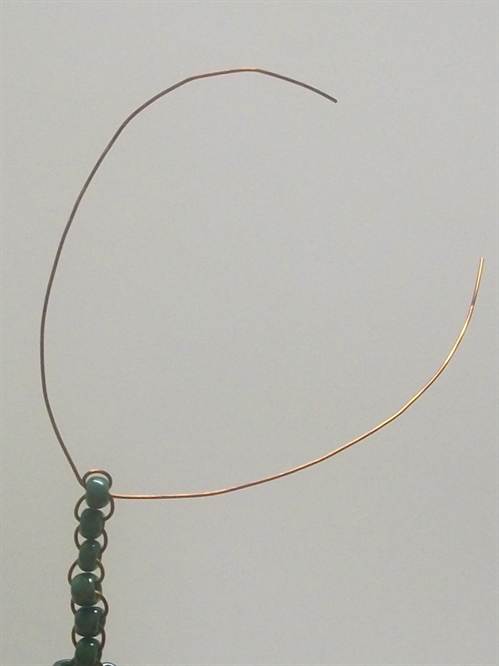
Movable tail
Let's braid the tail of our snake. To do this, string one bead onto either end of the wire and thread the second end through it in the opposite direction. And so on five times.


All that remains is to secure the wire. To do this, we pass one end of the wire through the last bead in the tail, do the same with the second end, and tighten the wire.

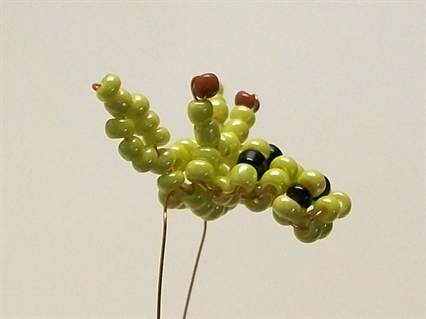
Let's do the same thing again.


To be safe, you can pass the wire in the same way through a few more tail beads.
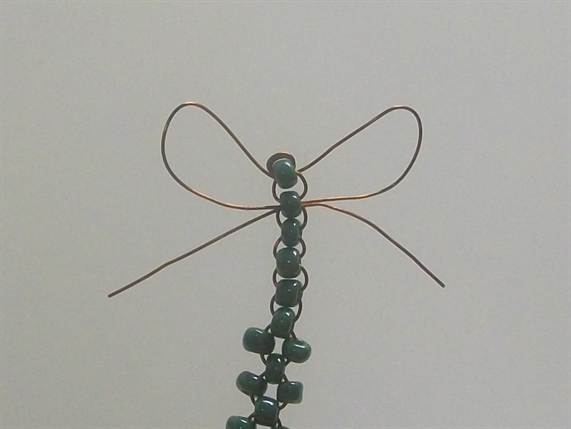

Carefully cut the ends of the wire, straighten it and give the snake the desired shape. Ready! Now you know how to make a snake from beads.
Cute sheep with diagrams and job description
From simple to complex. To make a voluminous cutie sheep, you will need to follow this diagram:

You will need to weave two such parts.
Let's prepare working materials:
- small sharp scissors;
- stuffing material (cotton wool or padding polyester);
- fishing line;
- 2 large black beads for eyes;
- 2 red beads for the nose;
- 14 beige beads for horns;
- 16 hoof beads;
- white beads for the carcass.
Let's start with the tail
We weave a chain of crosses with 13 beads according to the diagram.

On the 13th bead, we cross the ends of the fishing line and continue weaving a new row.

We continue to weave according to the pattern. Don't forget to change the color to black when it comes to the sheep's hoof and eye. Also note that bead 107 in the diagram is red.
Now you need to braid the sheep piece with a cross, starting with 97 beads. First we braid the breast, then connect the hooves, as shown in the diagram.

When braiding a sheep's head with 107 beads, you should pass the right tip of the fishing line through it and, stringing white and red beads onto the left tip, cross both ends of the fishing line in the red bead.
Braid the other half of the lamb, connecting the single chains together. Don't forget to gradually fill the toy with cotton wool.
At the end of the work, we make horns from yellow beads and weave them to the 99 and 95 beads.
You can make a keychain from such a sheep, or use it in a composition with other bead products.

We weave an African inhabitant from beads
Finally, let's look at how to make a giraffe. We will weave according to this pattern:
To weave a giraffe from beads we will need:
- yellow beads;
- brown beads;
- 28 black beads;
- wire 0.2 mm in diameter - 150 cm and 3 pieces of 40 cm each;
- 70 cm fishing line.
1 row
To make the giraffe voluminous, we will weave it in two tiers.
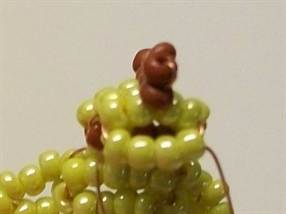
Let's start with the head. We collect 2 yellow beads on the main wire and place them in the middle of the wire.

Now we string 2 yellow beads onto one end of the wire, and pass the other end of the wire through them in the opposite direction.

We tighten the wire.

2nd row
We collect beads in the following order: 1 yellow, 1 black, 1 yellow, 1 black, 1 yellow.

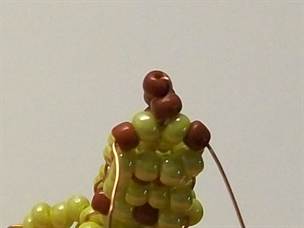
We wrap the wire on top of the previous row. From the side it looks like this:

And this from the back:

In the lower tier there are 2 yellow beads.
3rd row
Upper tier - 3 yellow beads; lower tier - 2 yellow beads.

4 row
Upper tier - 1 yellow, 1 black, 1 yellow, 1 black, 1 yellow; lower tier - 4 yellow beads
5 row
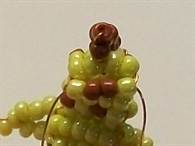
Upper tier - 4 yellow, 1 brown.

Holding the brown bead, pass the same end of the wire through the 2 closest yellow beads.
We tighten the wire.

On the same end of the wire we collect 4 more yellow and 1 brown beads, and pass it through the 2 closest yellow beads in the opposite direction.
We tighten the wire.

We collect 2 yellow beads on the same end.

We pass the other end in the opposite direction through 6 yellow beads and tighten the wire.
Bottom tier - 5 yellow beads.

Side view:

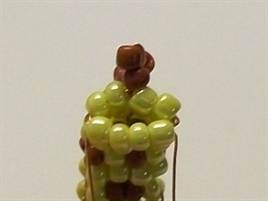
6 row
Upper tier - we collect 7 yellow beads on the wire, after which, holding the last bead, we pass the same end of the wire through the bead closest to it in the opposite direction.

We tighten the wire and get the tip of the giraffe's ear.
We collect 3 more yellow beads on the same end of the wire, and then pass the same end of the wire through the 6th bead from the tip of the ear in the opposite direction.

We tighten the wire - we get an ear.

We collect 11 yellow beads onto the same end of the wire, after which, holding the last bead, we pass the same end of the wire through the bead closest to it in the opposite direction.

We tighten the wire - we get the tip of the second ear of the giraffe.

We string 3 more yellow beads onto the same end of the wire, and then pass the same end of the wire through the 6th bead from the tip of the ear in the opposite direction.

We tighten the wire - the second ear is ready.
We collect 1 more yellow bead on the same end of the wire, after which we pass the other end of the main wire in the opposite direction through 7 yellow beads.

We tighten the wire.


Side view:
7 row
Upper tier: string 3 yellow beads onto the wire, then 2 brown beads.
We hold the last brown bead and pass the same end of the wire through the penultimate brown bead in the opposite direction.

We tighten the wire.

We collect 3 more yellow beads on the same end of the wire.

Then we pass the other end of the main wire in the opposite direction through 6 yellow beads. We got the beginning of a giraffe's mane.

Bottom tier - 1 brown, 1 yellow, 1 brown, 1 yellow beads.
8 row
The top tier is woven in the same way as the top tier of the 7th row, with a decrease in the number of yellow beads.
First we string 2 yellow beads, then 2 brown beads; holding the last brown bead, we pass the same end of the wire through the penultimate brown bead in the opposite direction, collect 2 more yellow beads, after which we pass the other end of the main wire in the opposite direction through 4 yellow beads.

Bottom tier - 4 yellow beads.

9 row
We weave the top tier in exactly the same way as the tier of the 8th row.
Bottom tier - 1 yellow, 2 brown, 1 yellow.
10 row
We weave the top tier in the same way as the tier of rows 8 and 9. Bottom tier - 4 yellow beads.
11 row
We weave the upper tier like the previous one, changing the color of the beads: first we collect 1 brown, 1 yellow and 2 brown beads; holding the last brown bead, we pass the same end of the wire through the penultimate brown bead in the opposite direction, pick up 1 more yellow and 1 brown bead, after which we pass the other end of the main wire in the opposite direction through 4 beads (without touching the mane).
Bottom tier - 1 brown, 1 yellow, 1 brown, 1 yellow.

12 row
Both tiers are woven exactly the same as tiers 8 and 10 rows.

13 row
We weave both tiers by analogy with the 9th row.
14 row
Both tiers correspond to tiers 8, 10 and 12 rows.
15 row
It is woven similarly to several previous ones, but the colors change.
Upper tier: 1 yellow, 3 brown beads; holding the last brown bead, we pass the same end of the wire through the penultimate brown bead in the opposite direction, pick up 1 more brown and 1 yellow bead, after which we pass the other end of the main wire in the opposite direction through 4 beads (excluding the mane).
Lower tier: 1 yellow, 1 brown, 2 yellow, 1 brown.
16 row
The top tier is identical to the top tier of the 7th row. Bottom tier: 2 yellow, 2 brown, 2 yellow.

The weaving of the head and neck is completed. View at the current stage:

17 row
Top tier: 1 brown, 3 yellow, 1 brown, 3 yellow. Lower tier: 1 yellow, 1 brown, 4 yellow, 1 brown.

18 row
Top tier: 2 yellow, 1 brown, 3 yellow, 1 brown, 2 yellow. Lower tier: 1 brown, 4 yellow, 1 brown, 2 yellow.

Row 19
Top tier: 4 yellow, 2 brown, 4 yellow.
Lower tier: 1 brown, 4 yellow, 1 brown, 1 yellow, 1 brown, 1 yellow. Next, take an additional piece of wire and pass it through 7 medium beads (leaving 1 bead on both sides). In the future, this wire will be used to weave the front legs of the giraffe.

We tighten the wire.

20 row
Top tier: 3 yellow, 1 brown, 6 yellow, 1 brown. Lower tier: 7 yellow, 1 brown, 2 yellow.

21 row
Top tier: 1 brown, 6 yellow, 1 brown, 3 yellow, 1 brown, 2 yellow.

Lower tier: 1 yellow, 1 brown, 4 yellow, 1 brown, 3 yellow, 1 brown. Take an additional piece of wire and pass it through 7 medium beads (leaving 2 beads on both sides). This wire is needed to weave the front legs of a giraffe.

We tighten the wire.

22 row
Top tier: 2 yellow, 1 brown, 5 yellow, 1 brown, 4 yellow, 1 brown. Lower tier: 1 yellow, 1 brown, 1 yellow, 2 brown, 6 yellow.

23 row
Top tier: 3 yellow, 1 brown, 3 yellow, 2 brown, 2 yellow, 1 brown, 1 yellow. Lower tier: 4 yellow, 1 brown, 3 yellow, 2 brown.
24 row
Top tier: 6 yellow, 1 brown, 5 yellow.

Lower tier: 1 brown, 9 yellow. We take the last additional piece of wire and pass it through 8 medium beads (there remains 1 bead on both sides). This wire will go to the giraffe's hind legs.
Animals made of beads: DIY weaving lessons and patterns (video)Animals made of beads: DIY weaving lessons and patterns (video)
Small, beautiful animals made of beads - original crafts, which are perfect both as small gift, and can be a good decor for a room, mobile phone or keys. Such products do not require a lot of financial expenditure, time and skill. For beginner needlewomen, this is a great way to have fun. If you have never done this type of beadwork, it is better to immediately watch a video of such work. 


Selecting materials for beading
What do you need to weave animals?
Almost all beaded animals are made from the same materials.
To make them you need:
- small beads;
- large beads;
- special thread, wire or fishing line;
- scissors;
- accessories;
- scheme.
Regarding the last point, if you have never dealt with such work, then for the first time it is better to choose something simpler. For beginning craftsmen, the simplest crafts that do not require a wide variety of materials are suitable. To learn how to use diagrams, just follow the picture and detailed description work process.
How to choose beads for weaving animals? There are mainly two types of similar materials sold in the markets - Chinese and Czech beads. The first few are cheaper. But if you want your beaded animals to turn out beautiful, it’s better to go with the second option. Unlike Chinese, Czech has the same size and color of beads. And this guarantees good beading density and a successful combination of shades.
How to choose a thread for weaving animals? Right choice such material contributes to the creation beautiful crafts. In this case, it is better to choose fishing line. Its advantage is that such a thread is very strong and practically invisible in the product. Animals made from beads on fishing line turn out to be especially beautiful.
But for beginners it may seem like a rather difficult tool. In order to learn how to weave a fishing line, you need some skills. Therefore, for the first time it is better to choose a special thread or wire. It's easy to work with her. For beaded animals, the main thing is that it is very strong.
Octopus made of beads
To create an animal you will need:
- beads of a suitable color;
- yellow beads;
- wire;
- scissors.
Manufacturing process:

For the craft, cut a wire about 50 centimeters long. We collect 7 beads of the main color and move them to the center;

Next, we continue to weave in a parallel way. We attach the neck and body using this method. We make nine more rows of these;
Octopus is ready!
Beaded parrot
These beaded birds look bright and unusual. The work is not very difficult, the main thing is to understand the most complex processes. 
To make this wonderful bird you will need:
- wire;
- blue beads;
- red beads;
- green beads;
- yellow beads;
- black beads;
- purple beads;
- scissors.
Manufacturing process:

The parrot's head weaves quite easily. The main thing is that the first two rows are flat. Black lines should be made after each tier;

Thus, it is necessary to weave until the yellow row appears.
Beaded lion
We offer you an interesting master class on making a lion from beads. These beaded animals are small in size, but voluminous and beautiful. 
For production you will need:
- wire or fishing line;
- yellow shiny beads;
- orange shiny beads;
- several black beads;
- one pink bead;
- fabric or paper as filler.
Manufacturing process:
To weave a lion, use the most common parallel weaving. It gives the product a special volume. The mane will be made using the needle method. Such beaded animals require quite a lot of skill. Especially in volumetric weaving. Therefore, such crafts are not entirely suitable for beginner needlewomen.

We put 1 orange and five gold on the wire. Be very careful with colors. If you get it wrong, the product won’t work out a bit;


Beaded deer

To work you will need:
- black beads;
- brown shiny beads;
- yellow shiny beads;
- gray shiny beads;
- black beads;
- scissors;
- wire.
Manufacturing process:

We begin making crafts by weaving horns. We string beads onto the middle of a metal thread, as the diagram shows. We continue to work according to the drawing;

At the next stage of beading, we begin making the body. To weave this workpiece, you need to cut a piece of wire about two meters long and thread it through the lower tier of beads on the head;
This article presents beaded animals of small sizes. If you want to make the same animals, but bigger size You can use larger beads, or even replace them with beads. But you need to know that appearance crafts will also change from this. When you want to make only some part of the animal longer, for example, the tail of a bird, you can simply add another row of beads in the calculations of the pattern. Volumetric animals made of beads are very interesting crafts. They can be not only a beautiful hobby, but also an excellent gift. to a loved one.
Cute flat figures that are very easy to weave with your own hands. Funny beaded toys will delight any child and not only!
All the necessary colors of beads for weaving each figure are indicated next to the diagram.
Lapwing
For lapwing you will need a wire 1.2 m long. On the top of the head, after eight rows, make two tufts on a separate wire and pull it down through the third row from the end (it is marked in green in the diagram). Next, string rows of the body. After the row marked with an arrow in the diagram, make both legs on one wire.
Red-nosed Pochard
For the red-nosed duck, you need a wire 1.2 m long. Through three rows of head beads, marked in green in the diagram, stretch another wire and string the rows of the body. After the row with the arrow, make both paws with additional wire. In the row marked on the diagram with an arrow on the side of the back, string three beads for the tip of the wing sticking up.
Weaving patterns for each figure:

White goose
When making a white goose on a 1.5 m long wire, stretch additional wire for the neck through the third row of head beads from the end (see diagram of the white goose) and make the neck. Pull another wire, marked in green on the diagram, from the bottom up through five rows of the neck, then complete the torso. After the rows with the arrow pointing down, do one leg at a time on separate wires; after the row with the arrow pointing up, do the protruding tip of the wings

frogs
Assemble the figures of both frogs according to the diagrams, starting from the tip of the nose. For each you will need a wire 0.8 m long.
Red-tailed skink
For a skink figurine, you will need a wire 1.2 m long. Attach additional wires for the paws after the rows marked with arrows in the diagrams.
Spider
A small beaded spider, a great souvenir or accessory for your phone or keys.

To weave such a miracle you will need:
- yellow bugles or golden
- brown beads
— 2 black beads for eyes
- wire
Spider weaving pattern:

Ant

To weave an ant you will need:
- red beads
- red glass beads
- brown beads for paws
- 2 black or blue beads for eyes
- wire
Skunk

Necessary material for skunk:
- black beads
- white beads
— 2 blue beads for eyes
- wire
Frog

Required beads and material for the frog:
- blue beads
- black beads
— black bugles
- 2 large blue beads for eyes
- wire
The color of the beads can be changed according to your wishes!
Perhaps, everyone who begins to study bead weaving first of all gets acquainted with the simplest patterns, and these are, as a rule, a variety of miniature animal figures. Despite their simplicity and small size, they help to work out such simple techniques weaving, such as parallel, mosaic and "brick stitch". And such figures can also become a good souvenir for friends and acquaintances.
How to weave animals from beads correctly
How to weave keychains in the shape of animals from beads
We offer you simple patterns for weaving keychains in the shape of animal heads. All figures are woven using mosaic and parallel weaving techniques. Don't forget to attach a small metal ring for fastening.

How to weave a dolphin from beads
This flat figurine of a dolphin is woven from blue and white beads in a parallel way. It can be used as a keychain or a small souvenir.

How to weave a spider from beads
This spider has a more complex pattern, and to make it you will need round and tubular beads of several shades. Weaving the body is performed using a parallel technique.

How to weave a lizard from beads
The photo shows a simple pattern of weaving a lizard in three different colors. To work, you will need multi-colored beads and wire, and perform weaving in a parallel way.

How to weave a mouse from beads
The photo shows a detailed diagram of weaving a mouse in two versions. One mouse has a single color, and the other, larger one, is made in two colors. Both mice are made using a mosaic weaving method.

How to weave a dog with a beaded bone
This funny dog is made of parallel weaving, but with a three-dimensional shape. The photo shows a detailed diagram with explanations of the work. Please note that such a dog is woven from two parts and then connected. Also prepare in advance beads of different sizes and colors according to the diagram.

How to weave an owl from beads
This voluminous beaded owl will be an excellent gift for the holiday of Knowledge and Teacher's Day. A detailed diagram will tell you how to weave this wonderful souvenir. To work you will need beads of white, yellow, brown and black colors, as well as wire. Weaving is done in a mosaic manner, and each piece must be made separately and then combined into one figure.

How to make a beaded brooch in the shape of a dog
Using carbon paper, transfer a sketch of a dog, such as a dachshund, onto the adhesive non-woven fabric folded in four, as in the photo. Embroider it with beads, trim off the excess interlining, and back side attach a pin. Please note that for a more aesthetic appearance of the brooch in the photo, an outline of transparent beads was made.

How to embroider a picture with animals from beads
We suggest you print out a color pattern with parrots and embroider this pattern with beads on fine calico. To make the picture look richer, sew up the background with one color that is not found in the proposed pattern. By placing such a picture in a frame, you will receive an excellent interior element or a gift for a friend.

Video with master class lessons on weaving animals from beads
In this block you will find large selection video tutorials for those who are just learning to work with beads, which will help you master weaving and bead embroidery of various animals.
- In this video you will receive valuable tips on bead embroidery of animals using the circular technique as an example.
- In this video you will learn a bead weaving pattern volumetric toy“Dolphin”, the weaving basics of which you can apply when making other animals.
- A video tutorial for beginners on how to make animal figures from beads using simple patterns, using the example of weaving a crocodile.
- Video tutorial with step-by-step animal beadwork using the example of a lion.
- Video with a lesson on how to make three-dimensional animals from beads, using the example of a dragon weaving pattern.
- Video with a master class lesson that will teach you how to make animals from beads on wire with your own hands, using the example of weaving a miniature elephant.
- In this video you will learn a simple technique for parallel weaving animals with beads using the dog pattern as an example.
- In this video you will learn how to weave beaded animals using the brick stitch technique using the owl pattern.
- This video contains a lesson on bead embroidery of an animal using a black and white pattern.
- Video with a selection of photos that demonstrate ideas for creating volumetric.
For those who want to continue their beadwork training, we offer several more interesting master classes.
The proposed master classes are so simple and accessible that we are confident in your success and look forward to interesting feedback in the comments. Tell us what beaded animal figures you have already mastered and how difficult it was to master the circular technique of embroidering animals using ready-made patterns.
In our article we will tell you about one of the most wonderful types of hobbies - making animals from beads. It is perfect for those people who like to do slow and painstaking work. Crafts and animal figurines can be used as gifts for family and friends, or made for yourself and decorated with them at home.
The most important thing is preparation
The hobby itself is quite complex; there are many ways to weave animals and various figures. If you have never done bead weaving, then do not be afraid - we will start with one of the simplest weaving patterns. In our article we will talk about how you can make animals from beads. We'll start with a snake, and if you like it, we'll move on to more complex patterns using a turtle as an example.
How to make a snake from beads?
To get started, you will need:
- 1. A scattering of small beads of the same color (preferably green) - this will be the main color of our snake.
- 2. Two large black beads - they will be the eyes of the animal.
- 3. One small red bead - it will be the tongue of the snake.
- 4. Thin wire - this is what we will string all the beads on.
Once you have prepared all the components, you can proceed to familiarize yourself with the diagram:
- 1. Take and straighten the wire and start stringing several beads. You need to string them in the following sequence: one small (for example, green), one large black, two green, one red, again two green, black and again green. This way we were able to make the head of our snake.
- 2. In order to separate this part from the rest of the body, you will need to fold the wire together and string two small beads on them. You should end up with a rounded snake head.
- 3. So, we separated this part from the entire body. Now you can move on to creating the rest of the body. To begin, we will create several large segments, each of which will require 7 small beads. You need to separate two wires and string three balls onto each of them, then stretch them crosswise through the seventh, which must be placed perpendicular to the others. This will give you your first segment.
- 4. Repeat the procedure from the third point four more times. You should have five “rings”.
- 5. Once you get five pieces, you will have to reduce the segments a little. Now, to create each one, you need not seven, but five balls, and you will need to put two, not three, on the wire. You will need to create four of these small segments. Having finished with this, you can safely move on to the final stage of creating the animal - the tail.
- 6. Our snake will not be endless - it’s time to finish it. To begin with, you need to reduce the small segments and use only three beads to create them, you should make five such segments. After this, you should completely reduce the components to one bead and simply connect with wire (pulling its ends through the holes crosswise relative to each other) to create a long chain. You need to tie a beautiful bow at the end - the snake is ready.


You may notice that the snake did not turn out very beautiful - there is no need to worry about this, because we used the most simple diagram for beginners. If you liked the process itself or, perhaps, you easily wove a figurine, then below we will present another diagram according to which you can make one of the animals - a turtle.
How to make a turtle from beads?
If you've always wanted a fun decoration for your dress or can't find a gift for a special occasion for a loved one, a beaded turtle is perfect for this. The only thing that can stop you is that for this you need to know the brick weaving method - without it you will not be able to weave such a turtle.
First, you should prepare. You will need:
- 1. One large bead, which we will use as the base for the figurine.
- 2. Beads of two colors.
- 3. Two small black beads that we will use as eyes for the turtle.
- 4. Thin and strong white threads, thin wire or fishing line.
Once you have stocked up on everything you need, it’s time to move on to the fake itself:
- 1. First, you need to take a large bead and wrap a thread (or fishing line) around it several times.
- 2. Once you have done this, then begin to weave beads onto the bead using the brick weaving method. You need to make four rows of beads, one in each, making sure that the resulting pattern bends like a real shell.
- 3. Having finished making the shell, you can safely move on to the rest of the turtle. To do this, you need to take new threads (or fishing line) and beads of a different color. Let's start with the head.
- 4. We used beads for this white, though you can take any other one. The head will consist of three rows: 1) The first (closer to the shell) will include three white beads. 2) In the second row we will make eyes for the turtle, and therefore it will consist of two black beads and one white. 3) In the third row there will be only two white beads. If you do everything correctly, you will get the head of a turtle.
- 5. Now it's time to move on to the rest of the turtle body. In order to make a ponytail you will need only one bead, and the paws will consist of two rows. In the first row (closer to the shell) you should have two beads, and in the second - only one. When you make the paws. Try to make them symmetrical; to do this, you can try them on “by eye” or simply count out the beads.


If you want, you can use a third color other than white for the paws. A pattern on a turtle shell will look great - for this you can use beads of expressive colors. To tie the beads together, we mainly used thread or thin wire, however, as an alternative, you can use fishing line, which is much stronger than thread, but thinner and easier to handle than wire.
As you can see, with the help of beads and imagination you can make a figurine of any animal. If you begin to engage in such a hobby, then over time you will be able to discover how far you have come in learning bead weaving - in the future you will be able to easily weave complex figures and use complex types of patterns and weaving for this. You can find many diagrams for different figures on the Internet.


