You'll love how easy it is to do DIY Santa Claus craft, because such creativity is aimed at the development of children of preschool and primary school age. Figures of Grandfather Frost and the Snow Maiden will take pride of place under the main festive decorated tree, but you can also make small, light figures, which you can then hang on a spruce or pine branch. In our collection we have easy master classes that allow you to create a craft based on a plastic bottle, using a glove or sock, but there are also complex ones original options, combining several complex techniques: knitting, felting, painstaking work on creating faces from nylon tights and padding polyester.
Crafts Santa Claus and Snow Maiden
Wonderful crafts Santa Claus and Snow Maiden you can get from a simple winter glove. You won’t place such a figurine under a holiday tree, but you can hang it on it as a Christmas decorations. The figurine turns out to be almost weightless, and in the process of making it you will not need any special skills or ability to work with complex tools.
To execute crafts for New Year Father Frost, you can use a red or of blue color, for the Snow Maiden - blue or white. In addition to the glove, which will be the main material for this craft and will serve as the basis for it, we will need additional materials: we will make the head using a shoe cover container, and you can also use a plastic egg from a Kinder Surprise. We will need nylon and padding polyester, some white yarn, braid with a folk pattern (red or blue embroidery), wire, thin hair bands or rubber bands. To complete this you will need a modest set of tools: scissors, a sewing needle and thread to match the glove, Moment glue.

The container for shoe covers is soft and transparent, so it needs to be sealed; for this we will use a piece of padding polyester wrapped in nylon. The workpiece must be placed in a container. In the case of an orange Kinder egg, more preparatory steps will be needed, since it must first be painted in several layers or covered with napkins so that the color of the future face becomes natural.

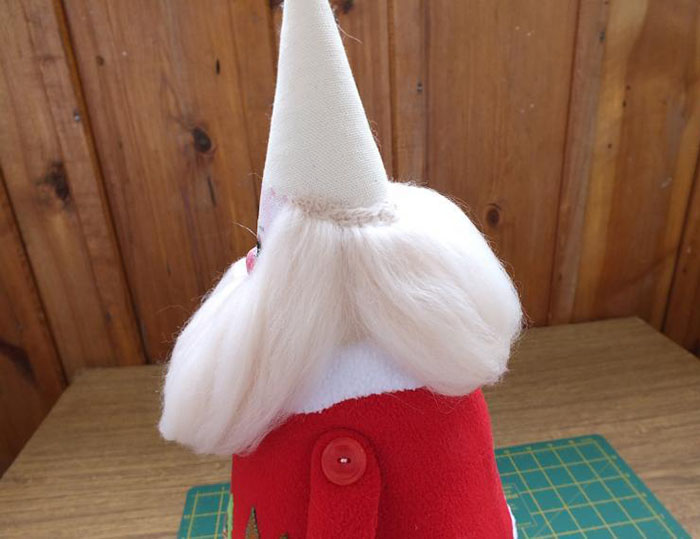
To make the hair and beard we will use white yarn. It is necessary to make two bundles from pieces of yarn, one must be tied tightly in the middle, this will be a beard, the other - loosely, from which we will make hair. The mustache will also be made, for which you will need a couple of pieces of yarn. Hair and beard can be fixed with glue, or they can be sewn on using thin beading wire. The wire must be threaded through a needle and pierced through the container, fixing the yarn. The bundle should fit snugly; if necessary, you can trim the yarn. The hair on the head must be smoothed and glued so that it covers the surface of the container on both sides of the center.
New Year's craft Father Frost You can’t do without using paper, for example, eyes can be made from colored paper, and you can also use beads or sequins for the eyes. Draw the mouth with a felt-tip pen and varnish it.

Crafts for New Year Santa Claus
When we have the head ready, we can start making the body: we will cut off the little finger, thumb and index fingers from the glove. Part thumb We will also need it: we will make a hat out of it, it should be voluminous, so it should be filled with padding polyester. The finished cap should be put on your head, and its lower cut should be covered with a white fluffy hair elastic, if necessary, fix it with glue.
A small piece of padding polyester wrapped in nylon can be attached to the center of the head, this will be the nose. On the bottom of the nose you need to make one stitch that will form the nostrils. Although the nose can also be made from a large bead or seed bead.

Carrying out children's crafts Santa Claus, the child may need the help of adults who will take on some of the difficult aspects of creating the figures. At this stage, the glove should be stitched from the wrong side, then turned to the front side.
Now you can decorate it with a ribbon, sew a ribbon in the middle that will define the sides of the robe. Make a belt from white braid and tie it.
The two protruding fingers of the glove should be bent down; for this we need a wire that is flexible but thick enough. It is necessary to measure the length of the wire, taking into account the length of both handles and leave a margin; bend its ends so that they do not pierce the material.

Now the wire frame needs to be inserted into the sleeves. You still have the wire that you used to fix the hair on your head, these ends need to be tied to the wire frame. Try to make the structure strong; you can secure it in some places with masking tape.
When the head is ready, you need to tint your nose and cheeks with blush, because our old man has just come into the room from the cold.

DIY Santa Claus craft
The main decoration of the craft is, it consists of a red (sometimes blue) caftan, belted with a white belt, a matching color hat, warm woolen felt boots and knitted mittens.
We will make the body for our figure from a wire frame, wrap it with padding polyester, and then put cardboard on top and sew up the holes. Since only the hands will peek out from under the fur coat, and even then they will be in mittens, the body can be made from a plastic bottle, attaching wire arms and feet to it, so that they are voluminous, they should be wrapped in padding polyester.
We can sew fur coats or caftans from fleece, and decorate the bottom and side panels with faux fur. If you don't find strips in the store faux fur, you can resort to a trick and knit them using “Grass” yarn white. The neckline and cuffs should also be covered with a fur strip. Fleece can be used to sew a red New Year's hat.

Special attention should be paid to the mittens, because they are knitted with thin red threads, and we felt the felt boots from gray or brown wool.
Find out how to sew Santa Claus, make Santa Claus. See how to make a New Year's card by checking out two master classes.
How to sew Santa Claus?
One of the gifts could be a figurine of Santa Claus, which is put on champagne. When you master this simple technique creating a New Year's character, you can sew a Snow Maiden and a snowman.

To make Santa Claus, use:
- artificial fur;
- fleece in three colors - white, flesh, blue;
- foam ball with a diameter of 6 cm;
- holofiber;
- blue crepe satin;
- sequins;
- bias tape;
- for the eyes - a plastic hemisphere;
- scissors;
- textile glue.

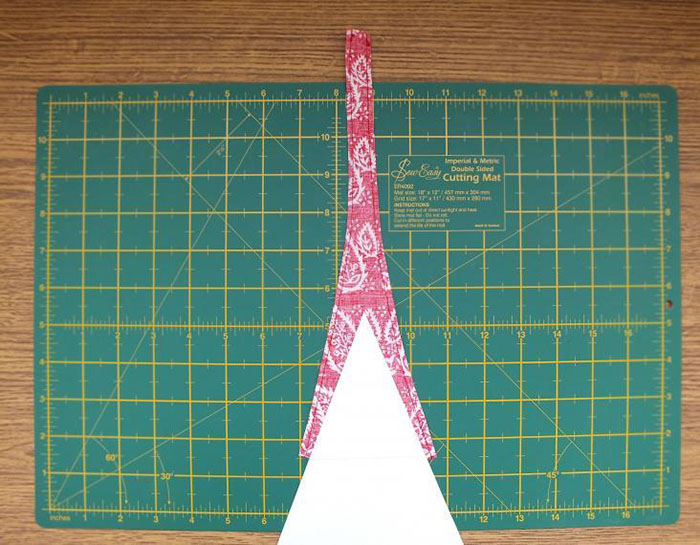
For Santa Claus' fur coat, you will need to cut out two triangular blanks, rounded at the top, with small cutouts for the head in the upper part. Finish large side cuts with bias tape.

From the same fabric, cut out 2 pieces for each arm and sew them together. Sweep the back and front of the fur coat together.

Place the ball on the fleece square and lift up the edges of the fabric. Wrap them over the ball with thread to form a neck, cut off the excess. Make a nose from a small piece of the same fabric, stuffing it with holofiber or cotton wool. Sew these parts in place, as well as the hemispheres for the eyes. You can replace them with buttons.

Place the head in place and sew it on.

Measure the volume of your head, cut out a rectangle using this size, the side of which is equal to this figure. Sew it on the side, gather it on top with a thread and a needle, and tighten it.

Cut out the edge for the hat from the fur and sew it to it.

Stuff your hands with holofiber, helping yourself push it through with a pencil or wooden skewer. Sew fur strips to the bottom of the sleeves.

Sew your hands to Santa Claus' fur coat.

Cut out several rectangles from white fleece - their difference in length is 1.5 cm. Cut the blanks into strips 5 mm wide, leaving a little solid fabric on top.
The fleece must be cut so that the strips run transversely. Then they will stretch along the long side of the rectangle.
We start sewing on the beard from the longest piece. Baste increasingly shorter ones on top.

Now you need to carefully pull each strip so that they acquire a twisted shape. Then the beard will turn out curly.

Attach sequins in the shape of snowflakes to the fur coat. Wrap silver braid around a stick to make a staff.
Here's how to sew Santa Claus to make him look so cute. If you don't have blue felt, use red.
Then you can make such a nice snowman.

Here's how to sew Santa Claus using another idea.

Prepare for the master class by taking:
- fleece in red and white colors;
- cotton fabric;
- holofiber or synthetic winterizer;
- felt;
- foam;
- buttons;
- beads;
- beige cotton;
- wool;
- felting needle;
- thick and thin wire;
- floss threads;
- cardboard;
- pliers;
- stationery knife;
- acrylic paints;
- glue gun;
- brush.
Based on this template, cut out a triangular and round blank from cardboard. Attach the round one to the foam rubber, cut out a part of the same shape from it. You also need an element made of fabric, we also make it round, but slightly bigger size so that the folded edges meet the cardboard.
Folding the edges of the fabric, you need to sew along the contour with a basting stitch, pull the workpiece onto a circle of cardboard. Pierce this part with one and the other tip of a thick wire, thread them here, twist them to form the character’s feet. Screw a thinner wire onto the top of the metal wire bracket.

Sew a belt from the same fabric, cut it in half, put it over the feet of Santa Claus.

Now, having attached the cardboard template to the beige fabric, cut out a triangle from it, sweep the sides of this figure to make a cone. Place it on a piece of fabric and cardboard, stuffing the inside with filler. In this case, a small wire needs to be pulled through the upper hole made in the cone. Stitch this Santa Claus coat with a cardboard bottom.

We cut out our character’s feet from cardboard and attach them to the wire loops with a glue gun. We cut out a shape for the boots from foam rubber, and also glue them to the bottom of the legs.

The feet need to be covered with fleece, cut in the shape of an oval. Pull this workpiece from below with a thread and a needle. Cut a piece of felt to the size of the sole and glue it.

Mark where the face and cap will be using a simple pencil. Draw the eyes, mouth, and eyebrows of Santa Claus with acrylic paints. Felt the nose from pieces of wool and sew it onto the face.

From red felt, cut out a cloth of such size that you can sew it to the body of Santa Claus in the form of a fur coat. Cover the hands and gloves of our hero, put filler in these blanks.

We decorate the hem of the fur coat with pieces of felt of different colors. Sew them on to make houses, mushrooms, and Christmas trees. Stitch the handles into place.

Make boot cuffs and sleeve cuffs from white felt. These parts should be wavy on one side. Sew them to the designated places, just like a collar on a fur coat.
To sew lapels and a white felt collar, place the edges of each of these blanks with the right side to the surface to be sewn. After stitching, turn the flap over so that the seam is on the inside.

Decorate the edge of the fur coat with a piece of felt of the same white color. To further sew Santa Claus, you need to make him a beard from felting wool with your own hands. To do this, cut a piece 10 centimeters long from it, glue it just above the beard line, for a mustache, separate a strand from the wool and sew it on as a mustache. Use scissors to give these elements the desired shape.

Cut a triangle from the fabric with an elongated sharp upper corner. Sew its sides to make a cap. Sew a wavy felt strip to it on one side, this will be the frill of the headdress. Attach a white pompom to the tip of the hat.

All that remains is to make small pompoms from green fabric, sew them to the winter wizard’s boots, cut out a Christmas tree from felt, decorate it with buttons, and sew on the side of the hat.

Here's how to sew Santa Claus, make it for him with your own hands luxuriant beard and a mustache, beautiful clothes.
New Year's Santa Clauses made from improvised materials
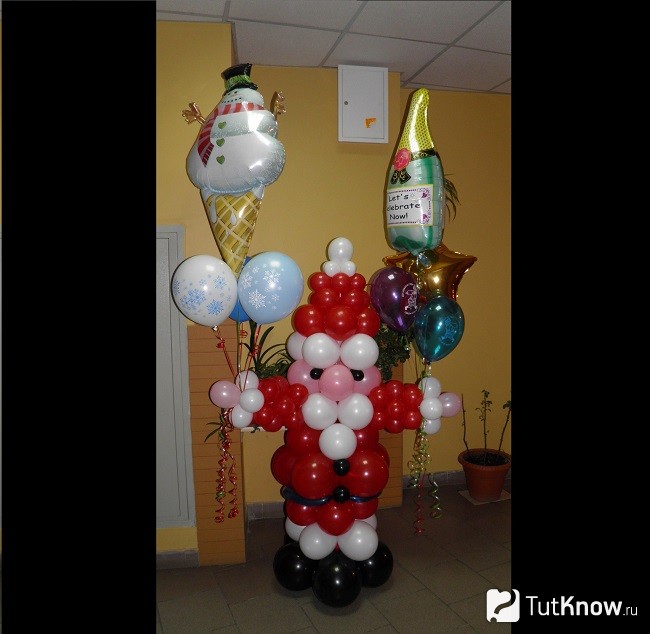
If someone wants to create the image of this foreign brother of our Santa Claus, they can use the most unusual objects, for example, plastic bottle or Balloons. This can be placed at the entrance to an office, store, institution to create for everyone festive mood. And at home, this New Year’s wizard will come in handy.

For work, prepare:
- long balls, as well as round ones of different sizes - pink, red, black;
- beads;
- threads;
- water;
- glasses;
- glue;
- rope;
- ball pump.

First, using a pump, you need to inflate 4 black balls of the same size. We tie each of them after filling with air with a thread. All four balls are then tied together using a string.
To prevent Santa from being blown away by a gust of wind, fill a red balloon with a small amount of water and tie it to the center of a structure of 4 black balloons.
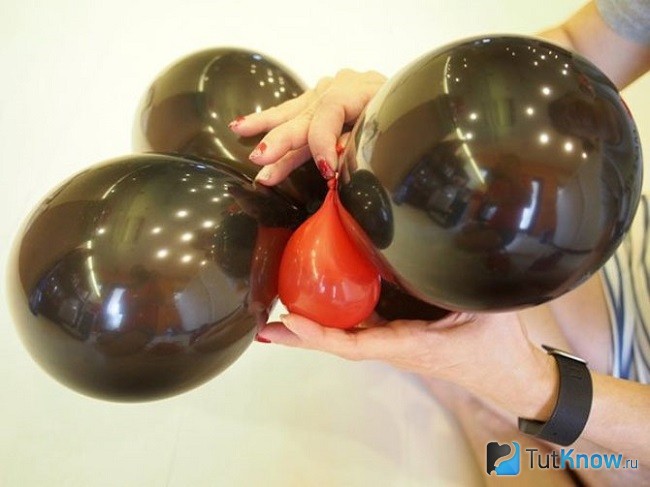
Take another red ball, put a bead in it, and secure it with an elastic rope.

Now inflate it, tie it with a thread, it needs to be fixed in the center of a blank of 4 black balls. In this case, the tail of this red one will be at the bottom.

We make the head of Santa Claus from a pink balloon, which needs to be inflated and tied under a red bead. Using a pump, inflate one pink and one black balloon with air. The dark one will become a belt, this part needs to be glued to the stomach of Santa Claus, as well as the buckle, which will become a twisted pink ball. You can make the edge of the fur coat and the clasp from two long white balls.

Inflate a long white balloon and tie it around the winter wizard's neck to create a scarf. The hands will be two long red balls, and the cuffs will be two white ones.
Make your hair from the same materials, or use sheet synthetic padding, cutting it and gluing it to your face. You can make these parts, the Santa Claus cap, at your own discretion.

If you want, for the New Year, Christmas, Santa Claus will be made from many balls. They also need to be fastened together using rope and glue.
If a child remembers before going to bed what needs to be brought to school or kindergarten Father Frost or Santa Claus, don't despair. You will make a winter wizard figurine in just 20 minutes.
The main thing is to take:
- transparent plastic bottle;
- scissors;
- cotton wool;
- colored paper;
- black plasticine;
- Super glue;
- plastic packaging for pills;
- red napkin.

Place a red napkin in a clean transparent bottle.

Use scissors to cut out plastic dispensers from a pack of pills that will become eyes. Place a small piece of black plasticine into them so that the pupils appear. Glue these blanks to the top of the plastic bottle.

Roll up a piece of cotton wool and glue the resulting nose onto your face. This is what Santa Claus looks like at this stage, the photo clearly shows.

Cut out a triangle from red paper, coat its side with glue, glue it to the opposite side to make a Santa Claus hat. A frill made of cotton wool and a tassel made of the same material are attached to this cap.

All that remains is to attach the beard and mustache cut out of cotton wool, and a funny Santa Claus is in front of you.
Glue a strip of black felt onto it, which is thinner. To make a buckle, draw it on a piece of felt or yellow cardstock, cut it out, and glue it in place.

At the top of the card, glue two eyes for toys, and just below - a red felt circle that will become the nose. To make the beard and hair, roll a few small cotton balls and attach them with a glue gun.

Using small pliers to help you, twist the wire to make glasses. Cut out a hat from red felt and glue it onto Santa's head.
That's it, you can write congratulations and give such a wonderful postcard. If you want to make a voluminous one, then make a fluffy Christmas tree. It's easy to make this type of card for the New Year. It is interesting to create its details with your own hands. Here's what you'll need:
- light-colored cardboard;
- green and red colored paper;
- scissors;
- glue.

Fold a sheet of cardboard in half. Cut 3-5 strips from green paper different lengths, their width is the same. You will glue shorter ones to the top, gradually attaching longer elements to the bottom.
Strips of colored paper for the Christmas tree should be three times longer than the blanks that will be obtained by folding them.
Roll up the elements for the New Year's tree like an accordion, glue one side to the right and the other to the left of the card. Cut out a Christmas tree from red paper and attach it to the top. Using white acrylic paint You can put a design on the Christmas tree; all kinds of sparkles are used for this.
We hope that the presented master classes will give you new ideas for inspiration; you will make gifts for the New Year with your own hands in advance, so as not to be distracted by this in the last days of the upcoming holiday.
For you - an interesting story that shows how to sew Santa Claus.
Learn how to make a New Year's card using 3D technology.
![]()
Would you like to invite your favorite children's fairy tale character to your home? Then see how to make Santa Claus with your own hands. Let this tiny old man in a red fur coat and with a white beard give joy throughout the winter holidays and, of course, promise good luck in the new year.
And if making a fleece Santa Claus seems very difficult to you, involve your mother, friend or classmates in an interesting activity. Separating the processes of creating a toy will make the work quick and entertaining, and maybe very soon a little wizard will also live under the Christmas tree in your classroom.
To make Santa Claus you will need:
- cotton fabric (beige - for the base of the body, multi-colored - for clothing elements),
- fleece (white and red),
- felt - for applique on a fur coat.
- holofiber and a piece of padding polyester,
- foam rubber for boots,
- wool and needle for felting,
- floss threads, buttons, beads and beads,
- thick tin and thin copper wire,
- thick cardboard,
- acrylic paints, brushes,
- glue gun, Moment-Crystal glue,
- pliers,
- stationery knife.
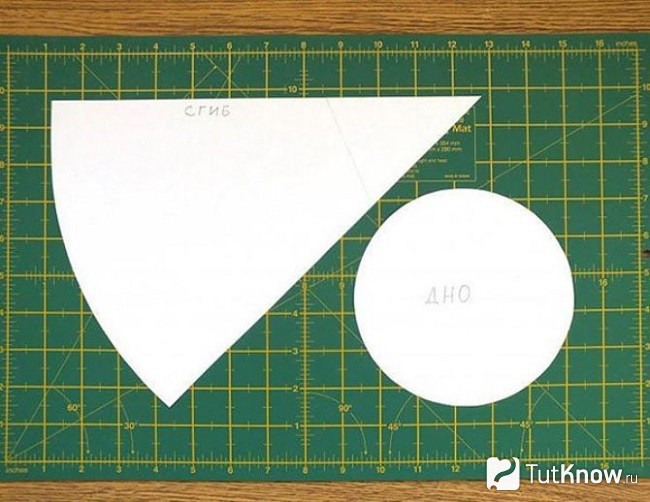
1. First, make a Santa Claus pattern on paper. Choose the sizes at your discretion, but remember that they must match each other. The required cone pattern is easy to find on the Internet.
2. Cut out a circle from thick cardboard. Divide the diameter of the circle into three equal parts. Cut holes for the wire (Santa Claus's legs) at the joints.
Place a synthetic padding circle on a cardboard one and wrap them with a slightly larger fabric one. Pull the fabric around the cardboard circle using a thread and a needle.

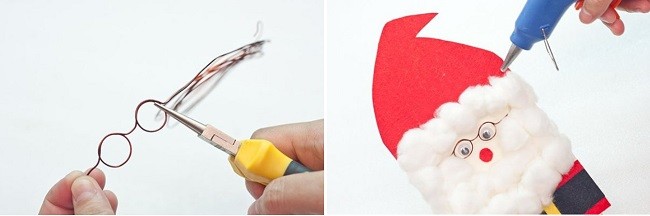
3. Pierce the circle with a U-shaped thick wire, make feet. Screw a thin copper wire to the thick tin wire, as shown in the photo. Let it be 10 centimeters longer than the height of the cone.

4. Carefully glue the junction of the wires and cardboard with hot glue. The figure should be stable and even. The cardboard should not fall down.
5. From some interesting and bright fabric (preferably red), cut out two rectangles, one and a half times longer than Santa Claus’s legs, and about 4 cm wide. Fold the stitching in half on the wrong side. Turn it inside out, put it on the legs, sew it to the fabric circle.
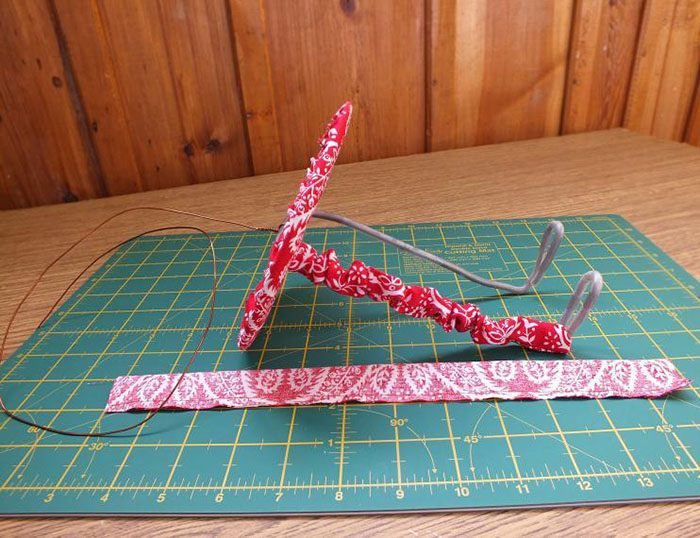
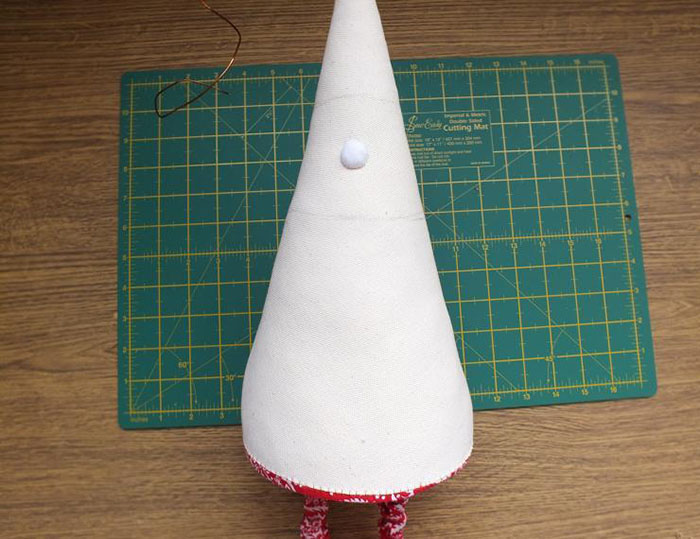
6. Cut out a cone from cotton fabric, fold it in half and sew, leaving a few millimeters at the top unsewn. Fold the edges around the circumference and baste. Turn out the cone.
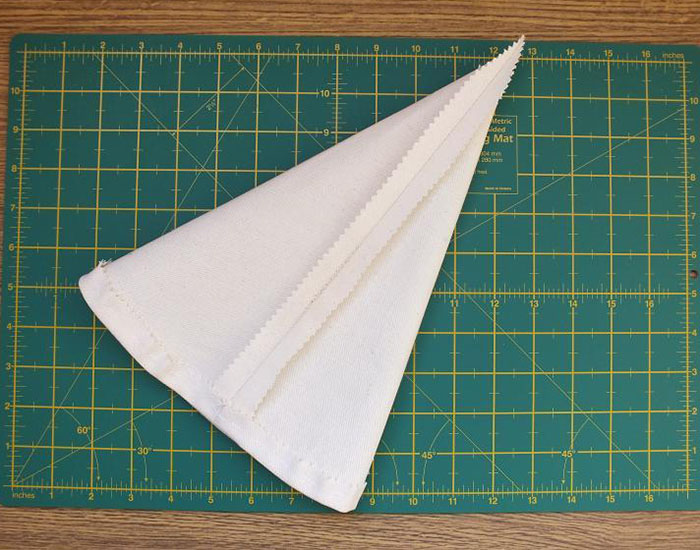
7. Sew the cone to the circle with a hidden seam, threading copper wire through the top and stuffing it with holofiber. While stuffing, make sure that the wire remains approximately in the middle of the toy.

8. Cut out the soles from cardboard. Glue it with hot glue. Let the soles be slightly longer than the wire loops. In this case they will be more stable.

9. From foam rubber, cut out boots for Grandfather Frost with a recess at the bottom for wire and a slit at the back. Focus on the photo.
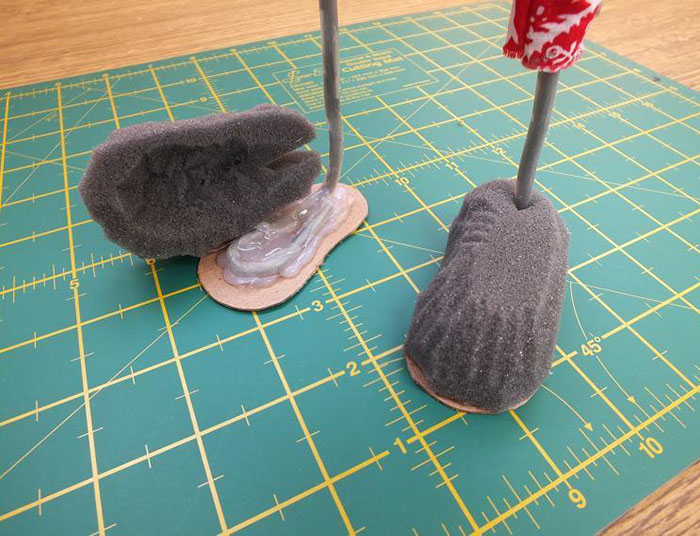
10. Using fleece ovals, cover the boots. Tie the fabric from the bottom with thread.
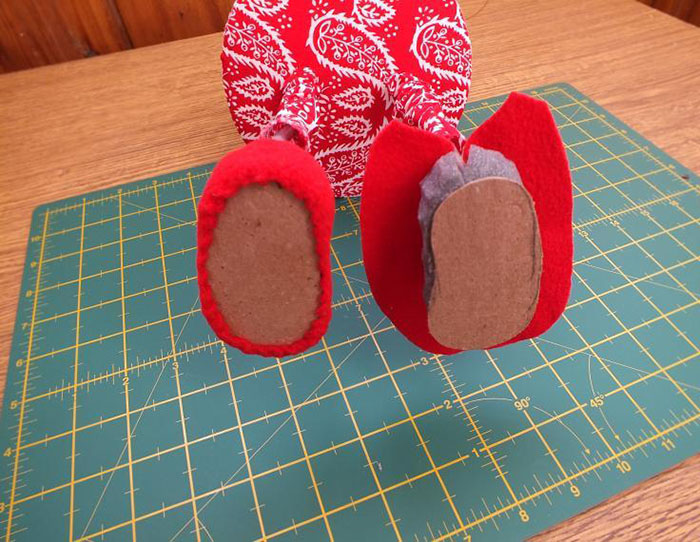
11. Sew felt soles to the boots, gluing the felt to the bottom of the boots. Trim off excess fabric.
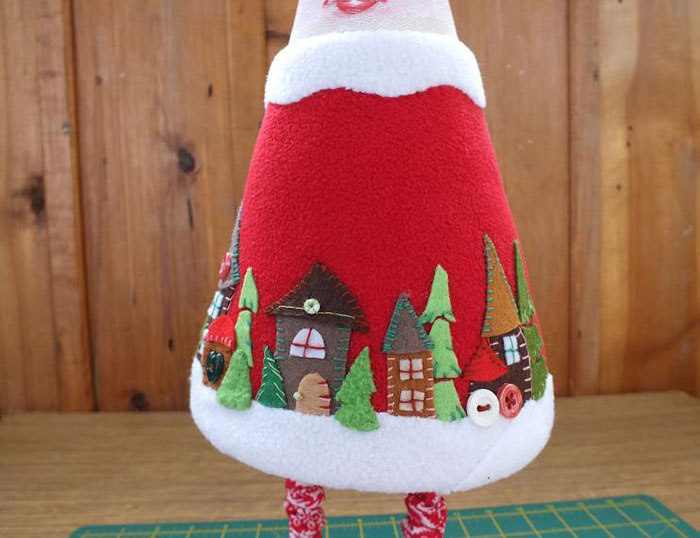
12. Mark on the cone the boundaries of the face, cap and fur coat of Santa Claus. Sew a nose from a pulled circle of fabric and a piece of padding polyester to the face.
13. Well done! Now you need to lightly cover the toy’s face with white paint and draw the eyes, cheeks and mouth.

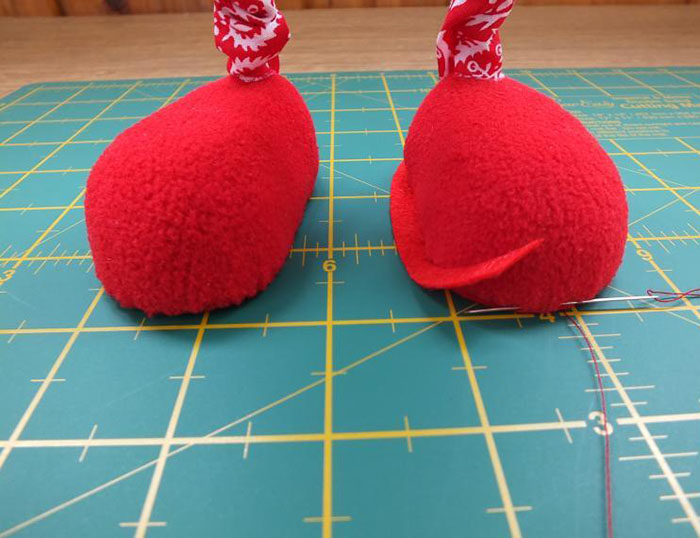
14. Make a fur coat pattern (truncated cone) from red fleece. Fold it in half, sew along the edge and turn it inside out. By using paper template sew the handles with mittens made of red fleece and colored fabric, leaving an opening for stuffing. Turn it inside out, fill it with holofiber, sew up the hole with a hidden seam.

15. Dress the wizard in his fur coat, sewing it around the neck and bottom with a hidden seam. Cut out houses, Christmas trees, mushrooms from multi-colored felt and attach them to the jacket with pins. Try on the handles for Santa Claus and see if the applique is distributed correctly.
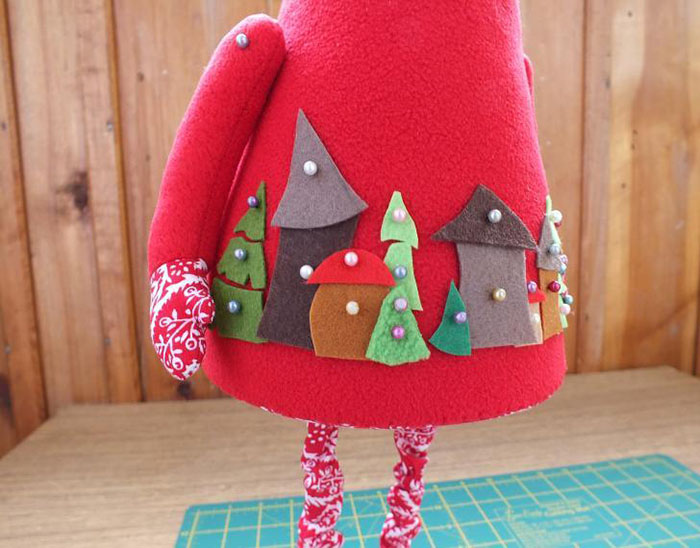
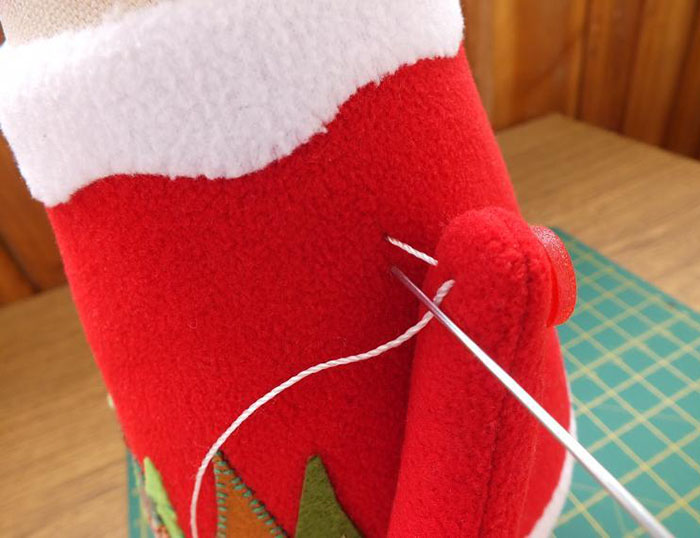
16. Glue the applique elements with drops of Moment glue and only then sew on with bright threads. Decorate the fur coat with buttons, beads, beads and sew snowdrifts of white fleece with a hidden seam.

17. Now is the time to make the cuffs and cuffs of the boots. Cut them out of white fleece, sew them, fold them in half and put them on the arms and legs. Sew it on.

18. Cut a wavy collar from white fleece and sew it with a hidden seam.
19. Thread a strong thread through the base of the handle and the button, and tightly sew the sleeves of the fur coat to the body. Tie a knot and secure it with glue.
20. Separate part of the wool (about 10 cm) for the beard and use a felting needle to attach it to the “chin”. Then take a slightly thinner bunch, 20 centimeters long, and begin to roll up the mustache.
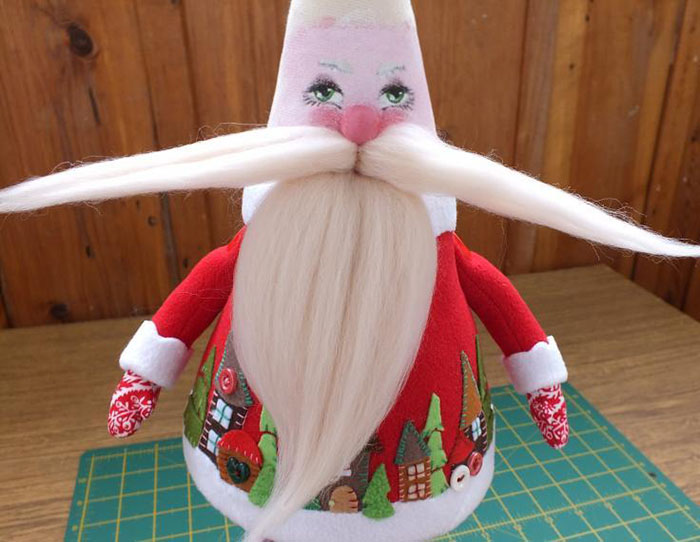
21. Take two more thick tufts of wool and lay them on both sides of your face. Like this:
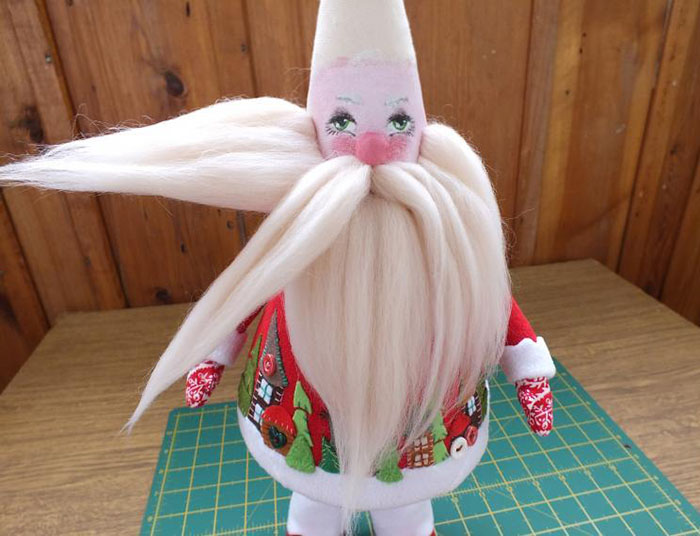
22. Comb and style your beard carefully. In the same way, roll Santa's hair, comb it and trim it with scissors.
23. Let's move on to making the cap. Using colored fabric based on half of the cone template, cut out a long narrow cap. Its length should be 2 cm longer than the free end of the copper wire that you inserted into the toy before.
24. Unscrew the cap and sew it to Santa Claus’s head. Twist the wire in the middle of the cap into a spiral and make a loop at the end (there will be a pompom on it). Now make a white fleece lapel, a pompom stuffed with holofiber, and sew them to the hat.
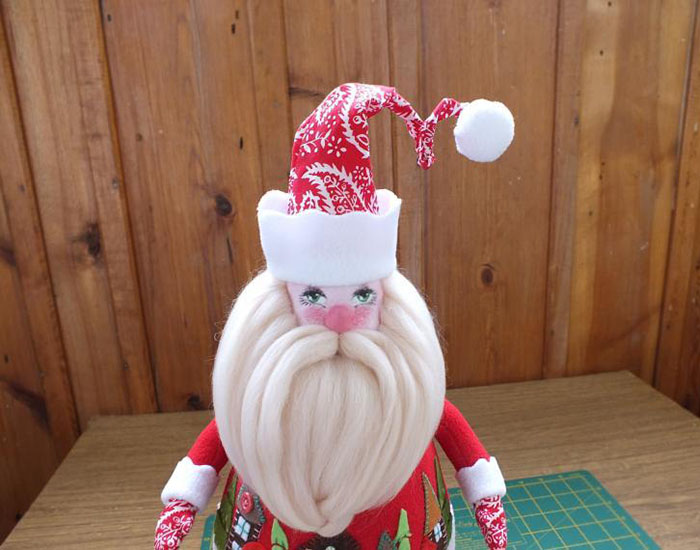
25. Complete the look with a small green Christmas tree with buttons on the cap and, if desired, small green pompoms on the shoes.

Hooray! Santa Claus is ready to charm the eyes of your loved ones and give an unforgettable feeling of the holiday.
You will find even more crafts for the New Year here:
Galya Bondareva
Hello, dear friends!
Today, Grandfather came to our guys Freezing!
True, he is still small, but this will not last long - before the New Year, Grandfather The frost will get big. In our group, all the children are good, cheerful, kind and everyone needs to bring gifts - that’s what Grandfather decided Frost and Snow Maiden.

My kids were not confused and whispered to Grandfather Frost listen to your wishes!
In the meantime, our unusual Santa Claus's bag is torn, The Snow Maiden sewed him a new one - big and strong, but white as snow, Grandfather Frost is upset, because in the snow he may not see the bag and the guys will be left without gifts!

No problem! - the kids and I decided. We will decorate Santa Claus bag! The holiday is coming, everyone will be dressed up, so let them bag It will be beautiful with gifts!
To decorate the bag we need
colored paper (bright colors)
tinsel (Snegurochka gave it to us)
and very skillful hands!


Happy New Year! Good luck to you!
Publications on the topic:
Hello, dear Maamites! Congratulations to everyone on the Day national unity! November 18th is the birthday of Father Frost. I suggest we make it together.
New Years is soon! By tradition, in our group, every year we open Santa Claus’s workshop and replenish it with new ideas and crafts made.
Master class with step by step photos"Valenochek of Santa Claus": making it yourself. I bring to your attention a master class on making.
It doesn’t seem like it’s close to the New Year yet (but it actually only seems so, but it’s the birthday of the main New Year’s character, Santa Claus.
Nowadays, it’s not easy for parents to find extra time to communicate with their children, and it’s even more pleasant to listen to kids’ stories about how they are together.
The purpose of the master class: To create a festive pre-New Year atmosphere at a meeting with parents, learn how to cut out curly symbols - snowflakes.
Ahead New Year holidays and we decided to make an assistant to Santa Claus-Snowman. After the renovation, ceiling slabs (foam plastic) remained.


