Everyone loves a holiday New Year because of fun tasty food, weekends, communication, dancing, songs, competitions... And it all starts with creating a festive atmosphere that will give joyful emotions and impressions. In this article we will tell you how to decorate your home for the New Year in an original, creative and enchanting way.
The most common home decoration for the New Year is a garland. Let's look at a few ideas and workshops for making it.
You will need: colored paper, scissors, pencil.
Master Class

Garland "Santa's Socks"

You will need: bright big socks, red rope or satin ribbon, clothespins or loops.
Master Class
- Attach the string to the desired location.
- Hang the socks on the rope, following the thematic color scheme.
- Secure each sock.
Garland “Circles of felt”
You will need: pieces of felt of bright colors, scissors, glue, thread.
Master Class
- Cut out circles from felt. There should be about 50 circles. The more circles, the longer the garland.
- Glue the circles to the thread.
- Attach the garland.

You will need: peel from orange, tangerine, grapefruit, lemon (you can choose one option, or you can make an assortment), scissors, needle and thread.
Master Class

Such a creative garland will not only decorate your home and surprise guests, but will also give a wonderful citrus aroma filled with vitamin C, which is so necessary in winter.
Garland “Natural composition”
You will need: cinnamon sticks, dried tangerine slices, pine cones, Christmas tree balls, thick thread and needle.
Master Class
- Using a needle, string a cinnamon stick, a dried tangerine slice, and a pine cone onto a thread.
- Repeat the first step until the desired size of the garland.
- Decorate with Christmas balls.
- Attach the garland.
Decorating a house with a wreath for the New Year is very original idea! It can be hung on a wall or door. A New Year's festive Christmas wreath can be made from clothespins, buttons, twigs and even wine corks. Let's take a look at the master classes and learn how to make wreaths for the New Year.
You will need: aluminum hanger or wire (for frame), clothespins, beads and ribbon (for decoration)
Master Class
- Unroll the hanger and make a round frame, or create a wire frame.
- String a clothespin and a bead.
- Repeat step #2 until the wreath is filled.
- Hang the wreath on the wall or door.
You will need: cardboard, scissors, glue, ribbon and bright buttons.
Master Class
- Cut out a round shape of the wreath frame from cardboard.
- Glue the buttons to the frame.
- Make a ribbon bow at the top.
You will need: base for the frame, a lot of wine corks, beads for decoration, satin ribbon, glue gun.
Master Class

If you have a question, where can I get so many plugs? - the answer is simple. Wine corks can be ordered from an online store at an affordable price, or you can purchase them in a specialized store selling interior goods in your city. You can make not only a wreath from wine corks, but also a huge number of different crafts, which are described in this article: “Crafts from wine bottle corks with your own hands.”
You will need: sprigs of pine needles or a fir broom, threads, beads and ribbon for decoration.
Master Class

Window, glass and mirror decorations for the New Year
You will need: snowflake pattern, toothpaste and a brush, a glass half filled with water.
Master Class

You will need: pieces of felt, scissors, glue, sequins, thread.
Master Class
- Cut out snowflakes or stars from felt.
- Glue a piece of sequins to the center of each snowflake.
- Glue all the snowflakes to the thread.
- Decorate cornices and baseboards.
Decorating the walls of the house for the New Year
Such bright snowflakes on the walls look very creative. They are quite easy to make, you just need to have at least 24 identical wooden popsicle sticks. You can collect them or order them from an online store at a very affordable price.
You will need: ice cream sticks, red gouache, newspaper, glue and ribbon.
Master Class

You will need: thick threads, an inflatable ball or balloon, PVA glue, scissors, a needle, a candle in a tin box, a glass.
Master Class

Now we will look at enchanting ideas for decorating the ceiling. Helium balloons will look very festive as they fly to the ceiling, decorating it. The more there are, the better, brighter and more beautiful!
Snowflakes on threads attached to the ceiling fill the entire room with snow and such snow does not make you cold! Get together with a big group, cut out a huge number of snowflakes and turn an ordinary room into a masterpiece!
We create festive mood and decorate the house in a stylish and original way - we’ll make magnificent New Year’s decorations with our own hands!
Any New Year's decorations, made with soul, are unique, so to prepare for the holiday all you need is a couple of free evenings, and a few inspiring ideas to create New Year's decorations with your own hands. Moreover, for this purpose you need to use items that are probably available in every home. So, let's go.
We make cool DIY Christmas decorations from Christmas tree balls
1. Balloon from a Christmas tree toy
It will require a beautiful Christmas ball, a piece of cardboard, thick thread and adhesive tape.
You will have to cut out a blank for the basket from colored cardboard. This will be a small box. Its bottom should be such that you can put a coin in it for weighting. Glue it from the inside and attach the threads to the corners of the box with adhesive tape. It should look like a basket with two handles.
All that remains is to assemble the New Year's decorations with your own hands. To do this, remove the fastener from the ball, throw a thread through it and put it back in place.
2. Teddy bear.
To make it you will need a plain ball and cotton wool. Glue will help give the cotton balls shape. They also need to glue the parts together.
3. Personalized New Year's ball.
Leave the imprint of your own palm on a plain Christmas ball. Sign the date and save it for many years.
4. New Year's garland of hearts.
The easiest New Year's crafts to make are DIY New Year's decorations made from paper. They are done literally within half an hour. And there are a huge number of ideas. A garland of paper hearts will look great on a forest beauty. It is made from strips of double-sided colored paper. You need to fasten the parts together using a stapler.
5. Ice cream - creative DIY decorations for the New Year.
Cut a circle out of brown cardboard and divide it into two semicircles. Roll each one into a cone. Glue well. Form balls from colored paper and attach them to the cone. First pierce the top one with a needle and thread.
6. Snowflake is a ballerina.
These New Year decorations are made based on snowflakes. You just need to cut out the ballerina’s body from white paper according to the template and insert it into the center of the snowflake
Cool ideas for decorations for the New Year are made from natural materials, such as thread. All thread crafts can be coated with sparkles or shiny varnish and they will perfectly decorate a Christmas tree or home.
7. Toy - a horse made of paper and thread.
Cut out two parts of the future toy from cardboard from the box. Place them together and wrap them tightly with thread or twine.
8. DIY Christmas balls made of thread for home decoration.
Inflate round balloon ik to the size that the finished decoration should be. Wrap it with thread so that the gaps are visible. Apply PVA glue to all threads. After drying, deflate the ball and remove it from the New Year's decoration with your own hands. They can be hung in the room or placed on a table with tinsel and candles.
9. Winter vase
It’s a great idea to make decorations for the New Year from scrap materials. A beautiful bottle or glass vase will become magical if you draw a semolina pattern on the glass surface. And you will immediately be transported to the lands of the Snow Queen.
10. Pasta garland
These Christmas tree beads will delight children with their uniqueness.
11. Wooden Christmas tree toys.
Skates made from twigs will give dad something to do and the kids will love coloring them.
12. New Year’s decorations for the house made from pine cones
A pine cone painted green will become a New Year tree.
13. New Year's funny gnomes
Unshelled peanuts are a reason to create funny people out of them.
14. Snowman made from socks.
White socks or tights filled with millet make cute snowmen. They can be dressed in jackets and hats made of colored socks. And make the noses from the core of an orange pencil.
15. DIY Christmas snowmen
Burnt out light bulbs are the basis for drawing funny gnomes that will decorate the Christmas tree for the New Year.
New Year's paper crafts
Do-it-yourself voluminous paper snowflake
This voluminous snowflake made of paper is a wonderful New Year’s decoration for any interior. A paper snowflake will definitely delight your children, relatives and guests.
For a snowflake big size We use only thick paper, and also add more lines.
A snowflake can be made from paper of any other color - it all depends on the color of your New Year's decor. You can also use wrapping paper.
Materials, necessary for making paper snowflakes:
six squares, cut out of paper, preferably white and identical in size.
Any paper is suitable for making snowflakes. The side of each square cut from paper can be from 10 to 25 cm.
Tools:
- ruler;
- a simple pencil;
- scissors;
- stapler
Preparation method volumetric snowflakes from paper:
1. Bend each of the six squares diagonally in half. We make markings of three parallel lines on each of them. The width of the segments should be the same. We draw lines with a simple pencil(in the photo they are drawn in red only to make them easier to see). Then we cut the outlined lines with scissors, starting from the edge and not reaching a little (leaving a couple of millimeters) to the middle.

2. Now open the square folded diagonally and place it face up in front of you.


4. Then we turn the snowflake to the other side and connect the next two strips closest to the center, fastening them with a stapler.

5. We continue to turn the snowflake over and fasten the remaining strips with a stapler.

6. We do the same with the five remaining squares of paper. Then we staple the three parts of the snowflake together in the middle. We do the same with the remaining three parts of the snowflake.

7. Now we connect these two large parts of the snowflake to each other.

8. At the points of contact of each individual part of the snowflake, we also fasten it with a stapler. This is necessary for the snowflake to keep its shape.

9. Now we decorate the snowflake according to our own taste, for example, you can stick on sequins and sparkles.
That's all! New Year's decoration is ready! A snowflake can be hung on a Christmas tree, window, wall...
Another option for snowflakes. It is made from two sheets of regular or thicker paper.
1-2. First we bend the sheets as in the picture.
3. Cut out a tick from the resulting triangle.
4. Make cuts on the remaining tick, but do not cut all the way through, otherwise the snowflake will break.
5. Bend the rays so that the snowflake is voluminous.
6. We bend each middle ray on all four petals of the snowflake inward and glue it in the center.
7. Repeat operations 1-5 with the second sheet of paper. Then we place it under the first half of the snowflake, so that the lower rays are between the upper ones. Then we bend it as in step 6, but glue the rays not in the center, but in the places where the rays diverge at the top snowflake.


Snowflake made from strips of paper

See the photo master class for the sequence of making a snowflake:
Prepare two fragments of a snowflake, each of which is made of 6 strips of paper, then connect them, as in the photo

Glue the strips together as in the photo and secure with paper clips until completely dry.

4.

We made two “half snowflakes”: 
Place them back to back
Connecting with glue 
Secure with paper clips and wait for it to dry: 
This is what the junctions of the ends of the strips look like: 

And again, all in one photo:

A more complex version of a snowflake made from stripes:


Balls imitating cones from strips of colored cardboard different lengths , folded like an accordion


You can make more snowflakes from old magazines
master class from Tiffany Lin

Tiffany marked out one-inch petals for future snowflakes. We can focus on two centimeters, for example.
In total you need to cut 140 strips. Of these: leave 20 strips along the length of the page, cut the next 40 by 1 cm, cut the next 40 by 2 cm, and cut the last 40 by 3 cm shorter. Refer to the photo above.

Fold each petal using 5 strips of each size. We take the longest strips, for the central ray of the snowflake, once, and the rest twice (once on each side).

Glue it and place it under a press while gluing.

To be safe, you can temporarily tie the tip of the petal.

Additionally, we cut out more stripes for the central part of the future snowflake.

We also glue this ring and fix it so that the glue sets successfully.

When the petals are glued, use a glue gun to process the end of the workpiece.

No need to spare glue! We process it well.
Then we glue the petal blank to the central ring.

We do this with four petals, gluing them so that we get a cross.

Then we glue the remaining petals. This method allows you to symmetrically glue all the blanks.

After this, we glue the petals together so that the snowflake does not fall apart.


Decorate the snowflake with sparkles. 
You can make snowflakes like this

Birds of happiness for your home:
Fold the paper in half and cut it out as in the photo on the left: Then unfold the wings and secure them to the body of the bird. Glue the body halves together.


How to make a snowflake like this:
Nov 28, 2016 Galinka
Even if your home interior is beautifully decorated and spending time in any room is a pleasure, there comes a time when you want a holiday in the house in the middle of everyday life. And even the holiday itself comes unnoticed according to the calendar. And there is a desire to somehow celebrate this day, to make the rooms elegant, to create that same joyful festive atmosphere. And this is wonderful, especially since a few cute details are enough for bright changes in the interior. And for them it is not at all necessary to buy expensive materials and spend a lot of time on manufacturing. Today you will learn how easy it is to make beautiful paper decorations with your own hands.
Basic materials and tools for work
What basic materials and tools will you need for the job? This, of course, is the paper itself. Believe me, everything can come in handy: napkins, newspapers, magazines, music notebooks, writing paper, colored from sets, colored double-sided, Whatman paper, corrugated paper, paper with various textures and embossing, design, for scrapbooking and others. Your imagination will tell you what paper to use when to get the result. original decoration, which will suit the style of your room.
Cardboard, either white or gray, or colored, may come in handy. If you have thick white paper or cardboard, you can use paints (watercolor, gouache, acrylic, etc.) to give the paper the desired color or apply patterns and designs.
Of course, you will need glue (PVA, glue stick, universal transparent Moment), a stapler with paper clips, scissors, a stationery knife, thread and a needle. A shaped hole punch can be useful for cutting out flowers and other small figures. This hole punch is used in scrapbooking and will be very useful if you like to do paper crafts. But if it’s not there, it’s okay, identical parts can be made by cutting out the outlined template.
For fine and accurate work, you may need tweezers, for example, medical ones.
Well, the most important tool is, of course, your imagination. Diagrams will be shown for many paper decorations, and you can easily figure out some of them yourself. The activity is going to be exciting! Let's get started.
Probably all of us in childhood decorated our window glass with homemade paper snowflakes. I really want to decorate my home for a winter fairy tale. Why not unfold a fairy-tale world right on the windowsill? We bring the idea to life.
You will need thick white cardboard. Cut out figured pictures from it according to the template. Glue them together (you can try to overlap them) to create a single strip of pattern the length of the window sill.
Then glue a second strip of the same type. In it, it is advisable to swap the pictures in places or even use other template pictures; you can come up with them yourself.
Now you need to glue a box of the same length as the window sill, about 10-15 centimeters wide and about 4-6 centimeters high.

We place rectangular pieces of foam rubber inside the box. In the foam rubber we fix cardboard holders with slots for strips with our figured landscapes. We insert the strips into the holders: one to the front wall of the box, the second to the back wall. We stretch a garland between the landscapes along the box. Bulbs with white or blue light will look best.
So, turn on the garland, turn off the lights and admire the fairy tale!

Let's continue decorating the house for the New Year. This time we are making paper toys for the Christmas tree. Prepare paper of different colors, a ruler and pencil, scissors, 2 beads and a needle and thread. 
We cut the paper into 18 strips of different colors, about 10 centimeters long and about 1-1.2 centimeters wide. Draw and cut out two circles with a diameter of about 2 centimeters.
We string the bead onto a thread and thread a double thread into the eye of the needle, as shown in the figure. 
Fold our strips in half. First we string a circle on a thread, and then all the stripes in the order you need (alternating colors, for example). 
We also string stripes on the same thread from their opposite end. At the end we string a circle, and lastly we string a second bead. Then we straighten the strips like a fan. 
The first one is ready Christmas tree decoration from paper! 
Let's move on to the next one. It is assembled according to the same principle. You just don’t need to bend the stripes (this way the toy will be in the shape of a ball). And the strips are distributed in a circle so that there is a distance between them. Therefore, you should not thread the thread through the toy, as was the case in the first case. It is better to fasten the strips at both ends with rivets (used in scrapbooking) or fasten them so that the strips can be fanned out.
If you use paper of the same color for stripes, decorate the toy, for example, with small flowers.  They can just be made using a figured hole punch, which we talked about above. You can cut out flowers with scissors or even decorate the toy with something else (sequins, rhinestones, sparkles, beads, etc.).
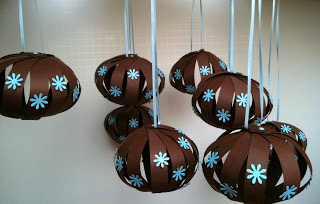
When the toy is ready, we stretch a ribbon at the top under one of the stripes, with which the toy will hang on the tree. If you make the ribbons for toys long and of different lengths, then the balls can be hung on a chandelier or attached to the ceiling and used as an independent decoration, for example, in a nursery.
And these amazing decorations made of colored paper will be appropriate for any occasion or will become an original room decor. Making them is quite simple. 
For greater effect, make these balls of different sizes and hang them together.
You will need paper of different colors, although you can use just white paper. 
To make one ball, you need to cut out 12 blank modules along the contour, make cuts in them in the indicated places and connect the parts of the toy together. 
But these balls are somewhat similar to the previous ones, but they are made differently. 
You need to draw and cut out identical circles from colored paper. Then draw and cut out an isosceles triangle that fits exactly within your circles, touching the circle itself.
We attach a triangle to each circle and draw lines along its sides. Then, using the lines obtained inside the circle, we bend the edges of the circles. You will end up with many triangles with rounded edges bent outward.
Glue the triangles together ( former circles) among themselves, applying them to each other with these same bent edges. Take a close look at the photo of the finished toy to understand how the circles are glued together.
The size of your colored balls will depend on the diameter of the circles you draw and the number of these circles.
And again paper ball decorations

In order to glue such a toy, we will again need to draw and cut out circles of the same diameter and different colors. 
We stack the circles, draw a line along the diameter on the top circle and connect the circles in several places with a stapler. 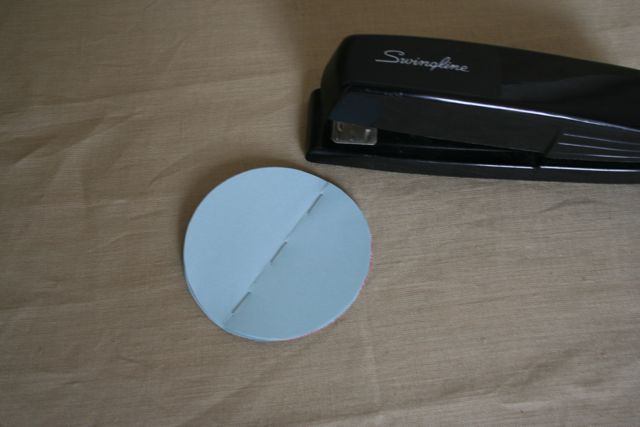
Then we open our circles slightly, like a book. Now we glue the circles together with a drop of glue, alternating: first from below, sometimes from above. After gluing, straighten our ball. All that remains is to attach a thread or ribbon to hang the decoration. 
Using the same principle, you can make multi-colored balls much easier and assemble them into a paper garland by stringing them on a thread or cord. 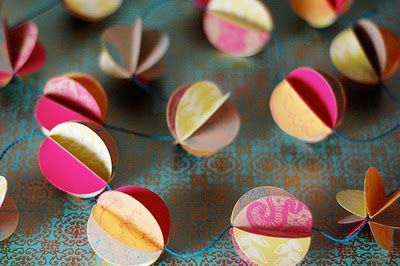
To make such a ball, fold the cut out circles in half and then glue them together, placing the halves next to each other. Connecting the balls into a garland, we stretch a thread through the center of each of them.
It is not necessary to make exactly balls for a garland. You can make toys different shapes and connect them in one garland.
This garland will be an excellent decoration for a child's room. Yes, and you can do it together with your child, because everything is so simple.
Look for more interesting options for creating paper balls.
Weaving volumetric paper jewelry
And finally, one of the most complex toys made of paper among all presented here. But it is much more wonderful than it is complex. So, let's turn on and develop spatial imagination - we will make a wicker paper balloon. 
Be prepared for hard work. In addition to colored paper in two colors, you will need 10 paper clips, a glue stick and tweezers. It is better that the colored paper is double-sided.
Here is a template that resembles a sun. You shouldn’t draw this yourself; the bend and thickness of the rays are very important here. Take advantage of just that; it may need to be enlarged a bit before printing. After printing the template with the sun, cut it out and transfer it to colored paper. You should end up with one sun of each color. 
The additional details that are in the template are parts of the future basket for our balloon.
Place the sun blanks one on top of the other so that their rays are directed in opposite directions. In the center, 2 suns can be fastened together with glue.
Now we begin the actual weaving. We stretch rays of one color between rays of another. Then we turn our blanks over and do the same thing again.
Having reached a certain place, you will need to begin to shape the ball. This is where we will use paper clips to secure the weave. We now use paper clips until the very end of working with the ball, until we secure the rays in the weaving with glue. 
When the ball is ready, you will need to make a basket for it. We take a pre-cut blank, which consists of a circle and a strip. These are the base and walls of the basket. We connect the ends of the strip and get these same walls, then glue the bottom to the walls.
A piece that looks like part of a wheel with spokes will serve to connect the ball and the basket. Connect the ends of the circle of this part with glue. Then glue the so-called knitting needles with their tips to inside walls of the basket, and glue the rim to the base of the ball.
To make the principle of working with weaving more clear to you, you can carefully watch the video of the entire process.
That's all - the magnificent balloon is ready! This DIY paper decoration can decorate a child’s room, children's party or simply become a decorative element to set the mood in your home. You can make several of these balls of different colors and sizes and hang them from the ceiling individually or on a special frame with crossbars, like a pendant. 
If you find an error, please highlight a piece of text and click Ctrl+Enter.
If spending on New Year's paraphernalia is not part of your plans, then New Year's toys made from paper with your own hands will be a way out for you. In addition, such original gift on the Christmas tree will be remembered for a long time.
The sacramental meaning of New Year and Christmas is to bring family members closer together. What brings people together better than joint creative activities?! Making New Year's toys with your own hands in the company of household members is an exciting activity in itself, not to mention its results - original New Year's decorations that can be hung on Christmas tree.
If you make toys with your own hands from glass, porcelain, beads, it will take a lot of time and require certain skills. Against this background, paper toys are a simple option that you can make together with your child and display them on the Christmas tree. Here are step-by-step diagrams and video master classes - 2017 for making such crafts with your own hands.
New Year's paper balls 2016
To make this DIY Christmas tree decoration you will need a minimum of materials. The main thing here is patience and sleight of hand. Don’t be discouraged if you don’t immediately get a toy like the one in the photo - such decorations require a certain skill that will come with time. Therefore, be prepared right away that the first toys will not turn out to be the neatest. But the result will exceed all expectations and justify your efforts!
New Year's paper balls 2016: making stencils
So, in order to make this with your own hands New Year's ball on the Christmas tree you need to perform the following sequence of actions:
- Print the stencil on the printer. We suggest using the following images:
- Then take thick sheets of colored paper and trace the stencil with a pencil.
Advice! If the printer allows, stencils can be printed directly on colored paper. This will save time and effort.
- Carefully cut out the details of the future toy.
- Arrange the resulting blanks in the shape of a flower. Secure the center with a circle cut out of colored paper, gluing it firmly, as shown in the photo.
New Year's paper balls 2016: main work
For execution further work manual dexterity will be required.
- The most important and interesting step is weaving. To do this, sequentially weave one strip into another, as shown in the photo.
Advice! Use paper of different colors to make the toy more interesting and colorful. To prevent the toy from falling apart when weaving, use clothespins.
- When you are almost finished weaving, glue the ends of the paper ribbons together.
- In the part of the ball where you glued the circle (see step one), make a small cut in the form of a line. Paste into it beautiful ribbon and glue it with glue. P It is better to singe it first so that it retains its original appearance.
Original New Year's paper toys for the new year 2017 are ready! Using different stencils and colors, you can create a wide variety of balls. Another interesting version of the 2017 ball with your own hands can be seen in the video:
Interesting New Year's paper toys for celebrating 2017 can also be made in the form of lanterns. This option New Year's decoration came to us from our grandmothers and was popular in those days when toys were hard to find on sale. The flashlight is even easier to make than the previous toy. Even a child can be involved in the process of its creation. Interesting option crafts in the shape of a flashlight can be seen in this video:
Magic lamps
Lamps for the new year 2017 can be made from scrap materials. To do this, you only need scissors, glue and colored paper or a pack of cardboard:
- Take two sheets: one yellow, the second a contrasting color, for example, purple. Cut out two rectangles. Yellow – size 100x180, purple – 120x180 (in millimeters).
- Take a yellow rectangle and glue its edges into a tube shape. Next, set it aside and proceed to the purple part. Fold the sheet in half and make cuts with scissors, leaving space around the edges. We also glue it in the shape of a tube, like a yellow sheet of paper or cardboard. The photo shows how to make a red flashlight. The sequence of actions is similar.
- If you cut everything out carefully, the yellow tube should fit into the purple one. However, it must not be pushed in all the way. Its edge needs to be greased with glue, and only then the resulting yellow flashlight must be inserted completely into the purple tube. The same must be done on the other side. Pull the purple part up slightly to release the yellow part. Cover it with glue. This will fix the yellow leaf in the purple.
- To make the flashlight more realistic, you should make a handle. Cut it out of purple paper or cardboard. narrow strip and glue it to the flashlight.
- Your magic lantern ready. This is one of the simplest crafts, even a child can do it.

You can also see how to make a lantern with your own hands for the celebration of 2017 in this video:
3D paper star
Another popular toy on the New Year tree for 2017 is a star. Rarely does a Christmas tree survive without it. This toy is both effective and easy to make. To do this, you will need the same materials as when making the previous decoration. All that remains is to add the thread. Read the master class or watch the video.
- You need to cut out two 10x10 squares from colored paper. You can use your imagination to the fullest: your stars don’t have to be yellow. Use purple, red, blue, pink colors! And your Christmas tree will sparkle with different colors.
- Fold a piece of colored paper twice in half, and then fold it twice diagonally.
- Make small cuts on the edges of the paper and fold them into the corners (as shown in the photo).
- Glue the corners in the center, leaving the rest of them free (this will give the future star volume). You should get some kind of rays.
Advice! Hold the corners while gluing with your finger. This way they will stick together better.
- Repeat the procedure described above with the second sheet of colored paper.
- Glue the two halves of the star into one. Don't forget to put the edge of the ribbon between them, with which you will hang the star on the tree.
- Give the star time to dry. This will take about 20 minutes.