Openwork shawls, scarves on the head and shoulders look incredibly feminine. Crochet looks especially stylish and beautiful due to the ability of the knitted fabric to be airy and lacy. There are many patterns and patterns that are easy to make even for beginner knitters. And if an experienced craftswoman gets down to business, the result of the work will exceed all expectations. Therefore, the given descriptions of crochet scarves with diagrams and descriptions will be useful both to beginners in knitting and to craftsmen with a wealth of knowledge.
Abbreviations for knitting patterns
For convenience and better understanding, the following designations are used in the description of the work:
- air loop - AirLoop. (or V.P.);
- double crochet - StolbSNak. (or SSN.);
- single crochet - Column. b/Nak;
- column - Column. (or with.);
- chain - CHEN;
- loop - P.;
- yarn over (loop thrown over a knitting needle) - NAC;
- *…* — the pattern between the stars is repeated.
These designations are used for each of the presented circuits.
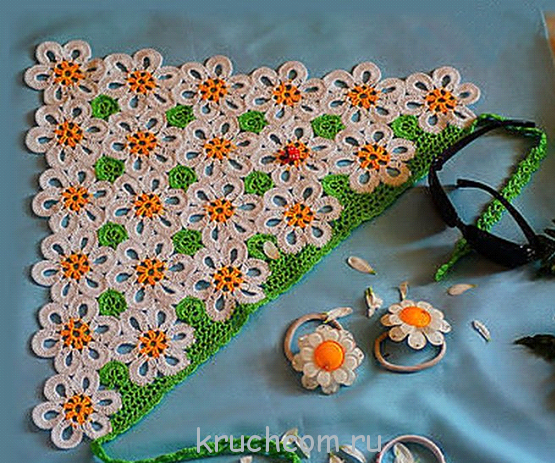
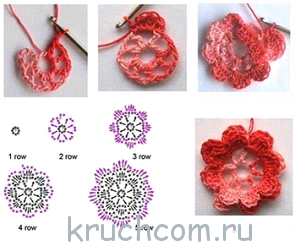
Openwork scarf
The scarf was previously used at the end of the 18th century to cover the neckline of the karako (a jacket with long tails and semi-long sleeves).
To knit such a scarf (shawl), you need to select about 300-400 g of thread in pastel shades No. 32/2 in 4 layers. The shawl pattern is a combination of two types of rhombuses, in one of which flowers are knitted, and in the other a mesh is knitted. The shawl is knitted from the bottom end, while the knitting evenly expands on both sides.

Then you need to knit diamonds in two rows, in which the flower is in the center, and the diamonds with the mesh and the flower alternate with each other. At the end of the work, the product is tied along the upper edge.
- 1st row: 3 chain stitches, S. without a chain stitch thrown over each chain of five chain stitches of the previous row.
- 2nd row: * Column SNak., 1 Air Loop. and so on from the asterisk to the end of the row (Column SNak. Use in turn for this either S. single crochet of the previous row, or a chain of 3 chain loops). Then they continue tying, without tearing off the thread, on the sides (those that are short) of the shawl like this: * a column with a stitch draped under each link of the rhombus, 3 air loops. and so on from * to the end of the row. Next you need to tie the work along the top edge in reverse side stitches without a loop thrown over (the hook should be inserted under all the chain loops of the previous row).
When the shawl is ready, it must be carefully ironed, trying not to crush the flowers from the wide columns; To decorate the shawl, fold tassels of thread into 16 - 20 layers, tie them along the edge of the work and intertwine them together at the same level. This shawl can be worn both on the shoulders, in the form of a cape, and as a scarf around the neck. A hook, a diagram and a description, not counting the threads, is all that is needed to complete this work, since it is not at all difficult, and even beginners will enjoy the result.
Snow-white shawl
Shawl - a strip of rectangular fabric that came from eastern countries, which served to cover the upper body from cold. In the 15th century, in the Indian region of Kashmir, shawls were made from the fine wool of Tibetan goats. Authentic shawls were distributed throughout Europe during the Directory. They were an addition to the costumes, which imitated the antique version - gathered clothes, in which there were no sleeves and a deep neckline. Precious cashmere shawls quickly began to be replaced by more affordable fake options.
This shawl will require 250 g of white thread No. 26/2 in one layer. Hook size No. 3. The product includes 6 themes - squares and 4 themes - triangles. Each theme is knitted separately according to the pattern and joined to an already connected theme - a square or a theme - a triangle as a result of knitting the outermost row (the joining points are indicated in the diagram).
Tie the completed work with the given pattern, knit only a mesh along the long edge of the shawl - S. without crochet and 3 chain stitches between them. Do not forget to add P. in each row in the corners of the product, so as not to tighten the strip of binding. In the outer row of the binding, on the long edge, make “picot” teeth from 4 Air Loops.
Scarf and gloves
 At the beginning of the history of their appearance, gloves not only protected, but also decorated hands. Examples of these clothing items were discovered in the pyramids of Egypt during the 21st Dynasty. Initially, gloves looked like bags with no openings for fingers, and much later a product similar to a mitten appeared.
In the Middle Ages, they used gloves that had no compartments for the fingers, and they were similar to today's mittens. A leather version with a cloth lining, or gloves made of metal rings, were part of the equipment of warriors and hunters. For the highest rank, this type of clothing was encrusted with jewelry.
For the finished product you need to take 200 g of light-colored yarn No. 32/2 in 3 folds. To do the work, take a hook size No. 3. The scarf will be about 22-26 cm wide, its length will be 140-150 cm.
The product should be started from the center, i.e., connected with a CHAIN. from 50 AirLoop. and then carry out the presented pattern (the result of completing the product will be three “fan” patterns in width) first in the first direction, and then from the center of the work in the second direction. Finish the work on the two halves of the scarf with the second row of the pattern according to the diagram.
Next, the finished product should be tied in three rows in a circle, continue to knit “fans” along the edges of the scarf, while the hook is inserted on the first side of the work under a chain of seven Loops, on the second side under the Pillar. with 2 yarn overs. In the third row of processing, the teeth are made of 3 VozdLoops. make a “fan” along the entire “fan” of the previous row (each “fan” will have 9 teeth).
Alternatively, gloves can be knitted on 4 knitting needles of the second size with an additional fifth to complete the work in a way that everyone knows as knitting sock fabric. The gloves will be decorated with four openwork stripes of 3 front stitches each against the backdrop of purl stitches throughout the glove. To make an openwork pattern, knit every 4th row in the following way: NAC., three loops together, NAC.
Black shawl with colored stripes
 At the end of the 40s. In the 19th century, an accessory such as a scarf was incredibly fashionable, but only in a single-color version, as an addition to the checkered crinoline, which was very popular.
Material: 200 g wool yarn No. 32/2. Hook No. 2.5 or No. 3.
The pattern is presented in the diagram, but the principle of its implementation is simple: 3 ColumnsSNak. form a combination, between them is a chain of 3 Air Loops.
So, the beginning of knitting is the middle of the wide side of the work. The dimensions of the product can be different, as you need. Increases are made only in two places - on two sides of the center line emanating from the beginning of knitting.
- 1st row: knit a chain of 3 Asc., then perform 2 Stolbs. on the first P. of this chain. Knit another chain of 3 Air Loops. and 3 SSN. on the same original P. TsEP., on which 2 ColumnsSNak are already connected.
- 2nd row: chain of four Air-Loops, two Columns. in the first P. CEP. air loops, chain. from 3 AirLoop. further above the CEP. of the last row, two groups of 3 Columns are knitted, separated by a chain, from 3 chains, - in this way additions are made, this action is repeated further in this place in each next row. Next, perform CEP. from 3 AirLoop. and 3 SSN. on the last P. of the last row.
As you can see, this knitting is not difficult. Between the colorful stripes there are 3 rows, connected with black threads. The colors of the stripes are selected various colors optional.
The finished shawl must be tied with 2 rows of StolbSNak., and another option is a small border. The pattern of this border is shown in the diagram. At the end of the work, brushes are tied, the length of which will be 12-18 cm.
Openwork mohair shawl
Mohair is a fabric that was obtained by processing the wool of the Angora goat, long and thin, with a silky sheen. Mohair was brought to Europe from Asia Minor.

To get a beautiful and openwork shawl, you should take thin peach mohair (another pastel color) - 100 g (in one thread), and 35 g of dark beige or other opposite shade of thread No. 10/2 (in one thread) for knitting the trim. Hook size no. 3.
Knitting: the main pattern is given with the shawl pattern: CHAIN. of 5 Air Loops, secured by two posts without a loop thrown over, between which three Air Loops are connected. (pico). The hem is made with teeth - the knitting pattern is shown in the diagram.
The shawl is knitted starting with the VozdLoop chain. the length of which is 160−170 cm (according to the diagram). Then you should knit on the chain. through one P. ColumnSNak., and between them along the 1st Air Loop. (see row 1 of the main pattern diagram) - this is how a “lattice” pattern is obtained. All further rows are knitted with the main pattern, but there is no need to knit 5 Ch.Loops at the end of each row until one chain of 5 Ch.Loops remains.

After this, you need to tie the shawl on both sides with a “lattice”, and on it tie a border of 3 rows of the main pattern, ending it with the same “lattice”. After this, you need to tie the border with cloves with brown thread (see diagram). The finished teeth should be tied with b/NAK posts. pink thread.
To decorate the lower corner of the shawl, ruffles are made, which should be knitted from pink threads; and the cells that formed the main pattern must be tied on 3 sides (the diagram shows the direction of processing). All parties end as follows:
- 1 ColumnSNak.;
- 1 Column. with two NACs;
- 3 AirLoop;
- 1 Column. with two NACs;
- 1 ColumnSNak.
Tie the completed ruffle with a contrasting thread in one row using a single stitch.
Openwork shawl scarf for shoulders
Most often, such products are knitted from the corner, and this shawl is no exception. First, the CHAIN is knitted. from fourteen P., then knit rows of the pattern.

Next, the work continues according to the diagram until it is possible to knit 2 rhombuses - a flower - vertically, and 3 horizontally. In the middle of the nineteenth row of work, the work begins on the lattice from ColumnSNak., and in between Column. - one VozdPetl. At the beginning of all rows and at the end of the lattice, 2 Air Loops are knitted. and ColumnSNak., while the hook is inserted under the AirLoop. past rows.
The remaining row is knitted with a Pillar. without crochet, and the hook is inserted under the VozdLoop. and under the hinges Pillar. The edges of the work are processed by CEP. 5 P. in each and Column. without NAC. (introducing the hook under the Column and CHAIN). To each circuit. tie tassels of thread 9-11 cm long.

The top edge of the work is treated with the Pillar. without NAC. and half rings of three Air Loops.
At the end of the work, the shawl must be washed and dried in a towel. Then pull it onto a frame with wooden pegs that replace nails (it is possible to use a carpet for this, which should be covered with a light cloth). Pin to the carpet with pins finished work and give it the necessary contour. You should tie the brushes only after the product has been washed. If there is still a need to wash the shawl along with the tassels, then after washing the tassels must be carefully straightened with a wide-toothed comb.
Knitting items for girls
The pattern of this product can be applied both from above and from below (from the corner). It will not be difficult to complete two crocheted scarf patterns to choose from.
To start knitting scarves, perform (diagram 1) a CHAIN on top. from 8 loops and close it into a ring, then knit rows of the pattern, placing them in both directions.
- 1st r. - 6 Air Loop., 1 Column SNak., 2 Air Loop., again 3 Column. and 2 AirLoop. between them, 2 Air Loop., 1 column with 2 NAC. When knitting all the Pillar. the hook is inserted into the ring from VozdLoop. Then the work should be turned inside out.
- 2nd r. - 6 AirLoop., 2 ColumnSnak. under the 1st C., 2 V.P., 2 ColumnSNak. under the 2nd CHAIN., 2 air P., 2 Column SNak., 3 Air Loop., 2 Column SNak. (bundle) under the 3rd chain, also 2 times 2 columns. under the 4th and 5th (of 6 loops) CHAIN., 2 V.P., 1 Column. with 2 NAC. under the same (last) circuit. Rotate the product.
- The 3rd and all other rows are knitted similarly to the 2nd row.
The scarf can be made in a size that suits you from threads of various colors: for children - for a head with a smaller head circumference, for women - for the shoulders and neck bigger size with the addition of brushes.
A scarf in the form of a combination of latticework with flowers is made from the bottom corner (Diagram 2). To begin with, they make a CEP. from 12 AirLoop. and rows of drawing according to the diagram.

The scarf is treated with StolbSNak. and in the form of a lattice. Threads for tassels are pulled into the cages of the lattice. Brushes length 20 cm.
Attention, TODAY only!
This version of the headdress, in principle, fits almost any outfit. See job description below.

We will need yarn of the desired colors, hook No. 2.
Detailed MK with job description for beginners
First, we make a chain of 122 chain stitches (the length of the initial rows of the scarf is regulated independently, but the number should be divided into 3 + 2 loops for the pattern).
Schemes for them:

You can also decorate the finished product with flowers, diagrams of which you will find.
After finishing knitting the fabric, you need to start tying our product.
A binding made of two threads will look beautiful and original.
The strapping occurs according to the diagram provided above. No loops are left for ropes.
In order to make a binding, the rim of the scarf is knitted in fillet stitch, and equal spaces must be left between the double crochets. Fillet knitting is done in five rows.
Having knitted these rows, you can start knitting the strings. Without tearing off the thread, decreases are made obliquely. Three rows are made of five squares and three more rows are knitted without decreasing. Then the decreases are made obliquely again, out of three squares one remains. Thus, a tie of the required length is knitted with one square.
You can add knitted flowers or bows to such a scarf, decorate it with beads or sequins, as in the photo above.
Watch the video lessons for more details.
We create comfortable jewelry for a 1.5-2 year old baby
We will need: approximately 20 g of yarn of the desired colors and hook No. 2. To begin with, 111 air loops are cast on and three rows are knitted with double crochets. Next, 33 rows are knitted with the pattern indicated in the pattern in the photo.

Knitting occurs by decreasing one stitch on both sides in an odd row, and two stitches in an even row. After this there should be 13 columns left.
The scarf for the baby is tied on both sides, with one row of single crochets and the second row of single crochets with a picot. The upper edge of the scarf is tied in one row with single crochets with a picot.
This scarf can be decorated with flowers on both sides or a strip of flowers can be made and sewn to the scarf.
Be sure to watch the training video lessons.
We make a headdress from triangles for every day
We will need: yarn of any color and hook No. 2. You can see options for triangle patterns in the photo below:

To make such patterns, they need to be knitted in a fillet pattern. Repeat once from the first to the tenth row, after that you need to repeat from the fifth to the tenth row.


For an empty cage, you need to knit one double crochet, one chain stitch and skip one stitch. For a filled cell, you need to knit two double crochets. Then replace the first double crochet of each row with three lifting chain stitches, and you need to finish with one additional double crochet in the topmost lifting chain stitch.
To get started, you need to knit a chain of three air loops, adding three lifting air loops. Then knit with a triangle pattern. After 66 rows, knit a row with single crochets. Congratulations, the job is finished.
Create a simple scarf from voluminous flowers

Such a scarf made from individual parts, it will look original. Let’s say right away that this option is not particularly suitable for beginners due to its complexity. For example, you can knit a scarf from lush flowers.
To do this you will need: yarn of the desired colors, a needle for sewing parts, hook number 3.
Each flower is approximately 5 cm in diameter.
Sentences marked *…* are considered combinations.
Step-by-step MK with a description of the process
To begin, we cast on 4 air loops and connect them into a ring with a connecting post.
1 row. One air loop, 12 single crochets - in a ring.
2nd row. Take a different color and knit a connecting stitch into the first loop, then knit 3 chain loops and make a yarn over, then *insert the hook into this loop, grab the thread and pull out the loop* to the height of the initial three lifting loops, one loop is ready. Then repeat this combination twice, then yarn over again, insert the hook into the next loop and grab the thread, then pull out the loop. Then repeat the combination twice again. After this, grab the thread and pull it through all the loops on the hook. And one flower petal is ready. An example of a petal in the photo.

The remaining petals are knitted similarly. There should be a total of six petals. Knit the last connecting stitch in the same loop.
You can connect flowers simply by tying them together, or you can also make a small mesh. Ties for scarves can also be made from flowers and by knitting several air loops and tying them with single crochets.
An interesting accessory made of bright hearts for the baby
To do this, take yarn of the desired color and hook No. 2.
1 row. 4 air loops are cast on, a connecting stitch is knitted into the 1st air loop. Next, cast on 3 chain stitches and knit according to the slipper pattern: 2 double crochet stitches, 3 double crochet stitches, 1 chain stitch, 1 double crochet stitch, 1 chain stitch, 3 double crochet stitches, 3 double crochet stitches, 2 chain stitches , connecting post into a ring.
2nd row. 3 chain stitches, single crochet, 2 single crochet from 1 loop, 3 single crochet.
To make it sharper, knit a stitch of the 1st row between the chain stitches in the following order: 2 single crochets, 1 chain stitch, 2 single crochets, 3 single crochets, 2 single crochets from the first loop, 2 single crochets.
Finally, knit 2 air loops and a connecting post.
You get hearts like in the photo:

Connect the hearts together with a thread or knit a simple mesh.
We hope your products turn out as wonderful as you wanted! Good luck in your creativity and continuous inspiration!
Free educational video lessons for beginners
Look how to make an openwork scarf, it's very simple:
Klondike - fillet technique

Kerchief using fillet technique.
Knitted using the fillet knitting technique, for those who don’t know how, you can see the basics here

It is knitted on the right side, while on the left in each row a decrease is made in one square. Speaking in the language of mathematicians, we take a leg of a right triangle and knit the hypotenuse (this is the longest side of the scarf) and the second leg. My scarf consists of 34 squares = 69 loops, the pattern can be seen here

Empty cell = STN (double crochet, also known as the border of the cells in the diagram) - VP (chain loop) - STN
Filled square = 1 SC, fluffy column of 5 ST2H, 1 SC
Please note that the border double crochet is counted in both cells (so as not to make too much noise)
After knitting the triangle without breaking the thread, cast on 40 VP (this is a tie on one side). On the first scarf I gained 50 - a lot, on the second 30 - not enough, so 40 is just right. Above these VPs we knit 40 STN, then we knit the same stitches along the entire hypotenuse (to avoid pulling, I knitted one STN from each knot and 2 from each lumen). Then we knit the second ST2N tie, using the first link as a hint. Well, the final chord is tying the entire scarf with fans of 5 SC (one SC of the previous row is the beginning, skip 1 SC, then the middle, skip 1 SC, the end of one fan and at the same time the beginning of the second).
As you understand, the design for the headscarf can be anything. Take a checkered piece of paper and create; you can also knit a lush column from 4 ST2H. The binding, in principle, is also to your taste and color. If the pattern is continuous, you can try to knit a scarf base only from empty cells. And then knit lush columns of the pattern on top, in a different color. The continuity of the line of the drawing is necessary so that there are no broaches. The same hearts are quite suitable. I would be very glad if someone dares to do this, it will be very interesting how it will turn out, since these are just my ideas.
PS I didn’t manage to take a good photo of the child wearing it, it keeps tightening, so for now the scarf is waiting for next summer
Crocheted scarves not only do not lose their relevance, but on the contrary, they are becoming more and more popular among the fair sex of different ages.
A light openwork scarf is an important summer wardrobe item, indispensable for long walks in the scorching sun. In particular, little princesses who like to play outside for a long time need a headscarf: it will protect the child’s head from the harmful effects of the sun’s rays and will not allow unruly hairs to interfere during play.
As a rule, crocheting a scarf for a girl is as easy as shelling pears, and even the most ordinary fillet mesh looks truly charming on small heads, but mothers give full rein to their imagination by coming up with exclusive models of scarves.
The patterns of crochet scarves amaze the imagination, they are not similar to each other, and if they have something in common, then the different colors, original finishes and openwork patterns make each product truly unique.

Scarves are crocheted quite quickly; with the right skill, in a few hours of crocheting you can get a new exclusive headdress. The only one important point in preparation for knitting - selection of appropriate yarn: for summer scarves it is better to use cotton yarn (Iris type), spring-autumn models should preferably be made from thin mohair or cotton thread with the addition of wool, which creates an air layer to retain heat.
We invite beginners in crocheting and experienced craftswomen to master classes on knitting a variety of scarves: children's and women's, light summer and warmer ones for the spring-autumn season. Step by step instructions, diagrams and explanatory photos will help you quickly understand the material and crochet a wonderful scarf!
Abbreviations in the text:
- VP – air. a loop;
- Runway - air. lifting loop;
- Art. s/n – double crochet;
- Art. b/n – single crochet;
- Art. s/2n – double crochet stitch;
- PS – half-column;
- pet. - a loop;
- flail - chain;
- PR – previous row;
- SS – connection column.
Photo tutorial on knitting a simple scarf for beginners
A summer children's scarf with decorative crocheted flowers is a great way to please your little one with a new bright accessory. The process of knitting it is quite simple; you can decorate the headdress with any decorative elements depending on the flight of fancy of the craftswoman.
For knitting you need no more than 100 grams. cotton yarn (iris, daffodil) and hook No. 1.5.

Knitting progress
We collect the flail. on 5 VP, we connect the SS into a ring.


We recruit 6 more VPs.

Let's start knitting the pattern: 6 VP + 3 tbsp. s/n + 3 VP + 3 tbsp. s/n + 3 VP + 1 tbsp. s/n (this entire combination must be knitted in a ring of 5 VPs).
To knit the second row of the pattern, the knitting must be turned over. Raise 6 VP.

We knit the third and all subsequent rows of the pattern in the same way as the second row, expanding the corner of the scarf with a combination of “3 tbsp. s/n + 3 VP + 3 tbsp. s/n" into the central arch.

We knit the scarf fabric until it reaches a width equal to the circumference of the child’s head.
The next step is tying the product along the non-stretch edge: 2 runways, in each cell - 3 PS s/n. So we will knit several rows.


Tying with an openwork border on the remaining two sides with the following repeats: “5 tbsp. s/n from one loop in the 2nd st. s/n there are three of them, art. b/n – under the chain.”

Completion: knitting ropes (cast on a chain of 50 VPs on each side, knit into each loop using a double stitch), as well as decorative flowers.

We knit flowers according to the pattern:
We decorate the headband with ready-made crocheted flowers, decorate them with pearl beads or other decorative elements (rhinestones, flower buttons, etc.).
Sprinkle the finished product with starch solution and iron it with a hot iron to give the scarf the correct shape. Ready!
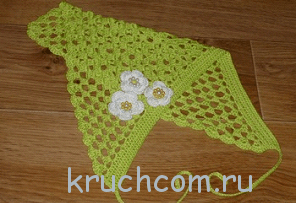
Openwork scarf for baby daughter

Those who have mastered the basics of knitting scarves can confidently move on to a more complex model - an elegant openwork scarf. For knitting you need cotton yarn, as well as a hook No. 2.5.
Progress
The scarf is knitted not as usual - from the corner, but from the base.
Row No. 1: pick up the flail. for 33 VP (the number of stitches can be varied, observing an important condition: it must be divided by 3) + 2 VP for the pattern + 1 runway, in each stitch. chains - according to the 1st art. b/n.
Row No. 2: turn of work, 2 VP, skip 1st st. PR, next. pet. – 1 tbsp. b/n, skip 1st stitch again. PR, next pet. – 1 tbsp. b/n, add 3 VP + 1 tbsp. b/n, then we knit with rapports to the end of the row: “skip 2 stitches. PR, next. pet. – 4 tbsp. s/n (between them - 2 VP), skip 2 pets. PR, art. b/n, 3 VP, art. b/n".
Row No. 3: turn around the work, into the 1st arch from the 1st VP - st. b/n + 3 VP + st. s/n, in the central arch of the fan: st. b/n + 3 VP + st. b/n, rapports to the end of the row: in an arch of 3 VP - 4 tbsp. s2/n (2 VPs between them), to the center. fan arch - st. b/n + 3 VP + st. b/n.
We knit the ties: a chain of VP, we tie them according to the principle of a fillet mesh: 1 VP, through 1 st. - Art. s/n. We smoothly move on to tying the smooth edge of the scarf (the base of the triangle), knitting it with fillet mesh.
Tying the openwork sides of the scarf (top of the triangle): we pass the st. along the entire perimeter. b/n. Then we unfold the work, 2 VP, SS in the next. pet., repeat the rapports to the end: (3 VP in one pet., treble s/2n, SS) x 4 times, 3 VP + SS + 2 VP, after 1 st. PR - SS, 3 VP, through 1 st. PR - SS, 2 VP, through 1 st. PR – SS.
The openwork scarf is ready. Using the principle of this knitting, you can knit a light bactus scarf for a woman; to do this, you just need to calculate the correct number of loops for the knitting base (must be divisible by 3).
For clarity, we offer you step-by-step video tutorials on how to make such a scarf:
Crochet air scarf made of square, pentagonal and triangular motifs

Despite all the airiness, this scarf can be knitted from wool and acrylic yarn, which means it can act as a headdress that doesn’t burden your hair or as a light cape over your shoulders in the cold season.
The knitting patterns for scarf motifs are as follows:

For knitting you will need: 170 gr. yarn (wool, cotton, acrylic), hook No. 2-2.5.
Progress
Quadrangular motif (5 pieces): we collect a flail. from 8 VP, we close it in the SS ring.
Row No. 1: 1 runway, 11 st. b/n in the base ring. SS.
Row No. 2: 11 rapports: “5 VP, 1 tbsp. with 2/n in st. b/n PR, 5 VP.” SS.
Row No. 3: 6 VP (1 VP, 5 VP), 12 repeats: “1 tbsp. b/n in Art. with 2/n PR, 5 VP.” SS.
Row No. 4-13: knit according to the pattern, ending each with a SS.
Triangular motif (4 pcs.): we collect a flail. from 8 VP, we close it in the SS ring.
Row No. 1: 1 runway, 11 st. b/n in the base ring. SS.
Rows No. 2-13: knit forward and backward according to the pattern.
Pentagon motif (1 piece): we collect a flail. from 8 VP, we close it in a circle with SS.
Row No. 1: 1 runway, 9 st. b/n in the ring. SS.
Row No. 2: rapports 9 times: “5 VP + 1 tbsp. s2/n in st. b/n PR, 5 VP.” SS.
Row No. 3: 6 VP (1 VP, 5 VP), 10 repeats: “1 tbsp. b/n in Art. s2/n PR, 5 VP.” SS.
Rows No. 4-13: continue according to the pattern.
Assembling the scarf: we connect the knitted motifs according to the motif connection diagram (presented above).
Finishing: we tie the base of the scarf according to pattern No. 1 in two rows. Sides (triangle) - according to strapping pattern No. 2 (6 rows).
The original women's all-season headscarf is ready!
Bright women's headscarf made with fillet crochet

For knitting you will need: 350 gr. yarn (cotton - for the summer, wool - for the spring-autumn season), as well as a hook No. 2-2.5.
Knitting pattern:

Progress
Central square motif: we collect a flail. for 27 VP (22 VP base + 3 VP + 2 VP).
Row No. 1: 1 tbsp. s/n in the 9th VP chain. from the hook, 7 rapports: “2 VP, 1 tbsp. s/n in the 3rd VP of the base chain.”
Rows No. 2-7: continue in the forward and reverse directions according to the square motif pattern.
Rows No. 8-12: knit in a circular manner according to the pattern. We end each row with a SS.
Row No. 13: to the beginning of work, go through with SS and knit on 3 sides of the square motif according to the row pattern. Next we knit in the forward and reverse directions up to the 28th row inclusive. We cut off the thread.
The back side of the scarf (green color in the diagram): attach the thread, knit straight and back according to pattern No. 3 main. pattern (rows No. 1-15).
Right side of the scarf (blue color in the diagram): attach the thread and knit straight and back according to pattern No. 2 main. pattern (rows No. 1-31). We cut off the thread.
Left side of the scarf (blue color in the diagram): attach the thread and knit straight and back according to pattern No. 2 main. pattern (rows No. 1-31). We don’t cut the thread, we immediately start tying. We knit along the long side of the scarf - according to the binding pattern.
We tie the side (short) sides of the scarf along the trail. principle: rapports to the end of the row “1 tbsp. non-woven, arch made of 30 VP" (such a harness will replace the need to attach fringe). SS. We cut off the thread. The scarf is ready!
Video tutorials on crocheting scarves
In order to examine in more detail the process of crocheting scarves, we suggest that you familiarize yourself with detailed master classes from famous domestic craftswomen:
I present to your attention crocheted scarf with a diagram and detailed description for beginner needlewomen. This thin cotton headdress is a convenient solution for a girl for the summer: a light scarf will protect her head from the sun's rays, hold even the most unruly hair, and, unlike a hat, stays more securely on her head and does not fall off at the first gust of wind. . The basis of the pattern is fillet knitting.

The design of the knitted scarf model is such that it does not need to be tied: it is fixed like a cap. Another undeniable advantage of the model is that it fits almost any size. We simply knit starting from the corner to the desired circumference of the head, regardless of the logic of the pattern, and then continue knitting in the round. You can extend the pattern (or take a little thicker yarn) for another block of hearts - and you will get a model for the head of an adult.
This scarf has served the child faithfully for several years. At first (as you can see in the photo) it was quite spacious, but it still fit well on the head and coped with its functions. Later it began to lie more tightly.

To crochet a scarf you need:
white cotton yarn YarnArt Violet (100% mercerized cotton, 50 g - 282 m);
hook 0.95 mm.
My scarf took almost the entire skein, 43 g of yarn. Crocheted scarf pattern (click on it to enlarge and save for printing).

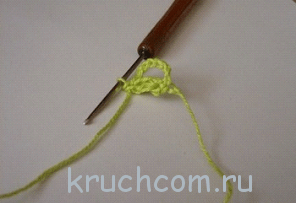
We start knitting a scarf for a girl or girl from the bottom corner.
The first block of fillet knitting consists of just one heart.
1 row. 6 ch, 2 tbsp. with a double crochet in the 1st and 2nd ch, 6 ch. Let's expand.
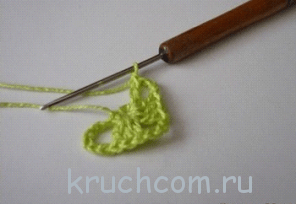
2nd row. 2 tbsp. double crochet (in the 1st ch and the last double crochet of the previous row), 2 ch, 3 tbsp. with a double crochet around a chain loop. previous row; 6 v.p. Let's expand.
3rd row. 2 tbsp. double crochet, 2 ch, 3 tbsp. double crochet, 2 ch, 3 tbsp. with double crochet, ch 6 U-turn.
4 row. 2 tbsp. double crochet, 2 ch, 3 tbsp. double crochet, 2 ch, 3 tbsp. double crochet, 2 ch, 3 tbsp. double crochet, ch 6, spread.
5 row. 2 tbsp. double crochet, 2 ch, 3 tbsp. double crochet, 2 ch, 1 tbsp. double crochet, 2 ch, 1 tbsp. double crochet, 2 ch, 3 tbsp. double crochet, 2 ch, 3 tbsp. double crochet, ch 6, spread.
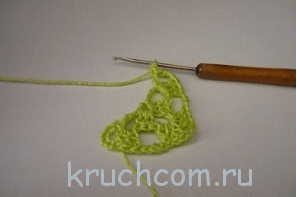
6th row. 2 tbsp. double crochet, 2 ch, 3 tbsp. double crochet, ch 2, *1 tbsp. double crochet, 2 ch* repeat from * to * 4 times, 3 tbsp. double crochet, 2 ch, 3 tbsp. double crochet, ch 6, spread.
7th row. 2 tbsp. double crochet, 2 ch, 3 tbsp. double crochet, 2 ch, 1 tbsp. double crochet, 2 ch, 1 tbsp. double crochet, 2 ch, 1 tbsp. double crochet, 3 tbsp. double crochet, tied together, 1 tbsp. double crochet, 2 ch, 1 tbsp. double crochet, 2 ch, 1 tbsp. double crochet, 2 ch, 3 tbsp. double crochet, 2 ch, 3 tbsp. double crochet, ch 6, spread.
8 row. 2 tbsp. double crochet, 2 ch, 3 tbsp. double crochet, 2 ch, 1 tbsp. double crochet, 2 ch, 1 tbsp. double crochet, 2 ch, 1 tbsp. double crochet; 3 tbsp. double crochet, tied together; 3 tbsp. double crochet; 3 tbsp. double crochet, tied together; 1 tbsp. double crochet, 2 ch, 1 tbsp. double crochet, 2 ch, 1 tbsp. double crochet, 2 ch, 3 tbsp. double crochet, 2 ch, 3 tbsp. double crochet, ch 6, spread.
9 row. 2 tbsp. double crochet, 2 ch, 3 tbsp. double crochet, 2 ch, 1 tbsp. double crochet, 2 ch, 1 tbsp. double crochet, 2 ch, 1 tbsp. double crochet; 3 tbsp. double crochet, tied together; 7 tbsp. double crochet; 3 tbsp. double crochet, tied together; 1 tbsp. double crochet, 2 ch, 1 tbsp. double crochet, 2 ch, 1 tbsp. double crochet, 2 ch, 3 tbsp. double crochet, 2 ch, 3 tbsp. double crochet, ch 6, spread.

10 row. 2 tbsp. double crochet, 2 ch, 5 tbsp. double crochet, 2 ch, 1 tbsp. double crochet, 2 ch, 1 tbsp. double crochet; 3 tbsp. double crochet, tied together; 11th century double crochet; 3 tbsp. double crochet, tied together; 1 tbsp. double crochet, 2 ch, 1 tbsp. double crochet, 2 ch, 5 tbsp. double crochet, 2 ch, 3 tbsp. with double crochet, ch 6 U-turn.

11 row. 2 tbsp. double crochet, 2 ch, 3 tbsp. double crochet, 3 ch, 3 tbsp. double crochet, 2 ch, 1 tbsp. double crochet, 2 ch, 1 tbsp. double crochet; 3 tbsp. double crochet, tied together; 11th century double crochet, 3 tbsp. double crochet, tied together; 1 tbsp. double crochet, 2 ch, 1 tbsp. double crochet, 2 ch, 3 tbsp. double crochet, 3 ch, 3 tbsp. double crochet, 2 ch, 3 tbsp. double crochet, ch 6, spread.
12 row. 2 tbsp. double crochet, 2 ch, 3 tbsp. double crochet, 2 ch, 1 tbsp. double crochet, 1 tbsp. without crochet, 3 tbsp. double crochet, 2 ch, 1 tbsp. double crochet, 2 ch, 1 tbsp. double crochet; 3 tbsp. double crochet, knitted together; 5 tbsp. double crochet; 3 tbsp. double crochet, knitted together; 5 tbsp. double crochet; 3 tbsp. double crochet, knitted together; 1 tbsp. double crochet, 2 ch, 1 tbsp. double crochet, 2 ch, 3 tbsp. double crochet, 1 tbsp. without crochet, 1 tbsp. double crochet, 2 ch, 3 tbsp. double crochet, 2 ch, 3 tbsp. double crochet, ch 6, spread.
13 row. 2 tbsp. double crochet, 2 ch, 3 tbsp. double crochet, 2 ch, 1 tbsp. double crochet, 2 ch, 1 tbsp. double crochet, 3 ch, 3 tbsp. double crochet, 2 ch, 1 tbsp. double crochet, 2 ch, 1 tbsp. double crochet, 2 ch, 1 tbsp. double crochet; 3 tbsp. double crochet, knitted together; 1 tbsp. double crochet; 3 tbsp. double crochet, knitted together; 3 tbsp. double crochet; 3 tbsp. double crochet, knitted together; 1 tbsp. double crochet; 3 tbsp. double crochet, knitted together; 1 tbsp. double crochet, 2 ch, 1 tbsp. double crochet, 2 ch, 1 tbsp. double crochet, 2 ch, 3 tbsp. double crochet, 3 ch, 1 tbsp. double crochet, 2 ch, 1 tbsp. double crochet, 2 ch, 3 tbsp. double crochet, 2 ch, 3 tbsp. double crochet, ch 6, spread.
14 row. 2 tbsp. double crochet, 2 ch, 3 tbsp. double crochet, 2 ch, 1 tbsp. with ankid, 2 ch, 1 tbsp. double crochet, 2 ch, 1 tbsp. double crochet, 1 tbsp. without crochet, 3 tbsp. double crochet, *2 ch, 1 tbsp. double crochet* - repeat from * to * 11 times, 2 tbsp. double crochet, 1 tbsp. without crochet, 1 tbsp. double crochet, 2 ch, 1 tbsp. double crochet, 2 ch, 1 tbsp. double crochet, 2 ch, 3 tbsp. double crochet, 2 ch, 3 tbsp. double crochet, ch 6, spread.
15 row. 2 tbsp. double crochet, 2 ch, 3 tbsp. with double crochet, 2 ch, * 1 tbsp. double crochet, ch 2* - repeat 4 times; 3 tbsp. double crochet, ch 2; *1 tbsp. double crochet, ch 2* repeat 10 times, 3 tbsp. double crochet, *2 ch, 1 tbsp. double crochet* - repeat 4 times; 2 ch, 3 tbsp. double crochet, 2 ch, 3 tbsp. double crochet, ch 6, spread.
16th row. 2 tbsp. double crochet, ch 2, 55 st. double crochet, 2 ch, 3 tbsp. with double crochet, ch 6; reversal
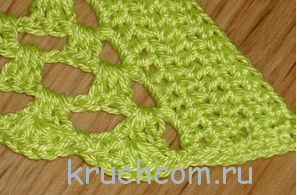
We've completed the first heart block and are moving on to the dividing lace.
17th row. 2 tbsp. double crochet, 2 ch, 3 tbsp. double crochet, *4 ch, 1 tbsp. double crochet* - repeat 13 times, 2 ch, 3 tbsp. double crochet, 2 ch, 3 tbsp. double crochet, ch 6, spread.
18th row. 2 tbsp. double crochet, 2 ch, 3 tbsp. double crochet, *2 ch, 1 tbsp. double crochet* - repeat 28 times, 2 ch, 3 tbsp. double crochet, 2 ch, 3 tbsp. double crochet, ch 6, spread.
19 row. 2 tbsp. double crochet, 2 ch, 3 tbsp. double crochet, ch 1, 61 st. without crochet, 1 ch, 3 tbsp. double crochet, 2 ch, 3 tbsp. double crochet, ch 6, spread.
20 row. 2 tbsp. double crochet, 2 ch, 3 tbsp. double crochet, 2 ch, 1 tbsp. double crochet, ch 2, *1 tbsp. without crochet, ch 2; 2 tbsp. double crochet, separated by 2 ch; 2 ch* - repeat from * to * 10 times, st. without crochet, 2 ch, 1 tbsp. double crochet, 2 ch, 3 tbsp. double crochet, 2 ch, 3 tbsp. double crochet, ch 6, spread. We have 10 hemispheres on which we will now attach the “petals”.

21 row. 2 tbsp. double crochet, 2 ch, 3 tbsp. double crochet, ch 2; 3 tbsp. double crochet, tied together; 2 ch, 3 tbsp. with a yarn over, tied together, at the base of the first “petal”; * 2 vp, around the center of the hemisphere of the previous row - 3 petals from 3 tbsp. with yarn overs, tied together, separated by 2 ch* - from * to * make 10 such rosettes; 2 ch, 3 tbsp. double crochet, tied together; 2 ch, 3 tbsp. double crochet, tied together; 2 ch, 3 tbsp. double crochet, 2 ch, 3 tbsp. double crochet, ch 6, spread.
22 row. 2 tbsp. double crochet, 2 ch, 3 tbsp. double crochet, *2 ch, 1 tbsp. double crochet* - repeat 36 times; 2 ch, 3 tbsp. double crochet, 2 ch, 3 tbsp. double crochet, ch 6, spread.
23 row. 2 tbsp. double crochet, 2 ch, 3 tbsp. double crochet, *4 ch, 1 tbsp. double crochet* - repeat from * to * 19 times, 2 ch, 3 tbsp. double crochet, 2 ch, 3 tbsp. double crochet, ch 6, spread.
We have finished the lace and are moving on to the second block with hearts. The heart is the same as it was in the corner, but now between the hearts there are dividing blocks with a checkerboard of “petals” - three double crochets tied together.
24 row. 2 tbsp. double crochet, ch 2, 87 st. double crochet, 2 ch, 3 tbsp. double crochet, ch 6, spread.


When we have knitted it to the required head circumference, we close the knitting into a ring and continue knitting according to the pattern, but without extensions, until the end of the pattern.


The last row in the pattern is a row of double crochets.
After this you need to perform the strapping. Around the face the harness is as follows: 6 tbsp. without crochet, 3 ch, 6 tbsp. without a crochet (in this case, under the chain of VP we skip one column of the previous row). Corner binding - 5 tbsp. without crochet, 3 ch, 5 tbsp. without a crochet.

Wash the finished crocheted scarf for a girl, dry it flat on a horizontal surface, and then steam it with a hot iron through a damp cloth from the wrong side.

A beautiful scarf, crocheted according to our scheme with a description, you can go for a walk... to the sea, for example, right?


Eva Casio specially for the site Handicraft Master Classes
We recommend reading
 Review of cosmetological procedures for facial care at different age periods Cosmetological procedures for the face after 30
 Salt-free diet for weight loss: menu, recipes, its benefits and harms
 - What to wear with it?") Women's bomber jacket (50 photos) - What to wear with it?
Women's bomber jacket (50 photos) - What to wear with it? Pilates - what is it, advantages and features of this set of exercises Pilates definition