A toy Santa Claus with his own hands will bring a holiday to any home. Whether you believe or not in a magical old man with a bunch of gifts in a bag, every interior is full of his images. But children believe in him unconditionally, therefore, when making a craft in the form of Santa Claus, they are probably expecting a real one, bringing them a whole mountain of long-awaited gifts. Give your children a real fairy tale and make with them a doll, paper, plasticine - any Santa Claus that your imagination can draw. And if our photographs from interesting ideas, then even better.
DIY Santa Claus
We will devote our entire article to how to make Santa Claus with your own hands. After all, in fact, crafts can be very diverse: sewing, felting, knitting, appliqué, painting and modeling. Well, we'll start with decoupage.
This plate with the image of Santa Claus is made using the decoupage technique. A beautiful napkin with a pattern needs to be divided into layers; you will only need the top one, the one on which the pattern is applied.
If you are decorating a plate or any object whose surface you will not use, you can use PVA glue for the work. But in this work, the reverse decoupage technique was used, that is, a transparent glass plate is taken and a napkin is glued with reverse side, and from the front it will shine through.
So, put a napkin on the back surface, degreased with alcohol, and moisten it with water. Make sure that the napkin is well soaked, but does not come apart. Be sure to remove excess water with a cotton swab. While the paper is still damp, coat the surface of the napkin with acrylic varnish in a thin layer. It should be applied with a narrow brush, moving from the center. The varnish should dry for quite a long time, about twelve hours. If desired, you can apply another layer, also allowing enough time for drying. Patterns and ornaments are applied to the clean surface of the plate using acrylic paint, you can paint over the entire surface of the plate. Another layer of acrylic varnish will complete the craft.
DIY felt Santa Claus
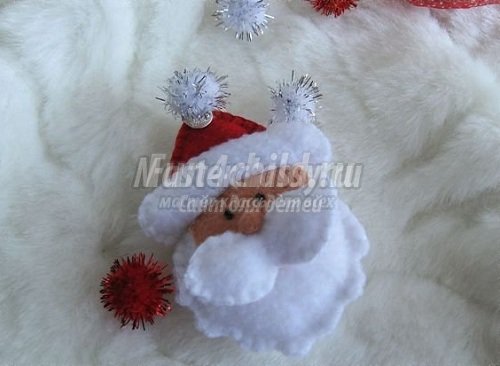
And such a Santa Claus with his own hands can decorate your christmas tree. It is made from felt, and you and I already know that it is completely simple to make.
To sew a toy you will need small pieces of white, beige and red felt. Of course, it’s a pity to buy large pieces to make such crumbs out of them, but you can make a lot of these Santa Clauses and give them to all your friends and acquaintances.
- On paper, draw a pattern for your craft; you will need five elements - head and beard, face, edge, hat, mustache.
- From beige felt we cut out one element - the face, from red felt - two elements of the hat.
- From white we cut out two elements of the head with a beard, the edges and a mustache.
- Now we create a mustache and a hat, sew the elements together not completely, and fill them with filler.
- We glue a beige face onto one part of the head using Moment glue, sew the two parts of the head together, and fill them with silicone filler.
- We put the hat on the top of the head, secure the bottom with a pin, put the edge along the bottom and sew it on with hand stitches. At the same time fixing the hat.
- You need to sew the edge on both the front side and the back side; we cut out two elements with you.
- A voluminous mustache, beaded eyes and a nose made from rolled felt with silicone are sewn onto beige felt.
- The end of the hat is crowned with an elegant bell with braid for hanging the toy.
There's more you can do the simplest postcard made of felt with Santa Claus. You don't even need a pattern - just use your imagination and creativity. For beginners, we recommend that you first make a paper sketch of the craft, and only then transfer it to felt fabric. Use glue to connect pieces of fabric together.

DIY Santa Claus made from plywood


DIY Santa Claus made from paper

New Year- a wonderful reason to make an application on greeting card. And who can decorate our applique better than Santa Claus with his own hands made of paper? You can glue either simple pieces of colored paper or strips folded using the quilling technique. In the second case it will be more effective. If everything is more or less clear with the figure of Santa Claus, then we will tell you in more detail how to make a Christmas tree. You will need sheets of double-sided colored paper. Cut out strips from it, but not even, but with small sides of two centimeters and a centimeter. Using scissors, cut the fringe strips on one side and use a wooden skewer to roll them into a roll, starting from the narrow edge. When you have rolled up the entire strip, secure the straight edge with glue and carefully straighten the fringe so that the element becomes as flat as possible. You will need a lot of such patterns; you will need to lay them out and glue them onto paper in the shape of a Christmas tree. Decorate the centers of the elements with folded multi-colored stripes.

Using thick paper or cardboard, you can make other important attributes, for example, make Santa Claus's sleigh with your own hands. These can be, or you can use a rolled one for the base newspaper tubes, and we suggest you make a sled based on an old car from which the body has already been removed. You need to cut out four elements from cardboard - the sides of the sleigh, the back and the front. You can color the sleigh with pencils and paints, and rhinestones or shiny stickers will add a snowy winter texture. You can put not only Father Frost and the Snow Maiden on your sleigh, but also put a bag or box with a gift in them.
Sew Santa Claus with your own hands
Using fabric you can make toys that you would never buy in a store. You can sew Santa Claus with your own hands and your child will simply be delighted with this toy. Santa Claus tilde has gained enormous popularity.

A distinctive feature of these wonderful dolls is a sweet facial expression, but at the same time very small facial features, as if simply outlined, rosy cheeks, plump tummy shapes, long legs and arms. Natural, soft fabrics, which are always used for sewing tildas, are welcomed by all mothers, since it will be both pleasant and safe for the child to play with such toys.

You can not only sew a figure or Santa Claus costume with your own hands, but also knit it. A knitted figurine will be a favorite toy, and if it is not stuffed with stuffing, then such dolls can be used for a homemade puppet theater.
How to sew Santa Claus with your own hands

But Santa Claus can be not only a toy, but also a decoration for a bag of gifts. We'll tell you how to sew Santa Claus with your own hands and place him on packaging for New Year's souvenirs, which we can then give to our relatives or friends. You can embroider the face of Santa Claus using satin stitch or cross stitch, you can make a fabric one using glue, or you can make a crocheted element, which you will then sew on a bag. It is done quite simply - the first row of loops is closed into a ring and tied with single crochets. When the circle is already of sufficient size, tie it with several circles of snow-white threads, then change the thread to red and knit a hat. Long threads white thread the loops into the bottom row, and then trim the resulting beard with scissors. Also make a red nose, like the real Santa Claus, from threads knitted in a circle. The resulting element is sewn to the finished bag quite tightly. It is better to tie the top of the bag with an elegant ribbon.

For the simplest Santa Claus, do-it-yourself patterns will also be the simplest. These are two large balls - one for the body, one for the head. Having cut out the circles, fold each of them in half, baste the bottom with thread not all the way, and when we have already filled the fabric with padding polyester, tighten the thread so that we get a ball. Santa Claus will also need an elegant hat with a pompom, made from fabric swatches. We connect all the elements together, sew the eyes onto the face, outline the mouth with red threads, and make a nose from a small ball. We create a beard and mustache from padding polyester, and we also use it to make the edges of a hat and a fur coat. You have Santa Claus ready for your New Year's composition.
Making a real Santa Claus doll with your own hands will be more difficult, because this is an entire art. ? For such crafts, a combination of modeling and sewing is most often used. With the help of skillful stitches, you can “sculpt” a face for a toy, and a fur coat, hat, and boots are simply sewn from fabric. This combination is called sculptural textiles.

For Santa Morse, you need to create a frame using the technique of sculptural textiles. For these purposes, we need a small plastic bottle, into which the wire is inserted in a loop, into the place where the head will be attached. The same loops will serve as hands; they will not be visible at all under the mittens. We paint a face made of fabric, glue on eyes, and attach a beard made of artificial fiber. A fur coat, felt boots, an elegant sash - we make everything, even Santa Claus’ staff, with our own hands.

If you are familiar with the technique of felting wool, otherwise called felting, then you can make this variation of the fairy tale wizard. This technique is very difficult, but at the same time, dolls created using the felting technique always look original and complex. The base material is wool, which is repeatedly pierced with a special needle until the material becomes dense and the fibers tangle together, forming a dense structure. Since such a craft is hollow inside, it will not require much material from you, but if you put such a Santa Claus under your Christmas tree, then the delight of everyone you know is simply guaranteed.
We hope that we have provided you with enough options on how to make Santa Claus with your own hands. Don't forget to please the New Year's old man by making his granddaughter - the Snow Maiden!
Key news tags: ,
Other news
Every home must have its own wizard, Santa Claus. Such a charming grandfather will not leave either children or adults indifferent. We will definitely place the good wizard under the Christmas tree and admire it, but first we need to make him. In this lesson I will show several options on how to make Santa Claus with your own hands with step-by-step photographs.


How to make Santa Claus with your own hands
From scrap materials
Since this is a “personal” wizard, we will make it from everything that is at hand, namely: from a can of tomato paste, polystyrene foam, plasticine, scraps of fabric and padding polyester, sushi sticks, “yolks” from Kinder surprises .
You will also need threads and a needle, scissors, line corrector, and red nail polish.

We make boots from “yolks” from Kinder surprises.

We make a body and legs from a can, foam plastic, and plasticine.

We cover the body with padding polyester.

We make “skin” from beige knitwear.

We paint the legs with concealer.

We sew pants.

We try on a mustache and beard from padding polyester and make a nose.

Sew it on.

We cover the boots with fabric.

We insert the legs into the boots.

We cut out the handles.


We sew on the button eyes and put the cap on the head.

And for our wizard to become truly magical, we’ll put a bag on his shoulder. You can put sweets in it.
Every morning the child will take out a new surprise from it.


Santa Claus made of cardboard and colored paper
The basis of the future Santa Claus is cardboard. You can use the bushing from toilet paper- then Santa Claus will turn out to be small, or the base from paper towels - then he can be made tall. Or you can make a base from any cardboard of the desired size by rolling it up.

What you will need:
- cardboard;
- red paper;
- white paper;
- cotton pads;
- buttons;
- glue;
- scissors.
Lubricate the selected cardboard base with glue.

Wrap it in colored paper, leaving space for the face.

Then cut out a beard from a cotton pad.

Glue it to the right place.

We are preparing a hat for Santa Claus. We make a cone out of red paper, securing the ends with glue.

Decorate the cap with the remains of the cotton pad. Glue cotton wool onto the tip of the cap and along its edge.

We grease the inner edge of the cap with glue so that it holds tightly, and we dress it for Santa Claus.

We cut out two mittens from white paper and glue them to the sides.

We draw the face with colored pencils or paints. Then glue the cotton mustache.

We decorate the front of Santa Claus's fur coat with buttons. They can be glued or placed on plasticine. This is such a cute Grandfather Frost!


For the next craft we need red napkins.

You can take any image of Santa Claus, the main thing is that it fits in size.
Or you can download and print our version presented below in A4 format. There are three different sizes, you can choose according to the size of the napkins.

Print out the required quantity.

Cut it out.

Take red napkins.


Fold the napkin as shown in the photo.

We make a cut where Santa Claus's hat is, and insert a corner of the napkin. Roll a small ball out of cotton wool and decorate the hat.

Ours is ready! It can be stolen festive table and surprise your dear guests.

Shell craft
This craft is very simple, but original. It can be made together with children, then used as decoration or as New Year's gift friends and family.

Let's take the shell.

Cover with white acrylic paint.

The eyes are made of black wool, the nose is made of cotton wool.

We decorate the hat with a bead. We attach all elements using hot glue. Our craft is ready!

What is New Year without the main wizard? Santa Claus is an obligatory guest in every home. Therefore, today we will crochet an applique in the form of Santa Claus!

For knitting we need:
- red, white and peach yarn;
- hook;
- scissors;
- black polymer clay or 2 black beads.
Let's start knitting with an amigurumi ring of 6 loops. To do this, we need to knit 2 ch and in the 2nd of them from the hook, make 6 sc.. At the beginning of a new row we form 2 lifting loops, since we will then knit a dc.. Then in the next 3 loops we knit 3 dc each..

At this stage, change the color of the thread to peach or beige, pink. We do not cut the white thread, but simply lay it behind the loops. And in the remaining 3 loops we knit 3 dc.

We knit 1 ss into the 2nd lifting loop. Change the thread again to a white one and do not cut the peach thread. We knit 2 dc only in white loops.


In the new row we make 1 ch and unfold the knitting. Now we perform 1 sc in each loop along the peach loops. Now change the thread to red. We cut the white thread.

Then we unroll the knitting and make 2 stitches. Next we will knit like this: skip 1 loop and knit 1 dc to the last loop. We don’t knit it, but skip it. Turn around and make 2 ch, then knit 1 decrease and knit to the end, don’t knit the last stitch, turn around and make 1 stitch.

We knit a beard. To do this, use a white thread to join the white loops in the corner. Cast on 3 sts, then knit 4 dc into the same loop. In the next loop we perform 1 sc. We skip the loop and knit 5 dc in a new loop. Next, 2 sc, then skip the loop and again perform 5 dc. We knit like this until the end of the row.

We join the cap with a red thread and tie the edges of the sc. You can add a lurex thread to the main yarn. The cap will shine around the edges.
Now we join the top of the hat with white yarn. We form 3 points. Next we knit 7 unknitted dcs. And now we grab the thread and knit only 2 loops from the hook. Then we grab the thread again and also knit only 2 loops. We knit 2 loops at a time until everything is knitted. This is a pompom.

Now let's make the mustache. We collect a chain of 5 ch. Then we knit 1 sbn, 1sbn, 1 hdc, in the last we knit 1 sbn and 1 ssn. And again ch 6 and repeat the action.

We sew on the antennae and sculpt eyes from polymer clay. You can take 2 small beads. Or you can embroider the eyes with black yarn.
This is how you make a crochet Santa Claus applique!

Good day, dear readers and guests of the Harmony of Life blog! Spring is on the doorstep, you say, and she and Santa Claus are here! Please forgive me, I couldn’t do it before. But this is not the main thing, because this master class on making Santa Claus will be relevant every year.
How to make Santa Claus with your own hands
We will make a grandfather easily and cheaply.
Unfortunately, this time I had to make Santa Claus myself during those short breaks while I was sleeping little son. I hope that our next craft will be made by all family members.
Well, now let's move on to the main thing, how to make Santa Claus with your own hands. During this master class there will be several photographs that I took on my smartphone, so the quality is not very good, but you can see it). I captured only the main stages. I was in a hurry...
To make Santa Claus, I used the following materials:
- Sintepon (the craft took 1m 30cm)
- 3 red Santa Claus hats (bought for 15 rubles each).
- Nylon sock or flesh-colored stocking.
- Plastic five-liter water bottle.
- The threads are white and red.
- Two buttons for the eyes.
- Tinsel and “rain” for decoration.
- A piece of brown velvet for making a bag with gifts.
- A small stick for making a staff.
So, the first thing you need to do is line the bottle with padding polyester, to do this, first wrap it with padding polyester, measure how much you need to cut so that the padding polyester fits tightly around the bottle, see the photo below. Using white thread we sew the edges together so that they fit tightly around the bottle. This is the future body of Santa Claus.

The next step will be sewing a fur coat. If you have sewing machine- Amazing. If not, no problem, I don’t have one either and I sewed by hand. For Santa Claus's fur coat we will need two Santa Claus hats. We cut the top of the hats together with the bubo by 7 cm. We rip the rest of the hats and sew the two parts together, because from one hat the fur coat will not fit on the grandfather. When the parts of the two hats are sewn, we put them on the body and sew them in the middle, see photo.

Now it’s the turn to sew the arms, we have one Santa hat left, we also cut off the top of the hat along with the tambourine by 7 cm, then cut the hat into two parts lengthwise, measure the approximate length and width of the arms, focusing on the size of Santa Claus and now We sew each part, then stuff the arms with padding polyester and sew them to the body.

We cut out a strip of padding polyester approximately 10 cm wide and sew it to the fur coat instead of fur, thereby closing the seam and at the same time decorating the fur coat. See photo.

Now we make the collar; it’s up to you to decide how thick it will be. We cut off the required amount of padding polyester, wrap it beautifully around the upper part of the body and carefully sew it to the vertical strip of padding polyester with which we closed the seam on the fur coat. See photo.

Well, the grandfather’s torso is ready. Now let's start making the head. To do this, take the prepared stocking and stuff it with padding polyester so that the head is proportional to the body. In place of the spout, you can sew a button or make a nose also from padding polyester, like my Santa Claus, for this we tear off a small piece of padding polyester and roll it up into the ball and carefully insert it into the place where the nose will be. To highlight the nose a little, you can sew it with threads. Unfortunately, I did not capture this process. But you can watch the process on YouTube, just ask “stocking dolls”. When the nose is ready, sew on the button eyes.

Above the eyelet we sew small pieces of padding polyester, giving them the desired shape of the eyebrows. We tear off a small piece from the padding polyester, pull it out in the form of a mustache, and carefully sew the mustache under the nose. Below we glue a mouth, which can be cut out from the remnants of red fabric.

How to make a beard for Santa Claus
Next, we put the head on the neck of the bottle; you can glue or tie it for reliability. What is Santa Claus without a beard? We cut out a beard from padding polyester and sew it to the head. Now, from the remnants of the red fabric (if you remember, I cut off the tops of Santa’s hats with buboes), now we cut off the buboes and sew a hat from the remaining pieces of material, and, putting it on Frost’s head, lightly grab it with threads so that it doesn’t go anywhere. We trim the edging of the cap with padding polyester.
Now all that remains is to do the most enjoyable part - decorate our Santa Claus a little. We sew pieces of tinsel onto the fur coat. The cheeks can be highlighted with blush.
DIY Santa Claus photo
I completely forgot, we sew a bag from the fabric prepared for it, fill it with something that clicks, I used a clicky bag. We tie it with a string and you can decorate it with pieces of tinsel. We sew the finished bag to the hand of Santa Claus. We also need to decorate the staff. To do this, take the prepared stick, wrap it with padding polyester and wrap rain of any color on top. The staff is ready. Now you need to tie it to Frost's hand. This is how you can make Santa Claus with your own hands, simply and inexpensively (about 150 rubles). By the way, you can make the Snow Maiden in the same way. The final photo was also of low quality, but you can see how our grandfather turned out.

I hope that my master class on making Santa Claus with your own hands will help you create the same, or maybe even better, grandfather for yourself. And this is our Santa Claus in the garden under the Christmas tree, photo from the camera, so good quality not like from a phone.

Sincerely, Elena Kurbatova.
Competitions for the best creative works among students and parents have begun in schools and kindergartens. The New Year theme is quite extensive. In some groups it was decided to make a mitten from scrap materials, in others - a Christmas tree, in others - New Year's toys. My daughter and I have already knitted a mitten with fairy-tale characters (a scratching mouse, a jumping frog, etc.). There are up to a dozen different paper Christmas trees at home. So, today we’ll make a simple one New Year's toy. It will be Santa Claus.
Junior children can handle a craft made from colored paper without any help. school age. Children are not yet able to do this kind of work.
So, let's prepare:
- scissors
- white and colored paper
- pencils.

Next you need to make a fur trim for the hat and fur coat. We will need two white stripes approximately 10 mm wide. Let's bend the strip in half lengthwise, and go along the edge opposite to the fold with scissors and cut a narrow short fringe.

Glue the fur trim to the bottom of the fur coat. We immediately decide on the height of the hat and mark the edge of the headdress with a white border.

Next, cut out an elongated trapezoid from a landscape sheet and carefully round all four corners. Immediately cut thin long strips into the resulting figure - a beard. At the end of the work, we will go through each hair with the blade of the scissors to fluff up the snow-white beard.

Using gouache, watercolors, felt-tip pens or pencils, we draw the face of Santa Claus. A distinctive feature of the hero's appearance is thick eyebrows and a mustache.

We will also cut out the hair for our craft from paper. No difficulties.

All that remains is to glue all the parts into place. Santa Claus made from colored paper is ready. Of course, if you wish, you can continue the work, in particular, design the hero’s arms and legs. However, the craft also looks great in its presented form.

Let's put Santa Claus next to the paper Christmas tree. The tree is made of multi-colored (white and green) palms. We will place tinsel next to the children's crafts. It's a pity that there were no silver items at home. We will correct any misunderstanding this coming weekend. You still have to prepare for the matinee.
On this holiday, the kind wizard Santa Claus comes to us, who performs the most cherished desires. How to make Santa Claus with your own hands?
There are so many ways to make Santa Claus that you can list them until the Christmas holidays. Therefore, we bring to your attention only some ideas that can become the basis for creating new images.
Santa Claus using plasticine technique
The most classic material for children's crafts is plasticine. To make a craft using the technique of plasticineography or painting with plasticine, we apply a plasticine background to a cardboard base.

Attach Santa Claus' fur coat from red plasticine.

We sculpt the grandfather’s head from plasticine and fix it in place.

Attach the sleeves of the fur coat.

We attach felt boots and a bag with gifts. We decorate the fur coat with buttons and trim.

We make a real winter blizzard from thin plasticine sausages. We decorate the craft with plasticine snowflake dots.

Plasticine Santa Claus can be used as a Christmas tree decoration.

Paper Santa Claus applique
The classic version of the craft is. The simplest option for making crafts is applique. We cut out blanks for crafts from colored paper.

Glue on the face and red cap.

Glue on the eyes, nose and white strips of paper for the beard.

Curl your beard using a pencil.

The beard can be made only from the bottom or the entire lower part of the face can be covered. Paper Santa Claus applique - ready!

You can add volume to your beard, mustache and fur trim on your hat using cotton balls.

You can make Santa Claus a nose from a fluffy pompom.

Santa Claus applique made of cotton balls with a pompom
Watch the video on how to make a full-length Santa Claus applique.
Three-dimensional paper Santa Claus craft
Any child can make a magical character out of paper with their own hands. And so that the craft doesn’t turn out boring, let’s add some zest to it. In order to make a three-dimensional Santa Claus out of paper, we will need to fold the red paper into a cone.

Paper cone
Glue the face onto the cone.

We will cut out the arms from paper, and make the legs from ice cream sticks.

This fun craft can be placed on a chair or table. Santa Claus from a cardboard cone is ready!

Santa Claus using quilling technique
Using a cardboard cone, you can make Santa Claus using the quilling technique. Glue a cone out of red cardboard.

From paper strips we roll paper into rolls. Fix the tip of each curl with glue.

Glue white and red rolls onto the cone, forming a collar and buttons.

We make two large rolls from beige paper and press them a little, making them slightly convex.

Glue white curls - hair - onto one of the rolls.

We connect two beige rolls together - we get a head. We place red curls on top of the white curls - the hair - for a hat. Glue the mustache and beard onto the bottom beige roll.

Glue on the eyes. Strongly elongated red rolls are used to make hands.

We make palms from small beige rolls. Decorate the rest of the cone with red swirls. We did very well handsome Grandfather Frost using quilling technique.

It’s even easier to make a three-dimensional figure using cardboard toilet paper rolls. Paint the bushing red.

Glue on the felt face.


We make a cap and hair: we wrap a piece of padding polyester with red chenille wire, give it a spiral shape, and decorate the tip with a white pompom.

Glue on the pompom nose. We make a belt from black lace, and a buckle from a tin can opener.

Santa Claus made of cardboard roll and fabric
For the craft we will need: a cardboard roll, fabric, cotton wool, glue, scissors, a button, red beads and factory eyes. We wrap the sleeve in red cloth and immediately form a cap from it. We make a face out of cotton wool.

Glue on the eyes. We make the cheeks and nose from red beads. All that remains is to attach the pompom to the cap and decorate grandpa’s costume with buttons.

DIY Santa Claus made from cork
You can make a three-dimensional figurine from a wine cork. We paint half of it with red paint.

Cut out a circle from felt.

Cut the circle into three sectors.

We make a cap out of felt, immediately gluing a loop to it.

Glue the cap to the cork.

Draw the eyes and nose. Glue on Santa Claus's beard. We make a cotton wool edge on the cap.

Santa Claus from traffic jams - ready!

A very cute New Year's Santa Claus pendant is made from a painted pine cone.

Santa Claus, made from a child's palm, will leave a touching memory of a small child's hand. For the craft we need to make salt dough, which we roll out into a layer of medium thickness. We apply a pen and use a stack to cut out the contours of the palm. Make a hole in the top. Place the pieces in the oven to dry and harden.

After the blanks have dried, paint them white.

Then we draw the face and cap of Santa Claus. We cover the craft with colorless varnish. Let Santa Claus dry and tie a beautiful ribbon. The original salt dough pendant is ready!

An interesting Santa Claus is made from disposable wooden spatulas or ice cream sticks.

Glue them in a row.

Cover the sticks with white paint.

We decorate the face with cardboard eyes and a nose, and make a beard from cotton balls. We glue the cap from red cardboard and decorate it with a cotton pompom.

Santa Claus made from popsicle sticks is ready!

You can make a craft from one stick.

We paint it red, leaving some free space - this will be the face. We decorate the face with a cotton beard and the edge of a cap, and glue on toy eyes.

The suit is completed with buttons. Even kids can cope with this task.

This original craft is made from a disposable plate that turns into the body of Santa Claus.

For greater resemblance, glue a felt belt with a large buckle to the plate.

Cut out a circle from cardboard - the head.

We decorate it with a cardboard cap and toy eyes.


We make a beard and fur from decorative shavings. We cut out felt boots from felt, and hands from cardboard. We connect the parts - and the craft is ready.

It is quite possible to make such a Santa Claus with your own hands, where he will find a worthy place on the wall of the reception room or playroom.
Look at the video for another version of Santa Claus from a disposable plate:
DIY felt Santa Claus
Very nice grandfather frost comes from felt. For the craft, cut out blanks from felt, as in the photo.

We sew or glue light beige felt to the red part - the face of Santa Claus. We secure the two red blanks with pins, then sew them together along the edge. Leave a small hole.

We turn the craft inside out and stuff it with cotton wool or synthetic fluff. Sew up the hole.

Glue the beard, mustache and the edge of the white felt hat to the craft.

Sew beads on the eyes and nose. Decorating the craft decorative elements. If you sew a ribbon to Santa Claus's hat, you can make a charming Christmas tree decoration out of it.

DIY Santa Claus drawing
You can draw Santa Claus for the New Year. First, we make a pencil drawing according to the sample.

Wet the surface of the sheet. Apply a blue background with watercolors. Due to the fact that the sheet will be wet, we will get very interesting stains on the sheet. You can sprinkle the background with salt, it will make the background seem to be covered with small dots - snowflakes. After the picture dries, the excess salt will need to be removed.

Using a bright yellow color, draw the outline of a magic star on the staff.

We color the fur coat and hat.

We paint the face with beige and pink paint.

We outline the facial features with a black marker. You can use a marker to highlight all the other elements of the design - a fur coat, mittens, felt boots, an asterisk, a bag.

The painting “Grandfather Frost” with gifts is ready!

DIY painting "Grandfather Frost"
Look at the video - how to draw Santa Claus step by step:
Santa Claus in tilde style. How to sew a Santa Claus doll?
Santa Claus tilde - ultra fashionable and beautiful craft. Below we have placed patterns that you can print out and use them to cut out parts of Santa Claus's body. Sew the head and arms together.

We stuff the head and arms and sew them together.

We sew the legs. Then we stuff the legs with padding polyester.

We cut out clothes for grandpa and dress him. We decorate Santa Claus with a beard and a cap made of thread.

Santa Claus in tilde style (patterns)


Here they are different Grandfathers Frosts can play the role of one of the main characters of the most magical holiday of the year.


