On the eve of the celebration of a person dear to the heart, I want to make a gift that would impress and leave pleasant memories. We offer to make voluminous postcards with your own hands, they are also called pop-up postcards. What are these wonderful postcards? At first glance, these are ordinary postcards, opening which, suddenly a three-dimensional figure or a whole composition appears in front of you! Such postcards will not leave anyone indifferent! Especially if they are copyrighted and keep the warmth of your hands!
Do-it-yourself cards with flowers inside
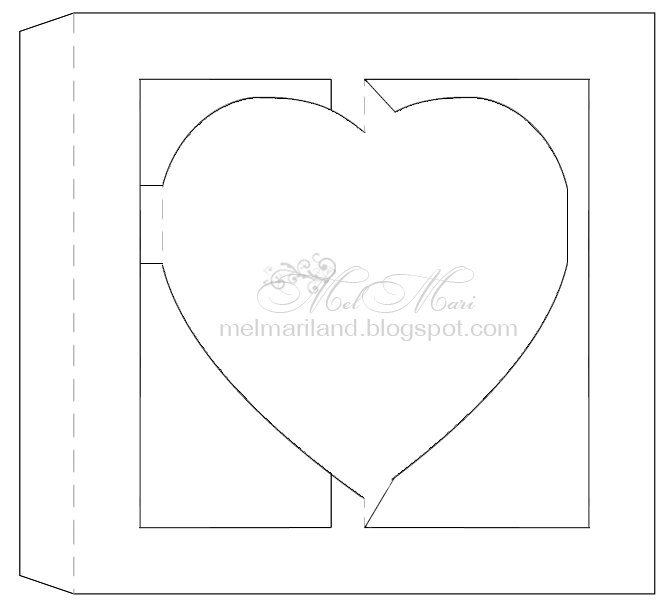
Even a child can make a heart-shaped card with a three-dimensional flower inside:

YOU WILL USE
We do both simple and complex creation technologies.

A lush flower for the inside or outside of a postcard can be made from colored or even plain paper, painted with watercolors or pastel crayons. You can cut flowers according to this pattern:

We print out the flower template, paint it with paints. We fold in accordance with the marked fold lines and glue the resulting flower onto the base of the card.

Undoubtedly, such a lush and bright postcard with flowers inside, made by hand, will surely please the recipient.

How to make it tells in his master class TheJulianaHappy:
The option with gentle, pastel colors, flowers looks very nice. Stamens for flowers are not difficult to make!

The original master class on English language, therefore, for your convenience, we offer a brief translation of the process of creating this flower card.

Materials and tools are standard: colored paper, cardboard, scissors, glue, plastic to simulate glass in the window.
We take thick colored paper, fold it in half. In one half we cut out a square window.

We make a frame from colored paper of a different color. Glass for the window can be made from a protective film for the phone or transparent plastic. Glue the resulting window frame to the base of the postcard. You can do without "glass" at all.


Glue into the hole
We glue a flower pot out of cardboard, glue it in the middle of the postcard on the fold line. We glue the sides of the resulting pot so that when the postcard is closed, the pot folds up.


Next, cut out green stems and all kinds of bright flowers from colored paper: crocuses, hyacinths, daffodils and tulips. Perhaps your bouquet will not be spring, but summer, which means that cornflowers, daisies, pansies, etc. will appear.


Glue the flowers into the pot
The height of the flowers should be such that they do not stick out of the postcard, but are visible through the window!


The window can be decorated with a cozy curtain.

Master class original
By the same principle, you can make a postcard with flowers from felt or colored cotton pads. Additionally, insert a concise but warm congratulation along with the flowers!

In addition to flowers, balloons, stars, bows can peek out from the card.

How to make a panoramic flower card along with a greeting envelope shows in his master class TheWorkshop:
We take thick paper - the basis for our postcard. Create a rectangle in the center of the card fold line. The width of the rectangle is 3 cm, the length is 7 cm.

We make cuts along the pink lines with a clerical knife. Then we fold the resulting rectangle inside the postcard. We attach the base of the postcard to another sheet, b O larger than the original base.

Then we make a floral design: a flower pot, the flowers themselves, fluttering butterflies and grass. We combine all this and glue it on the front of our postcard.


Masterclass original.
Using the same technique, you can make an original vase postcard. You can also make flowers in such vases with your own hands from paper or other improvised means.


We bring to your attention a master class on making a very delicate voluminous postcard, which will not only congratulate the recipient, but also fit perfectly into the interior, for example, of a children's room.

First, we make a frame-box. To do this, take thick blue paper and cut out a template for the box from it. We fold the edges of the template 4 times 5 mm on each side, thereby forming a frame. We glue the resulting frames.

On top of them we glue colored or scrap paper in a color suitable for your composition.

Next, we will prepare the elements of the future composition. We glue the balloon from paper circles. We fold the circles on the floor and glue them together. Waxed cord is glued to the base of the basket and directly to the mugs that form a ball.

We cut out the clouds from scrap paper, and the sun from yellow paper. Paste the elements of the composition into the frame. We glue the balloon as follows: we glue the base of the balloon on bulk adhesive tape, and the balloon itself on glue. We glue the clouds according to the same principle: one for glue, the second for voluminous adhesive tape.

We make green grass from a simple napkin. First we cut it, then we glue it. On the right side of the box we glue a tree made with a scrapbooking hole punch. The final touch - in the free places we glue the serpentine, butterflies and a congratulatory inscription! Glue a ribbon with embroidery or lace on the bottom of the box. The original voluminous postcard is ready!

Masterclass original.
3D postcards in the Kirigami technique
Kirigami is the art of cutting and folding paper figures and cards. This is the main difference between Kirigami and other paper folding techniques and is emphasized in the name: "kiru" - cut, "kami" - paper. The founder of this direction is the Japanese architect Masahiro Chatani.

For manufacturing, sheets of paper or thin cardboard are used, which are cut and folded. Unlike traditional 3D postcards, these paper models are usually cut and folded from a single sheet of paper. Most often, three-dimensional models of architecture buildings, geometric patterns and various everyday objects, etc. are developed.

It is better to start with a simple do-it-yourself voluminous birthday card. For example, using thick paper in two contrasting colors, you can make a birthday card-cake:

To make it, use this template:

Using various templates, you can make cake cards more complicated:


How to make a kirigami cake tells in his master class OksanaHnativ:
Using this technique, you can cut out various congratulatory inscriptions. The cake can be decorated and painted to your liking.

To create it, take this template:

White embossed paper will also make a spectacular postcard:

By combining two mirror parts of the “cake” cut from different sheets, you can make a whole voluminous cake in a postcard!


Use the following template:

There are a lot of options for creating volumetric postcards! Cut and fold your paper masterpieces!
Volumetric postcards in the technique of scrapbooking
Scrapbooking is the art of decorating photo albums, but its techniques are also very popular when creating postcards.
Using the elements of Kirigami, using the Scrapbooking technique, you can also make a voluminous postcard with your own hands. We cut out and fold from scrap paper "steps" for "pop-up" candles on the second half of the postcard. We glue the candles and stick the resulting blank on the base of the postcard.

You can make a simple but original greeting card from scrap or colored paper. We cut out the flame of the candle and decorate it with sparkles, then glue it on 2-sided tape. Glue the second part of the candle with glue. The congratulation itself can be tied or glued to an elegant satin ribbon. Simple and original!

From paper of a different texture, the postcard will look completely different)

By overlaying each element of the card on top of each other, again using double-sided tape, you can create such a voluminous bright cake!

Consider Tatyana Sadomskaya's master class on how easy it is to make a voluminous most delicate postcard using the Scrapbooking technique using ready-made pictures.

To create such a postcard, Tatyana used:
- ScrapBerry’s “Favorite Pet” scrapbook set
- scissors
- thick cardboard
It is better to use scrap paper with a lot of miniatures that can be cut from a single sheet, as well as colored stamp prints and chipboards.
Before creating a postcard, you need to decide on its plot in order to choose the color of the base of the postcard and its "characters". In this case, paper with a calm beige print is taken as the basis, the components of the plot are cut out of it: kittens, a puppy, flowers, a crown on a pillow.

Before starting this work, do not forget to decide what will be in the foreground and what will be behind it!
In our case, we put a larger kitten in the foreground, this will enhance the feeling that he is closer than kittens with a dog.

We make the necessary cuts. It turns out such a design with "steps". On the resulting "steps" we glue leaves of arbitrary size. These leaves imitate a wooden fence.

Next, gradually glue our elements, starting from near to far. We start from the foreground and glue the kitten. We glue it on beer cardboard, because it gives additional volume and casts a shadow. By the same principle, several other elements can be glued, for example, balls and flowers. When the inside is ready, glue it to the base of the postcard.

Outside, we also decorate the card with an elegant floral print.

For more elegance, we decorate the elements of the card with sparkles (we use glitter).
Masterclass original.
Check out this amazing 3D cake card for inspiration:

Volumetric postcards-dioramas
We present to your attention a master class on making a 3D postcard - a small three-dimensional scene. On such a stage, everyone can arrange various bizarre figurines and decorations)

To make a postcard, we take 4 sheets of thick cardboard, in this case we take cardboard of four shades of orange. You can also choose the colors of your choice.

On sheets of cardboard with a pencil, draw the outline of the frames and cut them out. We make the outline of the frame 1 cm wide.

From the remaining fragments of paper we cut out two strips, each of which is 10 by 4 cm in size. We line each one into 4 parts of 1 cm each. We cut off all the corners of the resulting strips. We fold the strips along the lines so that we get a paper zigzag. These zigzag pieces will support the diorama fragments. Glue the zigzags to the frame on both sides.

We glue the second frame clearly along the line on the other side of the zigzag.


The top of the zigzag should cover one side of the frame. The same must be done with the opposite side. Thus, the first scene of the diorama is ready!

By the same principle, we make the rest of the frames of the diorama.
It's better to pre-decorate each of the frames (especially the last one) than to try to squeeze the decor into the finished card.
The back wall does not have to be solid, you can make a transparent diorama without a back wall.

Decorate not only the "wall" of the diorama, but every frame. Use more voluminous decorations such as beads, bows, feathers, ribbons, etc. This will make the card look more voluminous and this will enhance the 3D effect!

Masterclass original.
You can come up with absolutely any plot! Create your own little theatre!
For example, waiting Assol!

Or a balloon in fluffy clouds.

Bright glade with lupins and butterflies!

Birdhouse with birds and flowers:

Postcard-accordion (schemes and templates)
Another type of voluminous postcards is an accordion postcard.
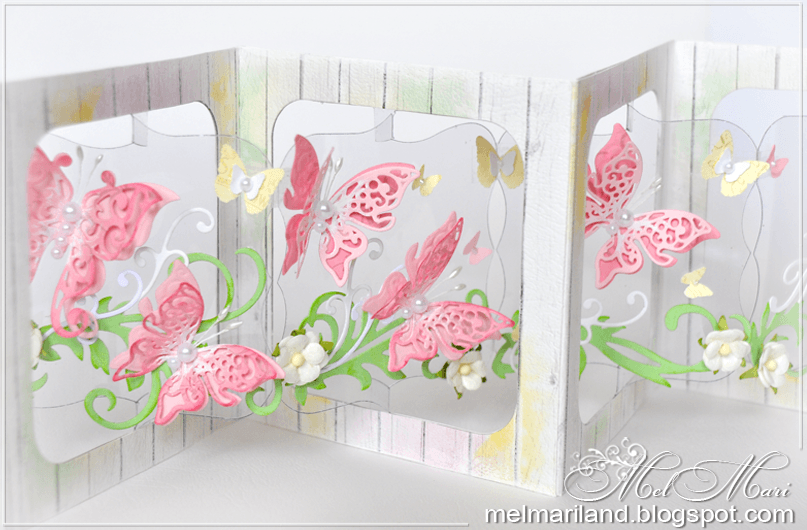
To create such a postcard, you will need: thick scrap paper for the base frame, a scrap-cutting knife or a clerical knife, transparent plastic for the internal parts, stamens, semi-pearls, etc. materials for decoration.
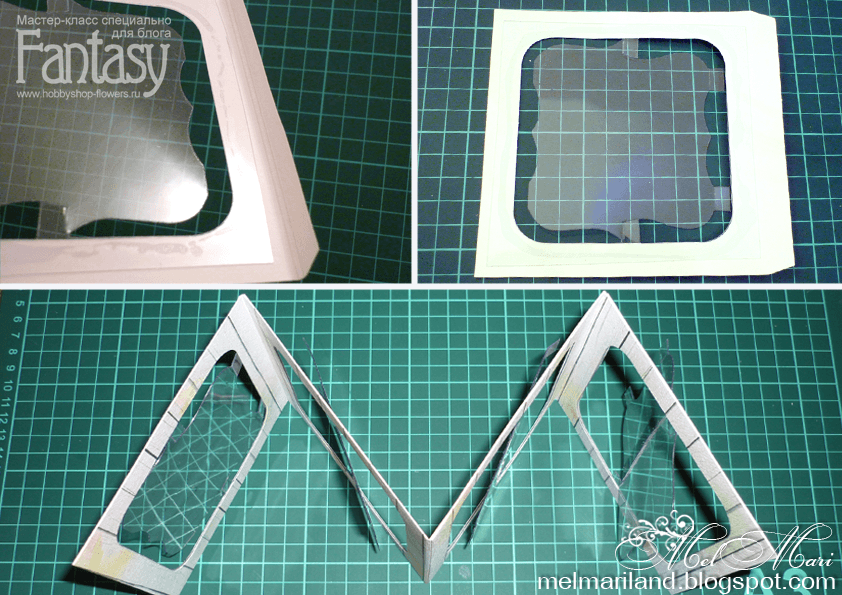
We take a template and make blanks for a postcard. From thick scrap paper we cut out 8 blanks for the base frame and 4 from transparent plastic.

Thick paper...

...and transparent plastic
We glue the plastic blanks to the paper base. In order for the card to fold, we make a double creasing of about 2 mm on the outer folds. We connect the resulting 4 parts - glue them with glue or use 2-sided tape. Glue the remaining 4 frames on the opposite side.
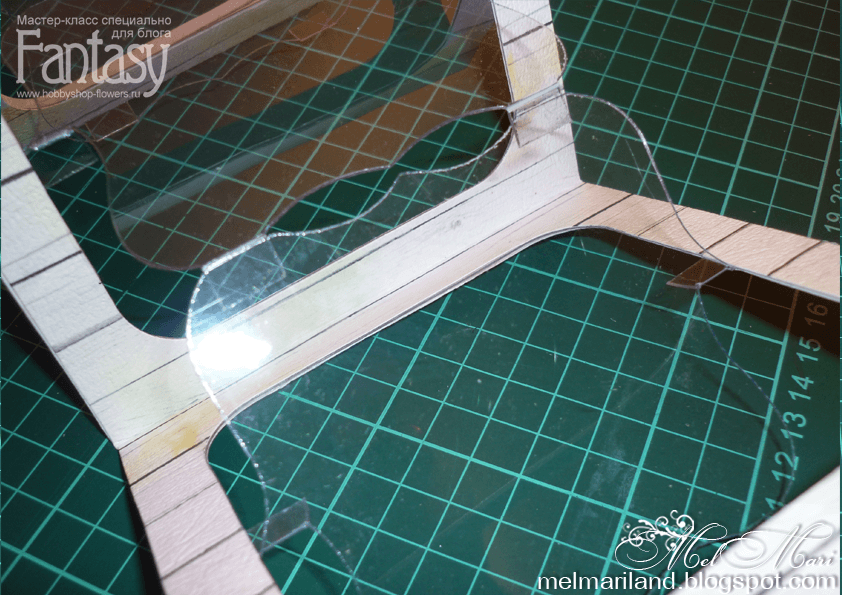

Now you can start the most creative part of creating a postcard - decorating it! We glue fluttering butterflies and twisted greenery to the plastic. Postcard is ready!


Master class original
Various templates for making the bases of such postcards, see below:


Using imagination, you can create all sorts of options for such folding cards. For example, with a predominance of children's topics. The number of components may vary.


Birds, flowers, butterflies - they always look very light and airy on postcards!


Postcards for all occasions
We have already seen that handmade postcards are more original than those that you can just buy.
YOU'LL LIKE IT!
Let's give, and sometimes for no reason at all! 🙂

To please your loved ones with congratulations, it is not necessary to spend money on a postcard with a template picture and text. You can make a beautiful product from improvised materials with the help of tips and tricks listed in this article.
A postcard is a nice little thing with bright pictures and warm words that we often get for the holidays. Modern postcards sold in stores are often made, as they say, "without a soul": they have template pictures of flowers, ribbons and smiling puppies.
Nevertheless, I want to make loved ones pleasant and try to surprise them, please them and give them pleasant emotions.
In such cases handicraft can help. In stores for creativity, now every buyer can find a huge number of suitable products for DIY postcard decor:
scrapbooking, scrapbook paper, kraft paper and kraft board, colored paper and cardboard, foil and corrugated paper, lace, braid, linen and canvas fabric, brushwood, vine, sequins, rhinestones, beads and beads, artificial flowers, foamiran, felt, felt, satin ribbons, lurex, gold and silver sand, sequins, decorative figurines, acrylic paints and much more.
DIY postcards: ideas for creativity
It can be said with certainty that in a homemade postcard you can express all your creativity and make any fantasy come true.
Before starting work, it is important to make a complete preparation for work:
- Buy everything you need decorative elements(to create a postcard).
- Have scissors, a ruler and be sure to have rubber glue to attach each decorative element (you can also use a hot gun and instant dry glue).
- Imagine in advance what your postcard should look like: draw a sketch of it on a draft or make a template by overlaying one material on another.
IMPORTANT: You should work very carefully, because if you leave a daub of glue, it will dry out and ruin appearance your product.
The easiest ideas for creating postcards with your own hands:
You can make a spectacular postcard for any holiday from craft cardboard, colored paper and woolen threads. First you need to decide exactly for yourself: how your postcard will look. There are several options:
- Postcard-book
- Postcard-flyer
- Postcard in an envelope
- Postcard square
- Rectangular postcard
- Figured postcard
- Postcard miniature
- Tie postcard
- Money card
- Large postcard (A4 format)
IMPORTANT: A simple postcard-flyer in an envelope looks impressive. The envelope will help her to survive for a long time, will not damage the decor.
per sheet white thick cardboard(base) you should glue the background of kraft paper (the size of the piece should be half a centimeter smaller than the base of the postcard). Gluing paper is best dry glue(glue stick) so as not to leave wet marks and prevent the paper from becoming irregularly shaped.
After the background is ready, stick on it a few woolen threads- these are "strings from balls." After that, from colored paper should be cut a few hearts. Hearts can be bent in half. After that smear only the fold and glue to the upper end of the woolen thread. From a red sheet of colored paper, make an envelope for storing a postcard. The product is ready, it remains only to sign.

 A simple and very beautiful postcard made of cardboard and colored paper
 You can cut out hearts, as well as any other shapes, not only from colored paper, but also from kraft paper. It has a pattern, pattern, or just an unusual color and texture that will add charm to your postcard. Choose for the base of the postcard white, milky or beige cardboard(light brown). Such colors are as pleasant as possible for perception and are considered classic.
Another interesting and budget way to decorate a postcard is glue buttons on it. To do this, you just need to have cardboard for the base and a handful of buttons of different diameters. With a simple pencil, draw a figure or pattern on cardboard: a heart, a ball, a Christmas tree (whatever).
Sketch if needed hover liner(thin felt-tip pen) and only then carefully glue the buttons onto the card. Wait for the glue to dry completely and continue the design: write wishes, attach another pattern or draw.

 Ideas for decorating cards with buttons and voluminous hearts
 Wool thread- simple and interesting decor for a postcard. But, it must be used correctly: pick by color check its ability to “color” the glue (this feature can leave ugly stains), and generally come up with why do you need it in handmade. The most commonly used thread as part of a drawing(strings, handles, legs, hair, ropes, bridges, etc.), or with it put out an important word.

 The word "love" written with a thread on a postcard: decor ideas
 Happy birthday cards with congratulations text
Birthday card challenge please the birthday boy. That is why it should be done bright, cheerful, colorful, fill with generous wishes, decorate with sparkles. By its very appearance, the postcard should “speak” that the person who received it means a lot to you.
The most simple idea — make a spectacular voluminous postcard. To do this, you need a base (white, gray or colored cardboard), threads and colored paper. The secret of the postcard is that when closed, it looks quite simple. But, when the birthday boy opens it, he sees a huge number of colored balls and flags characteristic of the holiday with the inscription "Happy Birthday!".
Beautiful and spectacular do-it-yourself birthday cardIMPORTANT: The advantage of this postcard is that the material for its execution is simple and accessible. In addition, every time a person opens it, he will mentally move to this day and his holiday.
Another interesting technique that can come in handy in creating a postcard is quilling. quilling- this is the twisting of thin strips of paper in order to obtain a figure or serpentine. A quilling kit can be purchased at craft and office supply stores.
IMPORTANT: Think in advance about the pattern, pattern and figures that will decorate your postcard. Attach them to the cardboard base with hot glue or rubber glue. After that, the card can be further decorated and signed.

 Beautiful quilling birthday card
 The classic way to decorate a postcard from the inside, not the outside - make a voluminous decor inside. It is not difficult to create it. To do this, first of all, you need to have two sheets of thick cardboard of different colors (preferably).
A sheet of cardboard that will be the inside fold in half and make 6 even cuts on the fold (for three convex gifts inside):
- Two 2 cm each (a small gift, the distance between the cuts is also 2 cm).
- Step back 5 mm and make two 4 cm cuts (medium gift) with a distance of 4 cm.
- Step back 5 mm again and make two 6 cm cuts (large gift) with a distance of 6 cm.
IMPORTANT: Measure your postcard ahead of time and draw cut lines to give you enough room.
After that, open a sheet of cardboard, turn the folds inside out and glue two sheets of base. It remains only to decorate and sign the postcard. Inside you will receive three convex cubes are the basis of gifts, they should be sealed with colored or craft paper, as well as decorated with ribbons. The product is ready!
Original card with three voluminous birthday giftsDIY Happy New Year cards: design ideas, templates
New Year- a magical time, and therefore every little thing that surrounds a person during the holidays should exude pleasant emotions. For making New Year's cards with your own hands, technique is best suited.
IMPORTANT: Scrapbooking is needlework that actively uses scrap paper (thin paper with drawings, patterns and prints).
The technique also involves the use of a variety of decorative elements: beads, ribbons, rhinestones, lace, sequins, dry twigs, acorns, candied fruits, cones and much more. All decorations and pictures are required glued to a beautiful background. Congratulations, words and signatures can be written by hand, or you can print, cut and paste.
IMPORTANT: It is best to glue the decorations on the card with hot glue - it dries quickly enough and has good adhesion.
New Year cards in scrapbooking technique:

 New Year card with buttons using scrapbooking technique
 Postcard with a Christmas wreath in scrapbooking technique
 Unusual postcard in scrapbooking technique
 Handmade: postcard for the New Year using scrapbooking technique
 If you are not strong in creativity and scrapbooking is a very difficult “science” for you, you can make a beautiful postcard with a simple application. To do this, you will need thick coffee-colored cardboard and kraft paper. Carving uncomplicated geometric figures, attach them to the base with dry glue to form a thematic pattern: a Christmas tree, Santa Claus, a snowman, a Christmas ball or a gift.
Simple and effective cards for the New Year: applicationINTERESTING: Instead of craft paper, you can also use ribbons, sequin beads, clippings from magazines and old postcards.
Postcards Happy New Year: texts of congratulations
To complement the design of any postcard made by yourself, will help printed on paper and cut out text. Such clippings look spectacular on the basis of beige and coffee colors, the text is beautifully written. calligraphic handwriting or book font.
Ideas for creativity, texts for a New Year's card:

 DIY congratulations for postcards
  Congratulatory text in a postcard with your own hands
 Text for New Year's card

 Inscriptions for scrapbooking in New Year's cards
 Beautiful inscriptions for scrapbooking in creating New Year's cards
 Postcards from February 14 - Happy Valentine's Day with your own hands: design ideas, templates
Valentine's Day - a holiday saturated with special energy. Every lover on this day tries surprise your soulmate: give flowers, gifts, sweets and of course valentine.
Valentine card is a beautiful card with which a person confesses his love. It must be red, have a lot of hearts, flowers, cupids and beautiful words.
 A simple and effective card for Valentine's Day with your own hands
 Thread is a decorative element that can be easily used in love-themed postcards.

 Beautiful do-it-yourself postcard for Valentine's Day An interesting way to decorate a Valentine: a large number of hearts from different material

 Valentine's card in an envelope with decorative ornaments: ideas for creativity
  Valentine decor with buttons How to make a simple DIY Valentine card?
 Interesting idea: you can do on the front page of your postcard several envelopes from different colored paper. Each envelope can include a compliment or note for your other half.
 Idea for creativity: original postcard decor with small envelopes
 Volumetric card for Valentine's Day: the word "love"
 Beautiful card for a loved one
 Heart shaped card with decorative ornaments
 Postcards from February 14: congratulations texts
As well as New Year cards, valentines can be decorated with texts specially printed on the printer and inscriptions. It can be simple words“I love you”, and there may be poems and confessions of romantic feelings.
Ideas for creativity, texts with congratulations:

 Original text for valentine's decor
  Ideas for creativity: Valentine text
 Text for postcard decoration on Valentine's Day
  Poems for greeting cards for Valentine's Day
 Beautiful inscriptions and texts for decorating valentines
 Do-it-yourself cards from March 8: design ideas, templates
Congratulate your beloved women Happy March 8 you can also use homemade postcard. Moreover, such a postcard will express your feelings much brighter and more emotionally than the one bought in the store.
You can decorate a postcard dedicated to the holiday of March 8 various decorative elements:
- bows
- beads
- lace
- artificial flowers and berries
- Number "8"
- braided
- kraft paper
- embroidery
IMPORTANT: Paper embroidery is another an original way to decorate a postcard. This is not difficult to do: you need to draw a pattern with a simple pencil, pierce holes with a needle throughout the pattern and only then thread a thread into each hole. Looks good on spring postcards. Quilling allows you to make volumetric floral decor on the title page of the postcard. You can combine quilling very successfully with printed texts, congratulations and signatures.
Floral decor in quilling technique on a postcard on March 8
Simple quilling decor for a spring card
beautiful pattern in quilling technique for spring postcard
Because March 8 - women's holiday very soft and organic You can decorate the card with lace. Available at the craft store lace braid any size and color. It is attached to the base with hot or rubber glue.
Postcard with lace: decor ideas
Satin ribbon — the best decoration for a postcard in honor of March 8. It can be attached in any way, but the best - make a bow. Other options for fastening the ribbon are ties that hold two sheets of a card together and a gift card with a ribbon.
Satin ribbon on a postcard: ideas for creativity
Text in a postcard on the day of March 8
Poems for postcards on March 8
Beautiful decoration of a postcard for March 8 with verses
Video: "5 postcards in 5 minutes"


We love holidays and we love gifts. And we all love postcards - to receive and give. Postcards are given for many events - birthday or New Year, March 8 or the birth of a child.
You go to the store - there are a lot of postcards, even the text is already printed inside - everything has already been invented and said for you, only - not from the heart.

Gift with love
Only handmade postcards can convey your feelings towards the gifted person. Buying an ordinary cardboard postcard is easy, but making it yourself means putting a piece of yourself into it. After all, making such a gift, you imagine the person to whom it will be intended.

Remember, we are all in childhood, in kindergarten or at school they tried, they made postcards for the holiday to their parents - carefully cut out, folded, glued. Then they were handed over. Remember how carefully mom and dad took the gift, kept it, and many still keep it with your children's drawings and crafts.
Today, handmade products are becoming more and more popular. Embroidered pillows decorate the house, knitted things are worn with pride. He does not sew, does not knit and does not glue, only the completely lazy.

Scrapbooking is gaining more and more fans - photo albums, paper postcards, made with love, made in a single copy - become a unique gift for various festive events.

For someone who has mastered at least the basics of scrapbooking, there is no question - what to give to a loved one, and these gifts are admirable.

The art of giving joy
Making postcards out of paper is called cardmaking. It is based on the use of paper and various additional materials. For an experienced scraper, when making a postcard, everything will be used - ribbons, small paper, fabric flowers, cutting - elements cut out of paper, buttons, lace and much more.
There are many ways to make postcards out of paper.

Experienced craftswomen make multilayer volumetric products, the more layers, the more interesting the postcard looks.

The elements are glued together and even stitched. The styles in which the masters work are also different - shabby chic, steampunk and others.

It is impossible to create two completely identical postcards.

It is impossible to say that card-making is a simple art. After all, in the process of creating just one thing, a composition is created, changed, and formed. A scraper must be an artist - to know the basics and subtleties of creating an ideal composition, selecting materials, and combining colors.
Sometimes this process of selection and application takes more than one hour, or even a day - the artist is a delicate nature, there is no inspiration, and nothing masterpiece will be created. And sometimes everything seems to add up by itself - and now a do-it-yourself postcard for the birth of a child or for the birthday of a loved one is ready.

Look at a variety of photos of postcards - how rich is the imagination of the masters who create harmonious compositions from many small disparate details.

We create a gift ourselves
Experienced scrapers use special scrap paper for work - it is dense, tends not to fade, does not fade over time. This ensures that your gift will keep its beauty for a long time.

Scrap paper comes with various patterns, sold in sets or individual sheets.
Note!

We also need:
- Thick plain paper for the base - watercolor is suitable.
- A utility knife and a metal ruler (if you are into scrapbooking, you can later purchase a special cutter to cut the paper straight - scissors are not the best option for this).
- Scissors for cutting small parts.
- Glue - ordinary PVA, clerical - will not work, it warps the paper, it will turn yellow over time. Take Titan, Moment and the like - scrap shops will advise you on others - see what is available to you.
- Double-sided adhesive tape - they can also connect the elements of a postcard, and with adhesive tape on a porous basis, you can create multi-layer volumetric compositions.
- Decorative elements - flowers, cuttings, ribbons, pieces of lace, elements cut out of scrap paper - butterflies, birds, twigs and others.

Buttons, pendants, buckles and other small items can be used to create a composition.

Stamps are often used - with their help you can create an interesting background for a future postcard, add certain elements, make inscriptions.

An interesting technique when creating voluminous postcards is embossing - a transparent stamp is applied to the base, which is sprinkled with special powder.
The last stage - the powder is dried with a special hair dryer - as a result, a three-dimensional image is obtained: most often this technique is used when creating the contours of a drawing, inscriptions.

Figured hole punchers - they can make an openwork edge, with their help they make voluminous flowers, cuttings.
Note!


In general, there are a lot of professional tools for scrapbooking and card-making, it makes sense to acquire some only when making postcards for sale. But, having mastered the art, you will not only please your friends original gifts but also replenish the family budget.

Pick up several sheets of scrap paper that match the style, color, put a background on the base, and decorative elements selected by color on it. The composition should be a coherent whole so that each element has a meaning.
You can use special sketch diagrams, they will tell you how to arrange the elements to create a harmonious composition. Having carefully prepared everything, making sure that each element is thought out, glue.

If something seems to be missing - add a couple of sparkles along the edges of the flowers, rhinestones, half beads. The main thing is the unity and thoughtfulness of the composition so that the postcard does not look like an application.

There are many tricks - how to make a beautiful postcard:
- quilling - curls are twisted from thin strips of paper, then they are given various shapes - these elements are glued to the base, creating a pattern, drawing - voluminous postcards are obtained;
- iris folding - small strips of paper, ribbons, fabrics are folded in a spiral, overlapping each other - an unusual pattern is obtained;
- shaker postcard - a multilayer postcard with a transparent window, inside which small elements move - foil rhinestones, beads;
- postcard-tunnel - a three-dimensional postcard with many layers, the cut out elements of each layer create a common spatial pattern.

Note!

Inside the postcard can also be issued with stamps, paper. You can make an unusual card inside - when you open it, the three-dimensional element straightens out - a heart or a bouquet of paper flowers will undoubtedly surprise the recipient.
Such a postcard made of paper cannot but be liked - it keeps warmth and a piece of your soul. If you want to master the art of card-making, visit the master classes of experienced craftsmen who will tell you all the subtleties - you can make a beautiful card with your own hands.

DIY photo postcards


A touching event is my mother's birthday. And even more touching - to congratulate a loved one not just with a purchased gift, but to make some crafts on your own. To give a pleasant surprise for mom, you can make her a birthday card with your own hands.
To bring the flight of fantasy to life and make a truly original postcard, you will need a standard set of tools:
As well as a variety of materials:
- sheets of thin cardboard or thick colored paper;
- multi-colored paper, it is possible for gift wrapping;
- various ribbons, patches of material, laces;
- rhinestones, beads, beads, buttons.
Quilling card for mom "Bouquet of flowers"
A perfect addition to a gift or as a small surprise, a Bouquet of Flowers postcard made using the quilling technique (paper rolling) is suitable. To make it, you will need a sheet of cardboard, colored paper that matches it in contrast and color, a ribbon, a quilling stick and a standard set of tools.
Now you can get to work:

Volumetric postcard "Hearts"
A do-it-yourself birthday card for mom will look especially heartfelt if the heart is the central figure on it. To make it, you will need sheets of A4 thick white paper and scarlet paper, glue and scissors. 
All work consists of 4-5 stages:

Postcard-pendant "Butterflies"
For mom's birthday, you can make your own handmade butterfly pendant card.
A gentle and romantic craft, made in the favorite colors of the birthday girl, will require a set of tools:
The work takes a little over an hour, and is divided into 4 stages:
- A blank card base is cut out of a sheet of white paper and folded in the middle. WITH outside this part is decorated with the same size sheet of scrapbooking paper with an unobtrusive pattern.
- After connecting the two sheets, a small hole is made in the upper left corner with a hole punch, which can be fixed and reinforced with an eyelet. Now it will be possible to thread a beautiful cord through the future postcard and hang the craft in a conspicuous place.
- The base is ready, it remains to decorate the front of the craft. Slightly below the middle of the cover, pieces of lace are glued, imitating the fence of a flower bed. On one of the edges with double-sided tape, 3 flower heads are heaped together with the core of the part. A couple of butterflies are glued above them so that their wings remain free. You can make flowers and butterflies yourself, find ready-made ones, cut them out of postcards.
- The decoration process is completed by arbitrarily gluing beads or beads, as well as attaching a small chipboard against the background of flowers.
A birthday card for mom is ready. Now you can decorate the inside of the product with your own hands by writing a couple of warm lines in calligraphic handwriting.
Surprise card: step by step production
A surprise in a postcard is something unexpected and extraordinary. 

One of the options for such a gift is very simple:
- On a sheet of paper, it is necessary to draw 2 circles using a compass, one inside the other, where the inner circle is 2 times smaller than the outer one.
- Petals are drawn between the circles. As a result, the drawing looks like an open chamomile.
- A congratulation is written in the middle of the flower.
- The petals are cut through, separated from each other, painted over with a colored pencil and bent inward. On one of the petals you can write "I bloom in water." This will be a hint.
- The postcard is ready. Now it remains to give a surprise to the birthday girl and watch how a flower with warm words will open in front of her eyes in the water.
Postcard with a secret inside
A pleasant surprise remains in memory for a long time, so you can congratulate the birthday girl with a card with a secret. To do this, you need colored paper, glue, scissors and lace. 
Gift preparation consists of several stages:
- The basis will be a sheet of paper equal in size to a double postcard. The workpiece is bent in the middle, where paired cuts are made different lengths. The number of cuts (future holders) is determined by the overall composition, consisting of 2-3 secret parts.
- The cuts are bent inside the future postcard. Flexion / extension movements are made several times so that the paper takes the necessary shape.
- Preparation of the actual secret pictures. They can be a bouquet of flowers cut out of colored paper, Balloons, anniversary date, as well as a chipboard with congratulations. A card with a wish will look original together with a photographic figure of the card performer himself.
- The outer side of the craft is sealed with paper of the same color and size as the base. Stick on picture holders.
- If it suddenly seems that the outside of the card does not look festive enough, then it can be decorated by pasting lace with beads over the entire surface. The main thing is that all the details are in harmony with each other.
Postcard with two wings
To make a postcard with 2 wings, you will need 2 sheets of photo paper, ribbon, adhesive tape and decorative elements at the discretion of the congratulator. 
Just 4 steps and an exclusive gift is ready:
- One of the sheets is cut into 2 parts - they will become sashes. The blanks are glued to the main sheet with adhesive tape.
- A piece of ribbon is attached to each sash so that you can tie a bow out of them. You can fix the fabric with glue or a stapler.
- It is recommended to decorate the sashes from the outside with a few small details so as not to get an overloaded surface. You can, for example, use beaded edging.
- The inside of the gift should contain the text of congratulations. To make everything look decent, you can use a computer set, decorating the congratulation itself not only with an interesting font, but also with vignettes.
Postcard in scrapbooking style
For those who are not very familiar with the technique of making scrapbooking cards, you can advise to purchase a ready-made kit of materials, in which:
- several options for cardboard bases;
- colored paper with various patterns;
- lace patches and ribbons;
- beads with a flat base for ease of gluing;
- figurative decor elements: artificial flowers, figurines of various types, frames, templates.
If you already have experience in making postcards in a similar style, then fantasy may suggest replacing cardboard with photographic paper, artificial flowers dried and covered with a protective layer, factory lace with hand-made lace. 


In addition to the availability of materials, you need a clear understanding of what exactly you want to capture on a postcard:
- traditional birthday wishes,
- a reminder of some pleasant event,
- hobby hint,
- humorous collage.
Only after that begins the selection of decor.
The simplest idea for congratulating mom is a frame pasted on photo paper or special cardboard.
It will be possible to place a photo of the birthday girl in it and write a few sincere words. The corners of an impromptu portrait are decorated with small bows or flowers, in the core of which beads can be attached. The most important thing is not to overload the surface of the gift and stick all the details so that together they look like a single, holistic composition.
Original postcard with flowers embroidered with lace
A do-it-yourself birthday card for mom will look original if the flowers are embroidered on it with a cord. 
To complete the work you will need:
- silver-tone and colored lace (thickness 1 mm, can be bought at a specialized store);
- dark cardboard;
- 2 needles - with a large eye and with a small one;
- ordinary white threads;
- a simple pencil, colored markers;
- scissors;
- copy paper.
First, you need to bend the cardboard in half with the colored side out. On an ordinary white sheet, an outline of an elegant flower or a beautiful bouquet is drawn. The drawing should not be complicated, since the trick is not in its sophistication, but in the resulting volume. The finished contour is transferred with a carbon paper to the color base of the postcard.
The surface is prepared for embroidery with a silver cord, which is threaded through a needle with a large eye (gypsy needle). A white thread is threaded into an ordinary needle, designed to secure the lace in certain positions and places. The flower head can be embroidered with a lace of a different color. It is necessary to pierce the cardboard very carefully so as not to wrinkle.
Congratulations words can be written with a marker or printed on a printer and pasted on a gift in a convenient place.
Unusual postcard with fabric flowers
 A do-it-yourself birthday card for mom can be made from improvised materials.
 It will require:
- fabric tape;
- buttons;
- needle, silk and ordinary threads;
- a set of paper and cardboard;
- glue.
A piece of fabric tape is sewn with zigzag stitches, then it is pulled together and the edges are sewn together. The blank looks like a flower. Its core will be a bright, catchy button, which is sewn in the center with silk threads. If a bouquet is conceived, then there should be 3 or 5 blanks.
The base of the postcard is formed using cardboard folded in half. on which slightly smaller colored paper is glued. Now with the help of glue you can begin to form a bouquet. It may consist only of flower heads or have stems made from a suitable cord.
A small piece of congratulations is pasted below the flowers. Its shape can be played as a leaf, the bark of a tree, or just as a handwritten note.
3D postcard from improvised materials
Fantasy and diligence will help to make a very interesting 3D postcard for a loved one.
It will require:
- a sheet of photographic paper;
- a sheet of cardboard;
- double-sided adhesive tape and glue;
- ribbons (lace and satin);
- scrap sheet;
- small scissors.
To begin with, a picture with an image is selected on the Internet different colors. It is printed several times on photo paper using a color printer.
Now you can make blanks of 5 colors, cutting out the details for each flower as follows:
- 1st - in full size;
- 2 - slightly less than the first;
- 3 - even less;
- 4 - slightly more than the center of the flower;
- 5th - almost the center.
Double-sided tape is glued to the back of each blank, after which the flowers are carefully collected. 
The basis of the postcard will be cardboard folded in half, on which a slightly smaller scrap sheet is pasted. A lace ribbon is attached a few cm from the edge of the latter in width, and a satin ribbon is attached to it on top. These manipulations are best done using double-sided or foam tape.
From the remaining scraps of cardboard and scrap sheet, 2 ovals are cut out - the color is slightly less than white, they must be glued together and attached to the base of the postcard. On the oval part, a composition of made flowers is formed. It remains only to write wishes for a loved one either on the card itself or on a curly sheet (card), which after attaching to inside craft gift.
Original ideas for making birthday cards for mom from daughter
How many pleasant memories will come flooding back after many years to my mother when she comes across a postcard once made by her daughter. Particularly touching are such crafts, where the main detail is children's hands circled on paper with a pencil. 
To implement one of these ideas, you need to circle your hand on cream-colored paper with a pencil, cut out the outline and stick it on the base of the postcard prepared at your discretion so that your fingers remain free. Next, using the quilling technique, make 3-5 flower heads and cut stems and leaves from green paper for them.
flower composition fastened with glue so that the impression of a hand holding flowers is created. Pair good wishes complete the postcard. Another idea for a card will require a photo of the birthday girl (preferably with the gift executor), which is pasted onto the prepared base of the craft. Photos can be taken in a lace frame.
The second step is to cut out the contour of the right and left hands with the continuation of the wrist. The blanks are glued in such a way that it seems that children's hands are hugging or holding the photograph crosswise.
You don’t have to waste time making do-it-yourself postcards for mom on her birthday, you can pick up something suitable in ready-made printed abundance. But does a purchased postcard absorb warmth loving hands, does the template of congratulatory words reflect the whole gamut of daughter's feelings for her mother?
Video: do-it-yourself birthday card for mom
How to make a card for mom with your own hands, see the video clip:
We make a card for mom with our own hands:
original ideas are in the air. Catch and make paper art with your own hands that will delight your loved ones. The most important thing is that all your works will really appear in a single copy, which means that an exclusive hand-made postcard will be expensive not only in terms of high spiritual criteria, but also financially.

Scrapbooking
The most fashion technology work with paper today (scrapbooking) was invented and began its circulation around the world as one of the ways to design photo albums. But why not use it to create beautiful postcards.
It has already become common that demand, sticking out its tongue, is trying its best to keep up with the offer, and therefore the store has everything so that you and I can safely do our favorite hobby - making DIY birthday cards using the scrapbooking technique.

You will need:
- white paper for watercolor - sheet A4;
- colored paper (lilac, purple);
- lace wide ribbon - 12 cm;
- beautiful ribbons or braid - 30 cm;
- three white artificial flowers that can be cut from hair ties;
- three small interesting buttons to match the paper;
- scissors, ruler;
- glue "Moment";
- a felt-tip pen or a purple gel pen.
How to make a scrapbooking card
- At the beginning of work, you can make paper blanks. Our greeting card"Happy birthday!" when folded, it will have a size of 10x16 cm. Therefore, we fold a white sheet of paper measuring 20x16 cm in half. Then we cut out four blanks of colored paper with our own hands (two purple and two lilac), as shown in the photo.
- Carefully glue the lilac blanks onto the purple blanks so that equal fields of the same width remain on each side. Write the words of congratulations "Happy Birthday!" and circle the frame with a pen or felt-tip pen.
- Now you can stick all the rectangles on the workpiece, stepping back from the edge by 10-5 mm. Glue the lace and 12 cm of ribbon on it, tucking and securing the edges of the textile on the back of the scrapbooking card.
- Glue a colored postcard onto a piece of paper folded in half. Now you can make a bow out of the remaining tape, and glue it, voluminous flowers and beautiful buttons with Moment glue.
- The final touch in the design of a birthday card in the style of scrapbooking with your own hands will be drawing a picture. With a felt-tip pen or pen, draw a monogram and dots along the edge of the frame. Unfold the card and write congratulatory words.

Volumetric cards for mom on her birthday
They do not require any additional material investments, any schoolchild can do it with his own hands, at the same time, these beautiful simple voluminous works made of colored paper are very interesting and original.

You will need:
- colored paper;
- scissors, compasses;
- Double-sided tape;
- PVA glue;
- wooden stick;
- beads;
- beautiful tape.
The order of implementation of the idea
- Draw circles of different diameters on colored paper with a compass and cut them out. Directing the scissors from the edge to the center, make a spiral from each circle. If you use curly scissors, the edges of flowers in 3D can be made terry or carved.
- Twist each spiral with a wooden stick from the edge to the center, fixing the resulting flower with a drop of glue on the center of the spiral circle. Try not to make very dense buds so that the bouquet is lush.
- Fold the pretty cardboard rectangle for the base of your birthday gift in half and try it on for the first time.
- Cut out a flower pot from brown paper and stick double-sided tape to its wrong side.
- Glue green paper 1-2 cm smaller on the background of the card. Now you can make a composition of a pot and flowers for your birthday.
- Tie a bow and attach it to the pot. Glue the inscription "Happy Birthday!" and you can give a handmade card to your loved one.


Postcard folding bed "chicken"
- To implement this idea, you will need two sheets of cardboard or thick paper. Bend one sheet measuring 12x12 cm, retreating 3 cm from the edge.
- The second sheet of cardboard measuring 15x18 cm must be folded in half. This will be the base of the postcard. Therefore, you can decorate it by pasting beautiful paper from two sides.
- Cut 6 lines on the fold of the first workpiece. Step back from each edge by 3 cm. The side 4 lines should be 3 cm long and symmetrical to the fold. The middle strip is cut 1.5 cm high from the fold axis, 2.5 cm down. The width of the resulting strips should be 1 cm. Bend them into reverse side to get three steps of the same height, but different lengths. They will serve as bases for paper figurines.
- Cut out two brown eggs from colored paper, decorate them with appliqués and glue them to the outer steps.
- Draw a chick in egg pattern on paper. On it, you must first cut out a newborn chick with paws and a scallop from yellow paper, and then a shell from white paper. Glue them together, draw a beak, eyes and glue to the middle step. Drape the backdrop with pretty appliqué and chicken feathers.
Postcard in quilling technique
elegant, volumetric decorations on a postcard they don’t look like paper at all, but they are made very simply. You just need to cut narrow stripes from colored paper and fold them into spirals in a certain way.

The quilling technique is well described in many sources. You can learn the simplest tricks quickly. For such a picture, you need to make 4 “closed spirals” of green paper, 4 “off-center spirals” of yellow and 8 pink, as well as 14 green leaves in the shape of an “eye”.
Start decorating with a large flower. Its center is also made from a strip of paper folded into a spiral, previously cut to the middle of the width into a fringe. Then glue the petals and leaves.

Attach the butterfly details in the upper left corner. Without gluing, lay out the details of the picture with a congratulation and a ladybug on a postcard, observing the proportions. It remains only to add "twigs" and fix the still life.
Gift Ideas
In order to make the voluminous postcard even more voluminous, you can make not a flat pot, but a bag with a bow. Fold an accordion fan out of pink paper or, as in the photo, a bag. Fix the edges of the fan on paper and glue the bottom of it with a corner. To prevent the fan from opening, limit its volume with a white ribbon with a bow.

To the inscription "Happy Birthday!" looked original on the postcard, it can be made with silicone. Next, you need to paint the background with a brush with dry paint, and then carefully remove the silicone film from the paper. There will be a white inscription on a colorful background.

There is no simpler and more original idea than an “endless” postcard. Write congratulatory texts, torn and connected in the process of folding, prepare applications, drawings. Decorate this postcard made by yourself according to the master class shown in the video.
Use natural material: leaves, dried flowers, flattened straws, ears of corn. This will enliven the gifts and give them natural living warmth.