Defender of the Fatherland Day is a holiday of courage, bravery, strength and bravery. We always congratulate our men on this occasion, regardless of whether they served for their homeland or not. After all, they are our defenders who mean a lot to us, which is why it is so important not to deprive your loved ones of attention on this men’s holiday. In this article we want to present you with several options for original DIY crafts for February 23.
A gift for Defender of the Fatherland Day should be given from the heart and bring a smile to the recipient. Therefore, it is best to try to make it yourself, especially since auxiliary materials can always be found at hand for these purposes.
First of all, a gift for February 23 can be prepared from ginger dough. It's easy to mix:
- First, use a mixer to mix 100 g of sugar and butter
- In another container, mix the egg with flour
- The contents of two containers need to be combined, add cinnamon, liquid honey, ginger and soda to them
- Knead everything thoroughly and then roll it out
- We cut out figures on the rolled out dough - these can be men, stars, tanks, airplanes - anything
All that remains is to paint the baked goods using cream or homemade mastic, which is also easy to prepare from marshmallows, powdered sugar, lemon juice, butter and potato starch.

Such DIY gift for February 23 a girl can present it to her brother, son, husband, dad and grandfather. Each of them will be happy to treat themselves to a delicacy prepared by a loved one. Young mothers who have small children at home can involve their kids in the cooking process in order to combine business with pleasure.
If you don’t know how to bake, and your men love sweets, you can use store-bought candies to make a very original “Chocolate Car”:

To work you will need the following materials and tools:
- Corrugated cardboard and paper (choose the color you like best)
- Packaging film used in floristry
- Wire (the more the better)
- A piece of beautiful fabric
- Braid
- Thermal gun
- Scotch
- Toothpicks
- Chocolates
- Chocolate medals
Using a template, we cut out the interior of the future car from corrugated cardboard, onto which candies and other decorative elements will be attached using tape and a heat gun:


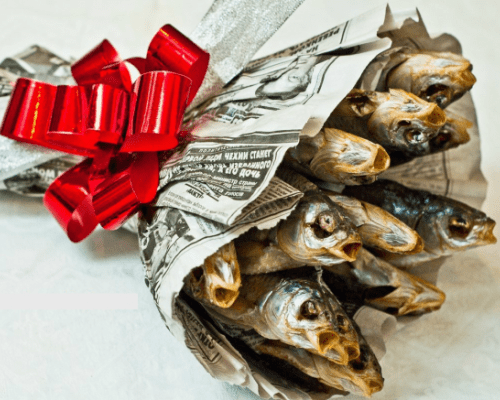
Men who like to treat themselves to salted fish and beer can be presented with a unique bouquet of dried roach, wrapped in newsprint, tied with a decorative ribbon:
Note that all of the above examples of crafts are best presented to family and friends. To congratulate veterans or teachers, it is better to make paper gifts.
Crafts for February 23rd from paper
You can use paper to make a very impressive card for February 23rd, which you wouldn’t be ashamed to give not on behalf of a child, but on behalf of an adult. As an example, here is a paper product:

To create such a paper shirt with a tie, you need two types of decorative paper and a template from which you need to cut out the elements of the product:

To decorate the card, you can use real buttons and even fabric (it will look good on a tie, for example). There is plenty of space in the middle of the card where you can write a congratulatory text. It’s good if the congratulator comes up with this text himself in poetic form.
Children's crafts for February 23
Very often educators kindergarten invite kids to make crafts for February 23 for their fathers and grandfathers. It is clear that the child preschool age will not be able to make some complex craft on their own, so mothers need to provide all possible assistance to the baby in preparing an important gift for a loved one, but in such a way that in the end it can be seen that the child tried himself.
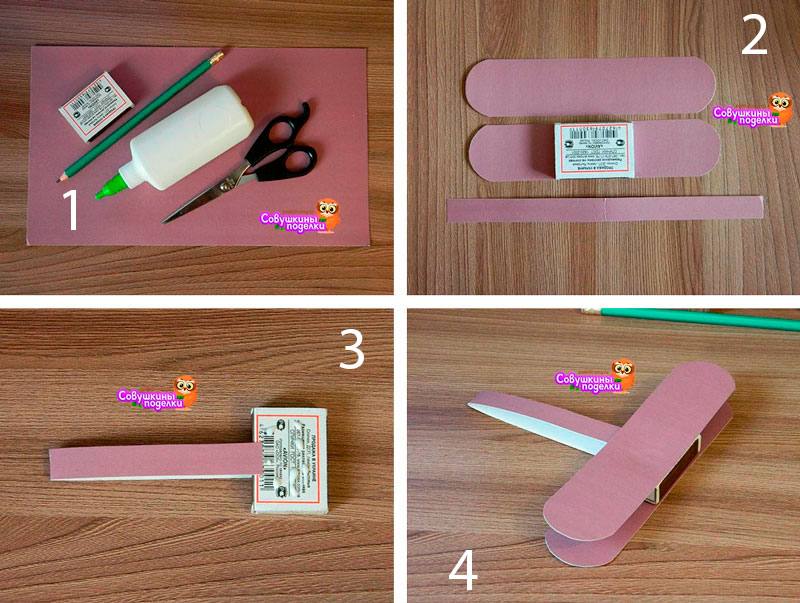
- Airplane

- A thin strip is cut out of cardboard of any color (the width should be approximately 3 cm and the length should be 20 cm). This strip needs to be folded in half and glued to the matchbox:

- Make two more strips with the same width. The length should be 10 cm. These will be the wings, which also need to be glued to the matchbox:

- Glue the tail to the plane: you need to cut two thin strips. We glue one exactly horizontally, and fold the second into a house shape and glue it to a horizontal strip:

- All that remains is to make a daisy-shaped propeller and decorative elements for the airplane wings out of white paper. The result is a memorable craft for dad on February 23, which he can attach to himself on the rear view glass of his car.
- Racing car

- Paint a toilet paper roll with gouache paint:

- Cut out 4 circles from thick cardboard (these will be the wheels of the future car) and paint them like wheels with black paint:

- On the sleeve you need to make a cutout for the driver of the car and attach a paper seat there (it needs to be done in exactly the same way as the body of an airplane - fold the paper strip in half, but place it perpendicular to the sleeve);
- Place a plasticine man in the car.
To make a craft for February 23, you just need to find out what the person you want to give it to loves most. In any case, the main thing is to show attention, which is always pleasant for any person.
Crafts for February 23: photos


Video: How to make a gift for February 23rd with your own hands?
(craft from waste material and colored paper).
Semenova Svetlana Petrovna, teacher of the 1st qualification category, MDOU kindergarten “Ladushki”, Kachkanar, Sverdlovsk region.
The master class is designed for children of senior preschool age and junior schoolchildren, preschool educators, club leaders and parents.
Purpose: The craft can be used as a gift for dad on February 23 or a friend on his birthday. The craft looks very attractive, every child will want to have such a boat, so they will take on the work with great desire. By easily turning into a little captain, you can role-play a sea adventure or happily give a boat to a loved one.
So, go for it!
Mystery: The palace floats on the waves
People are lucky on themselves. (ship)
Target: teach how to do work using various materials.
Tasks:
1. Continue teaching children to work with paper and waste materials.
2. Strengthen the ability to use scissors and glue.
3. Develop creative abilities, fine motor skills, sense of form, color, rhythm.
4. Cultivate perseverance, patience, the ability to complete the work started, the desire to bring joy to loved ones, accuracy.
Material.
To complete the work we will need:
- colored paper
- white paper
- 2 strips of colored cardboard measuring 5x30 cm
- toothpaste box
- PVA glue
- scissors
- threads

Progress:
1. Apply glue to the wide edge of the box and glue it to a white sheet of paper, starting from the edge.

Then we coat the remaining edges in the same way and cover the entire box. The base for the boat is ready!

2. Glue strips of cardboard to the wide edges of the box, placing them symmetrically. For strong bonding you need something
Press the workpiece down and leave until completely dry.

3. Meanwhile, we are making a pipe. Take half a white sheet of paper and, starting from the short side, twist it onto a pencil, fix the edge with glue. We take out the pencil - the pipe is ready.


4. To attach the pipe to the base, make several small cuts at one edge of the pipe and open them, as shown in the photo.

5. Coat the resulting “flower” with glue and fix it to the base of the ship.

6. Next, in the upper part of the pipe, we make 2 small cuts on opposite sides of the hole. We insert a thread about 60 cm long there.
We glue the strips of cardboard together along the edges, inserting the ends of the thread there. The thread should be tensioned enough so that the flags hung on it do not sag. Fix the ends of the cardboard strips longer for better bonding.

7. At the next stage of work, it is necessary to make blanks for the windows - the ship's portholes and flags.
For portholes, we select any contrasting color; in our case, yellow is suitable. You will need 10 circles with a diameter of 2 cm and 20-24 strips of colored paper 1x3 cm for flags.

8. Glue the windows along the sides of the ship, 5 on each.

9. Cut out different shapes flags, for this we bend the strips in half (the flags will be double-sided) and cut out triangular, rectangular and flags with a cut out corner.

10. Glue the flags to the thread, alternating them in color and shape.


11. And finally, let’s hoist the Russian flag.
For the flag you will need a white square measuring 6x6 cm. Cut out the unnecessary part from it - a square 3x3 cm.

From the remaining part we will make a flag. For the shaft, you need to tuck the left side of the workpiece several times to make it strong.

Prepare 1x6 cm strips of red and of blue color. Fold the strips in half and stick to the base of the flag.

Coat the shaft with glue and glue it.

12. And the last step is to insert the Russian flag into the upper part of the pipe.
This is such a beauty we have!

Every year, on the eve of February 23, children bustle around in the kindergarten. Everyone wants to make a gift for dad on February 23rd with their own hands. Adults don't lag behind children either. Let's see what you can surprise your work colleagues with, what gift you can prepare for the men in the family, and what you can do to please your dad on February 23rd.


Bouquets are also appropriate for men's holidays, especially when they are practical and do not fade. We are talking about sock bouquets that have become popular. It looks original, lifts your spirits and will always come in handy. We assure you that such a gift will be remembered for its original design. We advise you to pay attention to the quality of your socks. Color doesn't matter. A beautiful bouquet will be made from white, black, blue, red socks. It is also appropriate to make a potpourri of different shades. For a simple but original gift you will need:
- kebab sticks;
- scissors;
- pins;
- ribbon for gift wrapping;
- wrapping paper.
- socks.

The number of pairs can be completely different, but odd. Separating the socks individually will help to increase the bouquet.
- First of all, we remove labels and tags;
- Roll each sock or pair into a tube.
- We turn the edges a little to make petals.
- We secure each flower with a pin. Can be tied with a ribbon.
- We put the buds on kebab sticks.
- Wrap the bouquet in wrapping paper and decorate with ribbon.
Using the same principle, you can make a bouquet of panties. But you can give such personal gifts only to those closest to you. If your man loves sweets, add some sweets to the bouquet.

An unusual book holder will decorate your desktop. Even if a man does not work in an office, but loves to read, he will definitely appreciate this kind of gift. In order to build it, you will need two identical objects or two parts of one. You can take two wooden figures and attach them to wooden boards, leaving space in the middle for books.

An always relevant gift can look completely new if you approach the process creatively, using the most unexpected materials. So, the frame can be made from pencils. Crafts made from pencils will look strict and elegant black and white. It can even be placed on an office desk. You can also use:
- mosaic of CDs;
- paper rolls from old magazines;
- tree;
- threads;
- buttons
- keys from an old keyboard.

Pasta applications
Gift ideas made from paper, buttons, matches and even cotton swabs are popular in kindergarten. Children will definitely master our master classes. For this you will need:
- some pasta;
- sheet of cardboard;
- paints.
Progress:
- First, draw an outline on the cardboard. It could be a submarine, a helicopter, an airplane or a car.
- The picture is filled with pasta. They stick together randomly.
- We paint pasta creativity.
They come up with a lot of things in kindergarten to interest children. Have your child sign a card for dad. Even if it has mistakes, it's still nice.

Magnets, keychains and pictures made from salt dough
Crafts made from salt dough for February 23 can be given to work colleagues, classmates, friends and acquaintances. This is especially true when the figures turn out to be funny and cheerful.
Salt dough is easy to prepare. You can use it to make a three-dimensional figurine, a commemorative refrigerator magnet, a keychain, and even a picture. Here is one recipe for making salt dough.
- Mix 300 grams of flour with 300 grams of salt.
- Add 200 grams of water.
- 1 tablespoon of vegetable oil makes the dough more elastic.
- The salt dough is ready. Cut out the parts from it. Even children can cope with this task, and the process itself will seem more than fascinating to them. Be prepared that in the future they will constantly ask you to prepare salt dough.
Dry the finished salt dough parts in the oven. It is better to paint with acrylic paints. They shine and add elegance. their own. From the same material you can make a keychain or decorate a photo frame.

Paper gifts
If you cannot choose a gift for February 23, make it yourself from paper. Such crafts have long become a separate type of creativity. Knowing how to make the desired figurine using the origami technique, you can come up with so many things. So, even an adult man will like a postcard with three-dimensional details or an original paper craft. Especially if it is made by skillful children's hands.
Using the origami technique, you can make a shirt and tie for dad. Even made from paper, such a gift will look like a real one. Sometimes it's enough to make a tie and paint it beautifully. You can use candy wrappers to decorate it. No man will remain indifferent if his son or daughter presents such crafts on February 23rd.
The origami technique allows you to make different parts from paper for original postcards. Even the simplest one can be turned into an original craft if you brightly paint it and make a sail from straws and paper.
The holiday of the strong, firm and courageous part of the population is approaching. Our children are asked to make crafts of their choice and show their imagination. How can we not help them? In this article, we have created for you and your children a selection of simple and original crafts for Defender of the Fatherland Day, which you can easily make with your own hands.
You will need: toilet paper roll, half a mold easter egg, cardboard, pencil, scissors, paints, glue, brush, black marker, twine.
Master Class

Soldier ready!
Binoculars
You will need: yellow cellophane, scissors, tape, black paint, brush, green and black paper, glue, rubber band, wine cork, string or elastic band.
Master Class
- Cut out 2 circles of yellow cellophane and tape them to the circumference of the sleeves as binocular lenses.

- Paint the circumference of the wine cork with black paint and cover it with green paper.
- Cover the bushings with green paper and glue the black stripes as shown in the image.

- Glue the bushings together and secure with a rubber band. After a while, remove the rubber band.

- Glue the taped cork between the bushings.

- Prepare an elastic band or rope of the required length, make a hole in the side of the bushings and secure the elastic band.
The binoculars are ready!
Firecracker
You will need: sleeve, scissors, stapler, thin cord, glue gun, tape, cardboard, thin wrapping paper, corrugated paper, bead, glitter.
Master Class

Army of Ninja Turtles
You will need: 2 bushings (for one turtle), scissors, glue, clothespins, black marker, green and yellow paints, painting sponge, colored paper, decorative eyes.
Master Class
- Cut strips of colored paper and make a belt as shown in the image.

- Cut out a strip of colored paper that will later become a blindfold.

- Cut off part of the sleeve, shortening it slightly, then cut off the corners and shape it into a shell.

- Paint the front side of the shell yellow and the back side green.
- Draw abs cubes with a black marker on the yellow side and diamond shapes on the green side.

- Vertically cut off part of the sleeve, glue the edges to make the sleeve narrower, then secure with clothespins until completely dry.

- Remove the clothespins and paint them green.
- Apply glue to the inside of the shell and glue the narrow sleeve.

- Cut out a blindfold from colored paper and glue it on, securing it with a clothespin.
- Glue the belt.

- Make and attach the head as shown in the image.

- Glue on the turtle's eyes.
- Make a whole team of Ninja Turtles the same way.
Ninja Turtles made from bushings are ready!
Shooting gun
You will need: thick colored paper, glue gun, ruler, scissors, tape, rubber band, pencil, pen spring.
Master Class
- Take a sheet of paper and a pencil, twist the tube diagonally from the corner, then secure it with tape and pull out the pencil.

- Twist the second piece of paper around the first tube, then separate them. The second paper tube should be slightly larger in diameter than the first so that it can be used to shoot in the future.
- Secure the second tube with tape, then cut off the edges.
- Twist 2 more paper tubes in the same way.
- Cut the tubes into pieces of this length: trunk - 2 tubes 15 cm long; handle – 7 tubes 5 cm long; trigger – 1 tube 8 cm long.
- Glue 5 cm tubes diagonally to form a handle.

- Glue the 8 cm tube on top of the handle so that the remaining 3 cm protrudes to the right. This is a trigger.
- Glue two 15cm tubes together and glue them to the top of the gun as the barrel.
- Roll two thin tubes from yellow paper.
- Bend a thin tube into a “U” shape and insert one end into the trigger and the other into the upper tube of the handle. Trim off the excess. This will be the trigger.
- Make a trigger guard from the second thin tube. To do this, place one end of the tube into the handle (into the second tube from the top) and glue the rest of the tube to the bottom of the barrel.

- Roll up the pink paper tube, flatten it and tape it around the handle as shown in the image. It is worth noting that the rear hole in the trigger must be open.
- Pull the trigger out of the top tube of the handle and insert the spring. It is worth noting that the spring should rest against the tube covering the back of the handle. Reinsert the trigger.
- Roll up a thin, thick tube of yellow paper, secure with tape and trim the edges so they are even.

- Fold the edge, put on an elastic band and secure with glue.
- Insert the tube with the rubber band into the lower tube of the gun barrel and pull the rubber band forward, hooking it between the two tubes.
- Roll paper bullets, load the gun and fire.
Cornflower
You will need: colored cardboard, a simple pencil, scissors, an empty matchbox, a ruler, PVA glue.
Master Class
An airplane made of cardboard and a matchbox is ready! I recommend watching this video!
creative airplane
You will need: big cardboard box, pieces of cardboard, sharp knife, scissors, ruler, pencil, plastic bottle, red spray paint, round foam rubber, tape, black marker.
Master Class
- Draw 2 rectangles on the surface of the box, then cut them.

- Cut 2 rectangles in the same way on the other side of the box.

- Cut 3 holes in the back of the box for the tail of the plane: one hole vertically in the center, and two horizontally on the sides.

- Prepare cardboard rectangles and insert them into the tail holes.
- Cut holes horizontally on the sides of the plane for the wings.

- Prepare 2 cardboard rectangles and insert them into the side holes as wings.

- Cut a circle from the foam rubber and attach it with tape to the airplane wing as landing gear. Attach the second circle to the other wing in the same way.

- Draw 2 airplane controls on cardboard, decorate them with a marker and cut them out.
- Tape the steering wheels to the boxes as shown in the image.
- Make a screw from cardboard and a plastic bottle.

- Cut a round hole at the front of the plane and attach the screw.
- Disassemble the plane into parts.
Beautiful and cool crafts for February 23rd can be easily made with your own hands by kids from the youngest, senior group kindergarten, and children at school. Simple crafts can be made from paper, cardboard, and boxes. They are simply assembled and can be decorated different ways: felt-tip pens, scraps, beads. Give one like this unusual gift On February 23, every baby will want a dad. And using the given master classes with step by step photos and video, it won’t be difficult to quickly and accurately make an unusual postcard in the shape of a shirt, a ship, or a funny robot toy.
Simple DIY crafts for the senior group of kindergarten on February 23rd - Master class with step-by-step photos “Postcard with a ship”

Using ordinary cardboard for the base and decoration, the paper can be truly cool gift for dad for the holiday of February 23. Such crafts are attractive due to their ease of manufacture and bright, unusual appearance. At the same time, even those children who have not yet learned how to beautifully cut out paper parts will be able to make craft cards for February 23 with their own hands in kindergarten in the senior group.
Materials for making crafts "Postcard with a ship" for February 23 in kindergarten
- 6 wooden craft sticks (can be replaced with popsicle sticks);
- 1 sheet of single-sided colored cardboard;
- 1 sheet of double-sided colored cardboard (or thick paper);
- glue stick;
- plasticine (great for joining wood and helps replace a glue gun);
- strips of thin paper, beads and other decor.
Master class on the craft “Postcard with a ship” for February 23rd for the senior group of kindergarten

DIY craft from table napkins for February 23rd - for the younger group of kindergarten

Making cool crafts from napkins and using them for cards is as easy as shelling pears. Even children from junior group kindergarten To create an attractive craft, they only need a sheet of cardboard for the base, PVA glue and table napkins of different colors. If desired, such DIY crafts from the younger group in kindergarten can be used for a competition by February 23.
Master class on making crafts from table napkins in kindergarten
Napkins are very convenient to use to create beautiful flowers or various shapes. By rolling balls from thin sheets, you can use them to decorate small cards and create a beautiful frame. The following master class will tell you how to easily and simply make crafts for February 23rd with your own hands in kindergarten from napkins:
Unusual DIY crafts for dad for February 23rd - "Funny Robots"

Not only children, but also many parents love cool toys. For example, these include electronic robots and transformers. Schoolchildren or kindergarten children themselves can make similar crafts. The work will require a minimum of time, and the resulting products will definitely appeal to all modern dads.
Materials for making crafts "Funny Robots" for February 23
- cardboard tubes (you can take tubes from toilet paper rolls or make similar ones from cardboard);
- acrylic paints or gouache;
- adhesive eyes for toys;
- fluffy wire for children's crafts.
Master class on making crafts "Funny Robots" for dad on February 23

Original craft "Viking Ship" made of paper and boxes for February 23

At school, children try not only to create cool crafts, but also to show their imagination when making them, to create unusual and beautiful products. The Viking Ship craft is perfect for creative work. It can be decorated in different ways, complemented with unusual cardboard figures. This paper craft for February 23rd is perfect for primary and secondary school students. Children will love it for its originality and ease of assembly. Children can make such crafts with their own hands on February 23 for school and for extracurricular competitions.
Materials for making crafts "Viking Ship" for February 23
- small box;
- colored cardboard;
- markers;
- scissors;
- PVA glue;
- paper (white and red, with patterns);
- toothpicks and push pins;
- skewer.
Master class on making a “Viking Ship” from a box and paper on February 23

Cool DIY crafts for children for February 23rd - video master classes

Children are happy to create crafts from paper, cardboard, and napkins. Such toys and cards are optimal for children 3-5 years old and children 6-9 years old. Simple crafts for February 23 in kindergarten can be made using regular PVA glue. It is easy to use, dries quickly, so it will not be difficult for the little ones to connect individual parts. The master classes discussed below will help you learn how to make cool children’s crafts for February 23rd with your own hands for your beloved daddies.
Examples of making cool children's crafts for February 23rd with your own hands
A magical postcard with a disappearing image of a tank can be given to your dad in honor of the holiday on February 23rd. This craft is quite simple to make and does not require special skills in working with paper or felt-tip pens. Original postcard Primary and secondary school students will be able to make the following master class:
Many children find it much more interesting to collect crafts that will become real toys. Military equipment, which can be made from plain paper or cardboard, is optimally suited to the theme of February 23rd. In the following master class you can learn how to make a beautiful tank using a minimum of materials:
Not only tanks, but also planes fit perfectly into the theme of February 23rd. It can be assembled from scrap materials. The following video master class will help you make a cool craft for February 23rd with your own hands:
Interesting DIY "Postcard Shirt" craft for February 23 - master class with step-by-step photos

A neat postcard in the form of a shirt will help you beautifully congratulate your dad, who works in the office, on February 23rd. It can be additionally decorated with rhinestones or colored paper. When making such a craft for dad on February 23, be sure to attach a small tie to it. A cool postcard will be an excellent decoration for your desktop in your office or at home. Such crafts are suitable for February 23 with their own hands for children from kindergarten and from school.
Materials for an interesting craft “Postcard Shirt” for the holiday of February 23
- white paper (can be replaced with colored paper);
- colored paper with patterns;
- scissors, PVA glue.
Step-by-step master class on making a “Postcard Shirt” craft for February 23

Do-it-yourself children's crafts for February 23 are great for making at school, junior or senior group of kindergarten. Cool and funny robots, postcards in the form of a shirt or a ship are easily made from paper and cardboard. Among the proposed master classes with step-by-step photos and video tips, you can find an excellent craft option for February 23, which dad will definitely like and help him express his love and respect beautifully.
We recommend reading
 Review of cosmetological procedures for facial care at different age periods Cosmetological procedures for the face after 30
 Salt-free diet for weight loss: menu, recipes, its benefits and harms
 - What to wear with it?") Women's bomber jacket (50 photos) - What to wear with it?
Women's bomber jacket (50 photos) - What to wear with it? Pilates - what is it, advantages and features of this set of exercises Pilates definition